Introduction to Cloud Computing
Overview
Teaching: 0 min
Exercises: 0 minQuestions
How does a business design, implement, and deploy a comprehensive end-to-end service to customers?
Objectives
Understand how various micro-services could be brought together to compose a service
Understand the complexity of in-house development/implementation/deployment
Understand the overall concepts of cloud computing
1. A design for a up-and-coming unicorn startup
- Cryptocurrency miner startup!
- Mine coins!
- Mining infrastructure:
worker,rng,hasher,redis,webui.
- How does this work?
rngproduces a constant stream of random bytesworkerissues a GET call torngto acquire a number of random bytes.workerissues a POST call tohasherto hash these bytes.workerupdatesredisto indicate how many coins (loops) were done.webuiqueriesredisto acquire the rate, then compute and visualize the rate on a web page.- This is only the design stage
- This is a common general design for many commercial/production system.
- Another name:
full stack
- front-end:
webui- back-end:
worker,hasher,rng- database:
redis
2. Implementation stage
- How does the startup implement their design?
3. Deployment stage
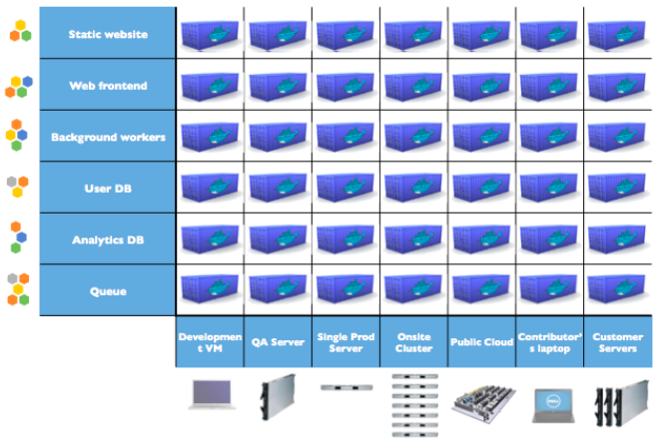
- Deploy one component per Linux machine!
- Is this really everything?
4. Reality of deployment in production environment
- Significant considerations need to be made to selection of hardware (computers and network), software, and other physical limitations (spaces, power, cooling).
- Differences in software stacks for different components
- Differences in network security requirements for different computers hosting different components
- Cost of personnel.
- True on-site deployment would have hindered many new startups.
5. A more complete deployment
- Companies/businesses are relieved from having to manage both software and physical hardware setup.
- Hardware configurations are feasible, but physical management is not required.
- Dynamic scaling of resources
6. Cloud computing is the answer
- The National Institute of Standards and Technology (NIST/Department of Commerce) Definition of Cloud Computing:
- Cloud computing is a model for enabling ubiquitous, convenient, on-demand network access to a shared pool of configurable computing resources (e.g., networks, servers, storage, applications, and services) that can be rapidly provisioned and released with minimal management effort or service provider interaction.
- This cloud model is composed of
- Five essential characteristics
- Three service models, and
- Four deployment models.
7. NIST: Five essential characteristics of cloud computing
- C1. On-demand self-service
- C2. Broad network access
- C3. Resource pooling
- C4. Rapid elasticity
- C5. Measured service
8. Enabling technologies (equal order of importance)
- Broadband networks and Internet architecture
- Data center technology
- Virtualization technology
- Web technology
- Multi-tenant technology
9. Course project and course progress: the big picture
- Project-driven course
- General project statement: Enhance the implementation and carry out the full stack deployment (including CI/CD services) of the coin miner design (described in Slide 1) on an academic cloud.
- Throughout the course, you will learn about:
- Theory behind virtualization.
- Modern data center technologies.
- Modern cloud orchestration technologies.
- Recurrent skills:
- To be performed in similar way over various problems.
- Linux-based system administration
- Git repository.
- Deploying and managing a cloud infrastrucure.
- Non-recurrent skills (variable-component/open skills):
- Be able to design a complete micro-service architecture, including components for in-house development/integration.
- Be able to design and implement individual microservice using appropriate containerization solution.
Key Points
Traditional on-site computing resources are difficult to manage and scale.
Cloud computing enable dynamic deployment of complex infrastructure.
Introduction to CloudLab
Overview
Teaching: 0 min
Exercises: 0 minQuestions
Where are we going to get our work done?
Objectives
Understand the concept behind CloudLab
Be able to setup account, SSH key, and github repo to support CloudLab
1. Access CloudLab
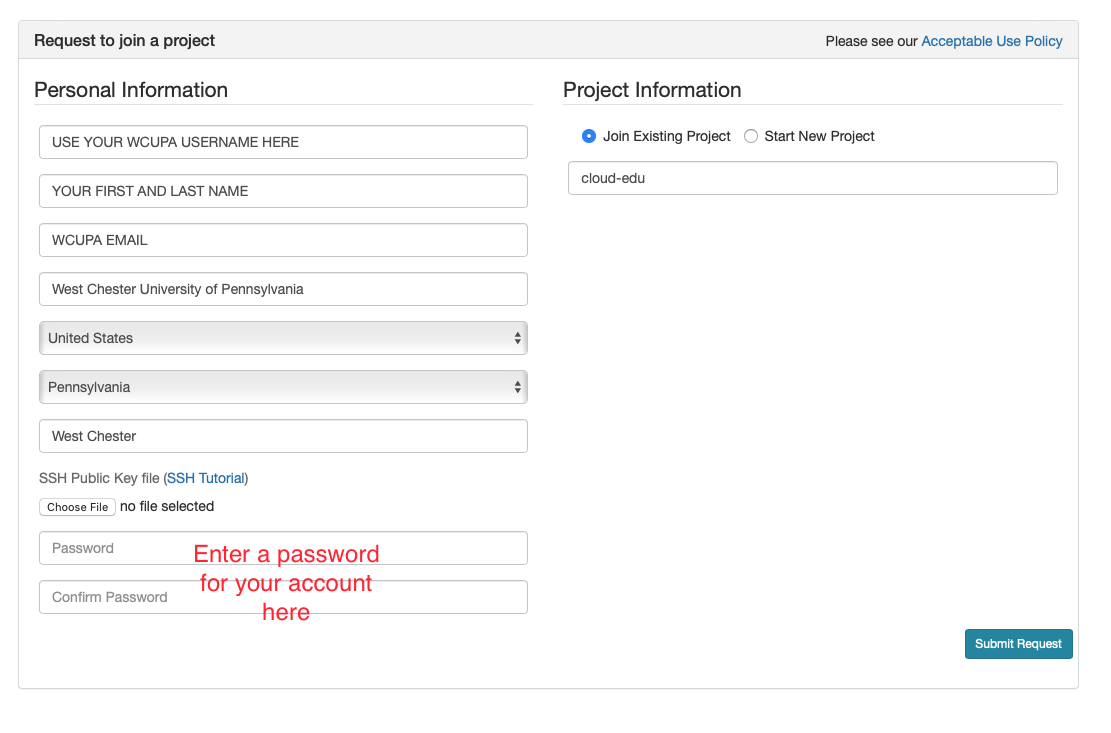
- Visit CloudLab’s website
- Click “Request an Account”
- Fill in the information as shown in the following figure and click “Submit Request”
- Wait for a confirm ation email to arrive in your wcupa.edu mailbox. You might have to resubmit a new request if you don’t see this email in about half an hour.
- After your account is confirmed, the instructor will be able to see your application and can grant you access to CloudLab.
- If you already had a CloudLab account, you can select
Start/Join Projectunder your username, then selectJoin Existing Projectand provide the namecloud-edu.
2. What is CloudLab
- Experimental testbed for future computing research
- Allow researchers control to the bare metal
- Diverse, distributed resources at large scale
- Allow repeatable and scientific design of experiments
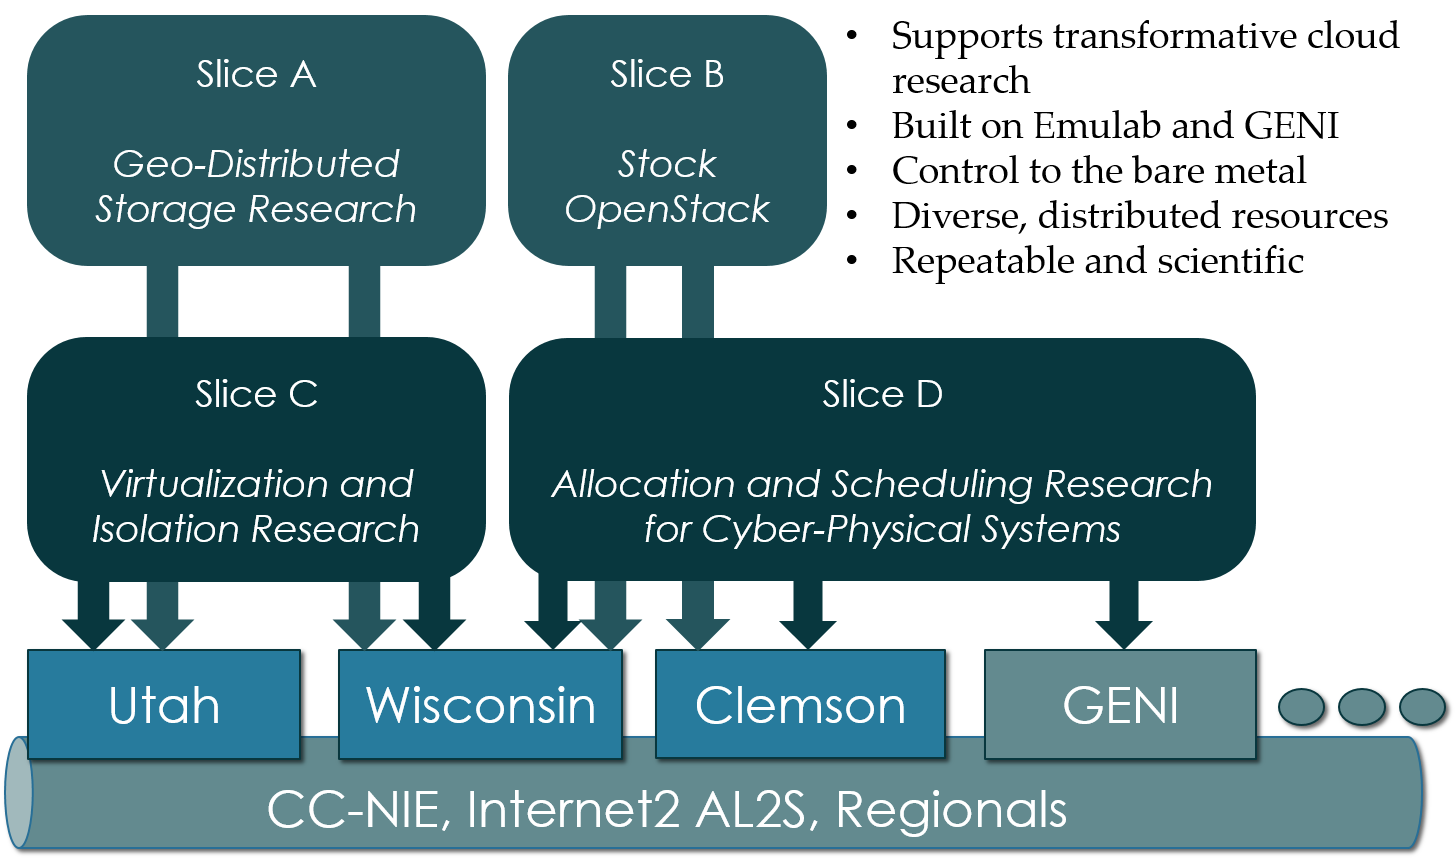
3. What is GENI
- Global Environment for Networking Innovation
- Combining heterogeneous resource types, each virtualized along one or more suitable dimensions, to produce a single platform for network science researchers”
- Key components:
- GENI racks: virtualized computation and storage resources
- Software-defined networks (SDNs): virtualized, programmable network resources
- WiMAX: virtualized cellular wireless communication
Berman, M., Chase, J.S., Landweber, L., Nakao, A., Ott, M., Raychaudhuri, D., Ricci, R. , and Seskar, I., 2014. GENI: A federated testbed for innovative network experiments. Computer Networks, 61, pp.5-23.
4. Key experimental concepts
- Sliceability: the ability to support virtualization while maintaining some degree of isolation for simultaneous experiments
- Deep programmability: the ability to influence the behavior of computing, storage, routing, and forwarding components deep inside the network, not just at or near the network edge.
5. Hardware
- Utah/HP: Low-power ARM64 (785 nodes)
- 315 m400: 1X 8-core ARMv8 at 2.4GHz, 64GB RAM, 120GB flash
- 270 m510: 1X 8-core Intel Xeon D-1548 at 2.0 GHz, 64GB RAM, 256 GB flash
- 200 xl170: 1X 10-core Intel E5-2640v4 at 2.4 Ghz, 64 GB RAM, 480 GB SSD
- Wisconsin/Cisco: 530 nodes
- 90 c220g1: 2X 8-core Intel Haswell at 2.4GHz, 128GB RAM, 1X 480GB SDD, 2X 1.2TB HDD
- 10 c240g1: 2X 8-core Intel Haswell at 2.4GHz, 128GB RAM, 1X 480GB SDD, 1X 1TB HDD, 12X 3TB HDD
- 163 c220g2: 2X 10-core Intel Haswell at 2.6GHz, 160GB RAM, 1X 480GB SDD, 2X 1.2TB HDD
- 7 c240g2: 2X Intel Haswell 10-core at 2.6GHz, 160GB RAM, 2X 480GB SDD, 12X 3TB HDD
- 224 c220g5: 2X 10-core Intel Skylake at 2.20GHz, 192GB RAM, 1TB HDD
- 32 c240g5: 2X 10-core Intel Skylake at 2.20GHz, 192GB RAM, 1TB HDD, 1 NVIDIA P100 GPU
- 4 c4130: 2X 8-core Intel Broadwell at 3.20GHz, 128GB RAM, 2X 960GB HDD, 4 NVIDIA V100
- Clemson/Dell: 281 nodes
- 96 c8220: 2X 10-core Intel Ivy Bridge at 2.2GHz, 256GB RAM, 2X 1TB HDD
- 4 c8220x: 2X 10-core Intel Ivy Bridge at 2.2GHz, 256GB RAM, 8X 1TB HDD, 12X 4TB HDD
- 84 c6420: 2X 14-core Intel Haswell at 2.0GHz, 256GB RAM, 2X 1TB HDD
- 2 c4130: 2X 12-core Intel Haswell at 2.5GHz, 256GB RAM, 2X 1TB HDD, 2 NVIDIA K40m
- 2 dss7500: 2X 6-core Intel Haswell at 2.4GHz, 128GN RAM, 2X 126GB SSD, 45X 6TB HDD
- 72 c6420: 2X 16-core Intel Skylake at 2.6GHz, 386GB RAM, 2X 1TB HDD
- 6 ibm8335: 2X 10-core IBM POWER8NVL at 2.87GHz, 512GB RAM, 1X 2TB HDD, 2 NVIDIA GV100GL
- 15 r7515: 2X 32-core AMD EPYC Rome at 2.9GHz, 512GB RAM, 1X 2TB HDD, 2 NVIDIA GV100GL
6. Setup SSH
Command line terminal software on Windows
- Download and install Windows Terminal from the Microsoft Store.
Command line terminal software on Mac
- Use the Search box (magnifying glass on top-right of your Mac Desktop) and type in the word
Terminal.- Launch the resulting Terminal app.
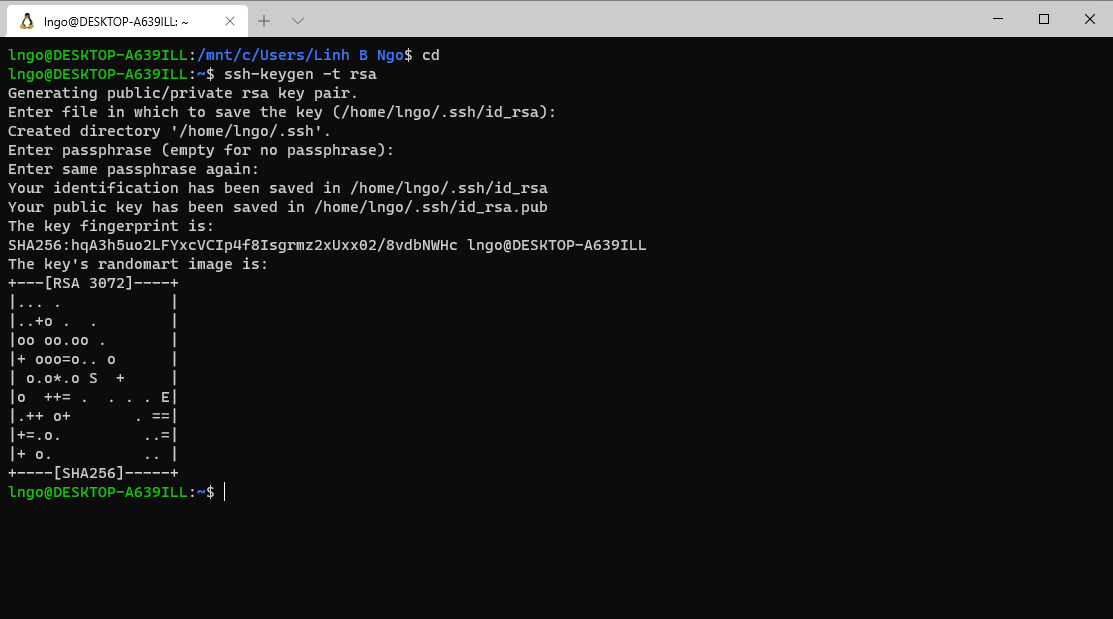
- Launch your terminal (Windows Terminal or Mac) and run the following command:
- Hit
Enterfor all questions. Do not enter a password or change the default location of the files.$ cd $ ssh-keygen -t rsa
- Run the following command to display the public key
- Drag your mouse over to paint/copy the key (just the text, no extra spaces after the last character)
$ cat ~/.ssh/id_rsa.pub
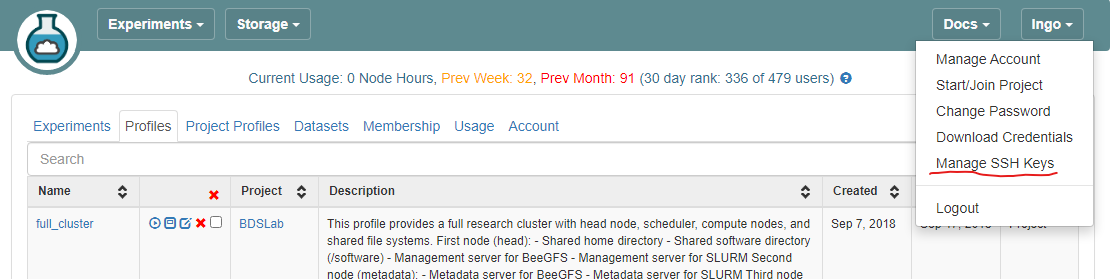
- Log into CloudLab, click on your username (top right) and select
Manage SSH Keys:
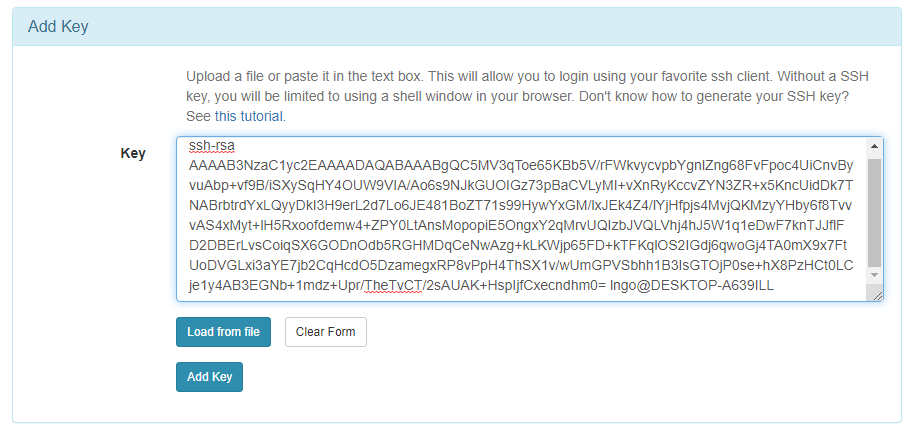
- Paste the key into the
Keybox and clickAdd Key:

7. Setup GitHub repository
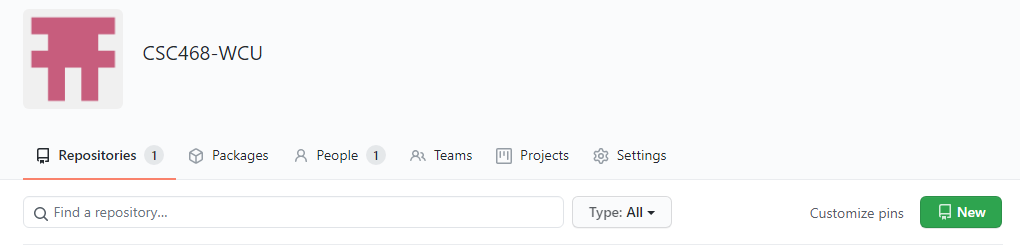
- Go to your GitHub account, under
Repositories, selectNew.
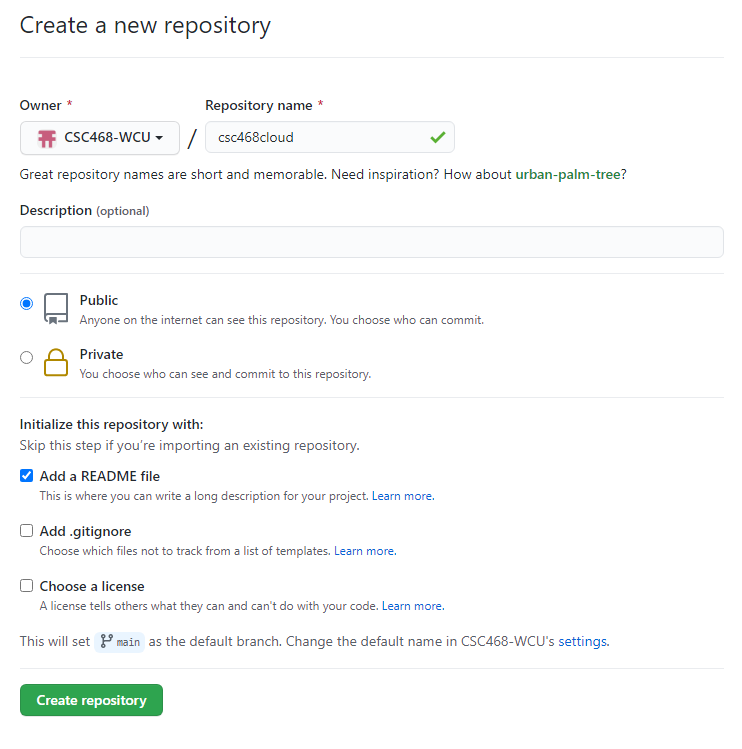
- You can select any name for your repo.
- It must be
public.- The
Add a README filebox must be checked.- Click
Create repositorywhen done.
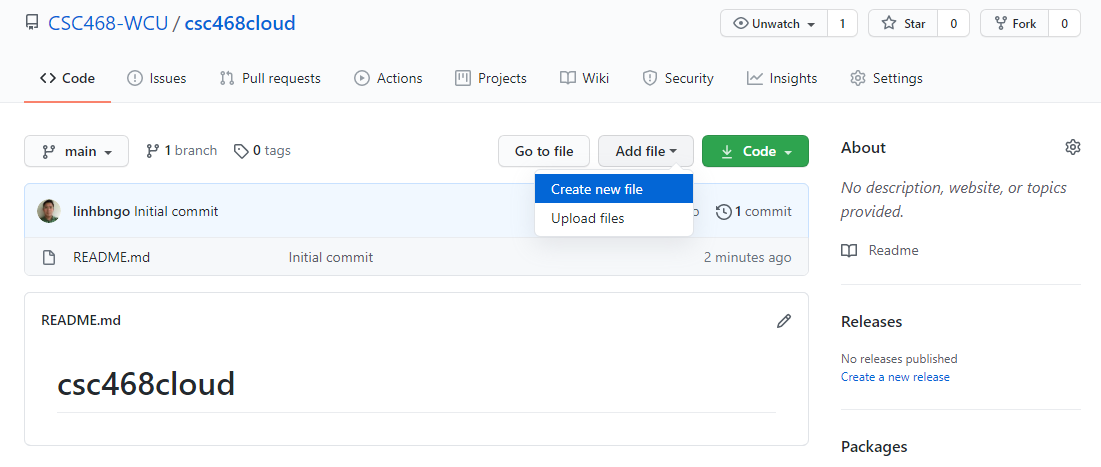
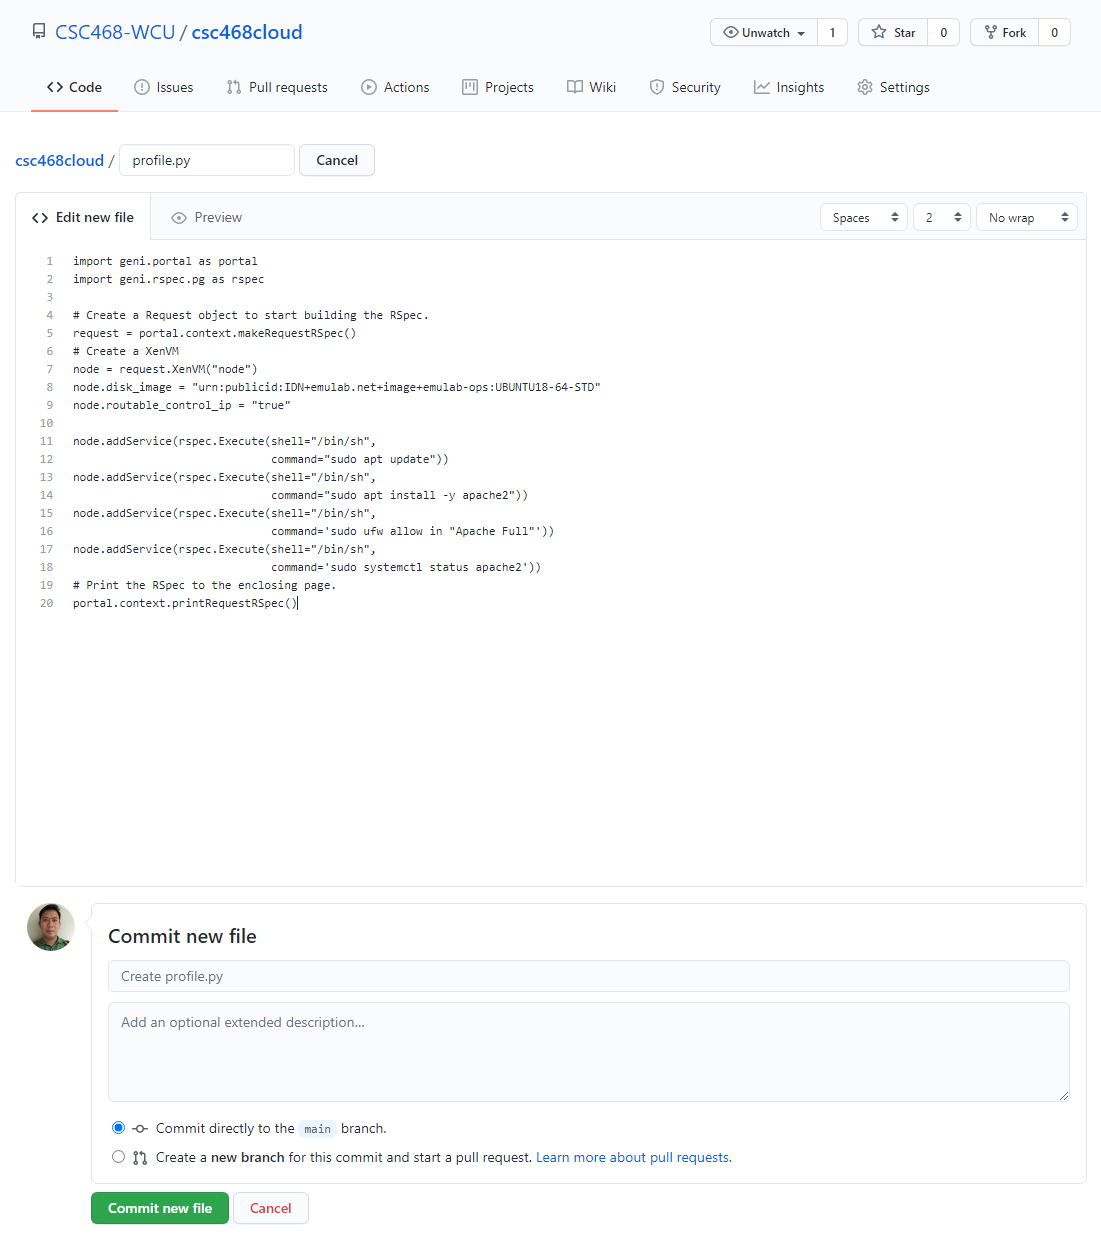
- Click
Add fileand selectCreate new file
- Type
profile.pyfor the file name and enter THIS CONTENT into the text editor.- Click
Commit new filewhen done.
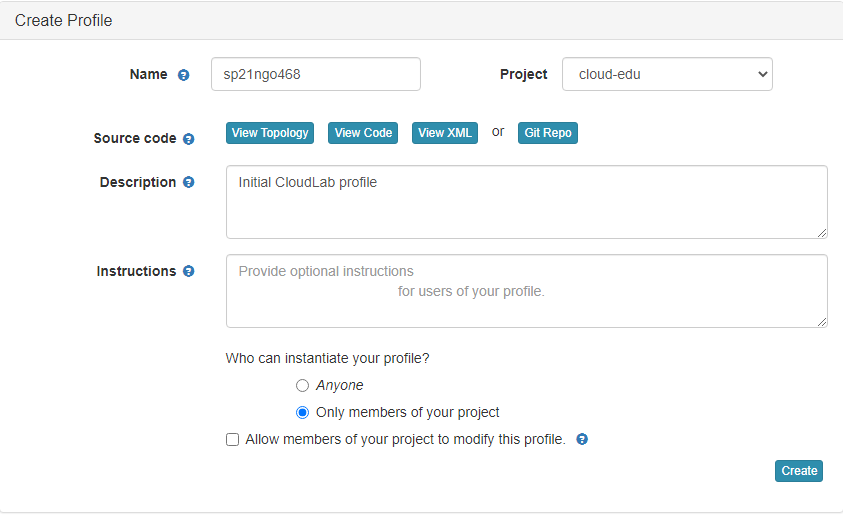
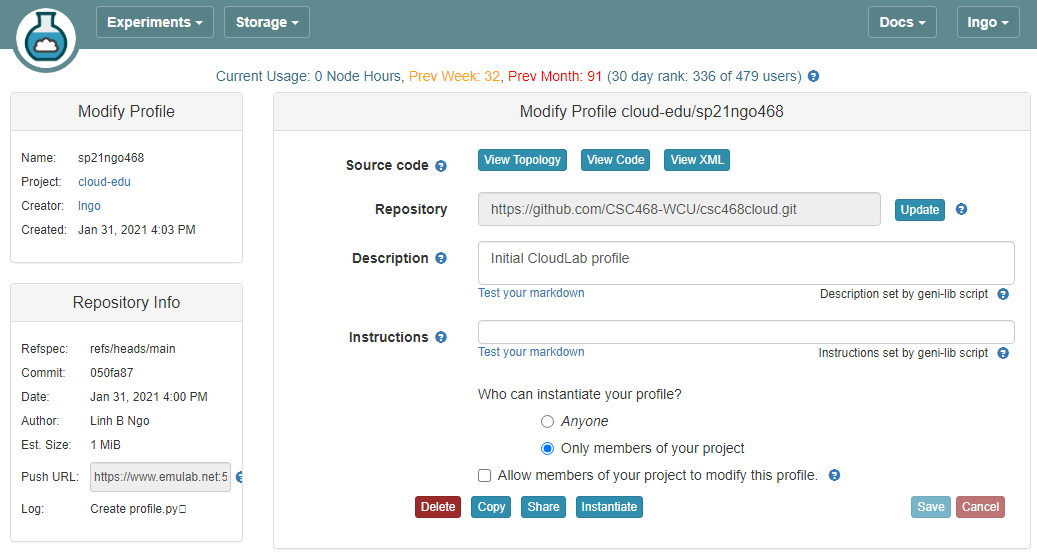
8. Setup CloudLab profile
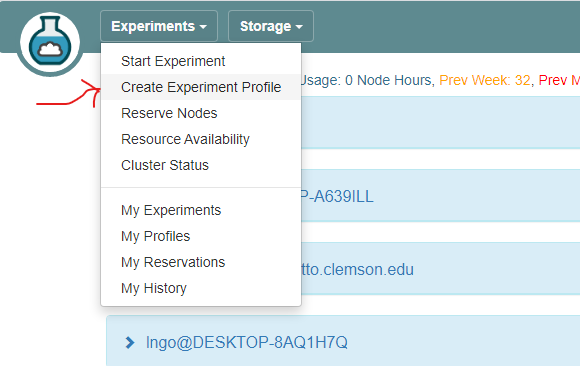
- Login to your CloudLab account, click
Experimentson top left, selectCreate Experiment Profile.
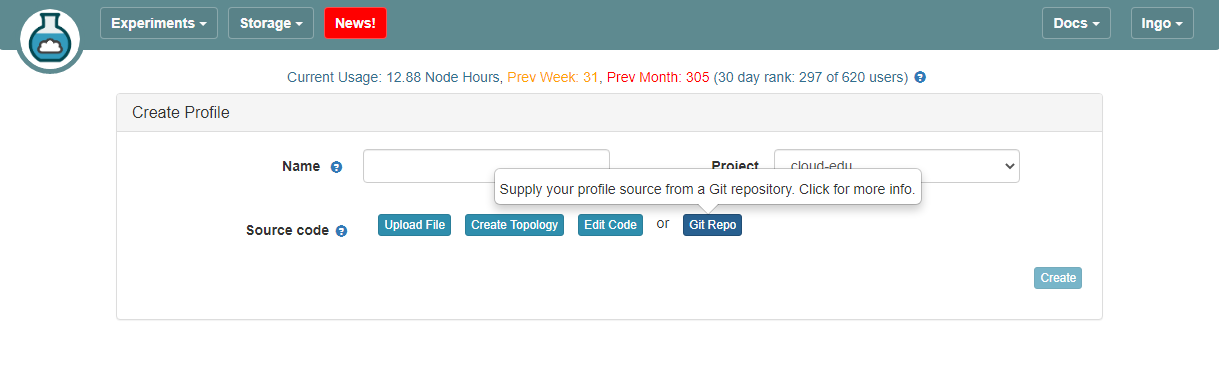
- Click on
Git Repo
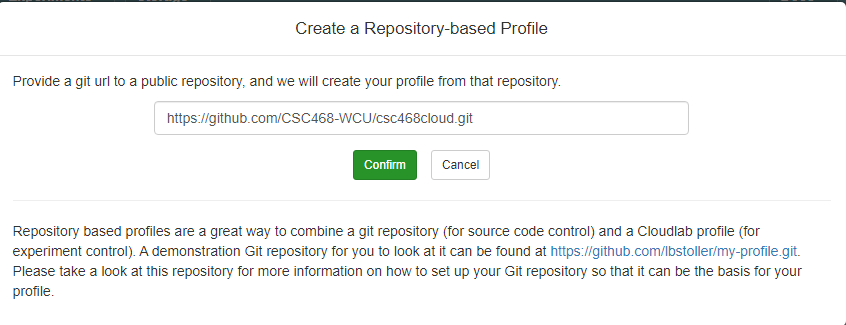
- Paste the URL of your previously created Git repo here and click
Confirm
- Enter the name for your profile, put in some words for the Description.
- You will not have a drop-down list of Project.
- Click
Createwhen done.
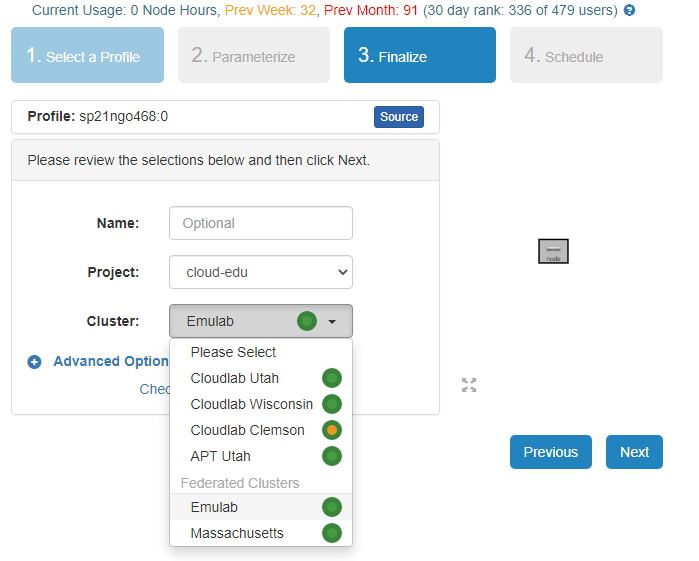
- Click
Instantiateto launch an experiment from your profile.
- Select a Cluster from Wisconsin, Clemson, or Emulab, then click
Next.- Do not do anything on the next
Start on date/timescreen. ClickFinish.
- Your experiment is now being
provision, and then `booting

- When it is ready, you can use the provided SSH command to log in to your experiment (assuming your key was set up correctly).
- The command is in the List View tab.


Key Points
Course Project
Overview
Teaching: 0 min
Exercises: 0 minQuestions
What is the scope of the project?
Objectives
Identify your team
Identify your project
Identify how hard your team should make your projects
1. Introduction
Enhance the design and implementation and carry out the full stack deployment (including CI/CD services) of the coin miner design or an alternative design with at least similar level of complexity on CloudLab.
2. General requirements
- All projects will be carried out/demonstrated on CloudLab.
- All subsequent hands-on in class will be done as part of a team.
- Team: 4 to 5 members
3. C-level technical requirements
- Core components:
webui,rng,hasher,worker,redis- Inclusion of CI/CD services with demonstrated live update of
webuidisplay.- Inclusion of a Docker image hub as part of the infrastructure
- Cosmetic update to
webui.- Conversion of the infrastructure from using
docker-composetokubernetesdeployment.
4. B-level technical requirements
- Everything from the C-level requirements
- Complete replacement of one service design. For example, instead of using
redis, switch tomysql. Instead of usingrubyforhasher, it can be rewritten as Python code or another language.- An alternative design will be evaluated on a case-by-case basis using the complexity of coin-miner as the benchmark.
5. A-level technical requirements
- Everything from the C-level requirements
- Complete replacement of three or more service design. This most likely will result in the replacement of
rediswith another database solution, and the rewriting/implementation of two of the remaining components.
- Staying with coin-miner will be difficult for getting an A-level evaluation due to the existing creative limitation of the project itself.
- An alternative design with high level of complexity is more likely to achieve an A-level technical requirements.
- I want this project to be something that will wow your technical interviewers.
6. Project deliverables
- Deliverable 1:
- Team description, including a 2-page resume for each team member.
- A Technical Report with the first two chapters:
- Chapter 1 describes your team’s vision for the
coin-mineror a selected alternative. This is simply a design document (similar to the second figure in slide 1, Introduction to Cloud Computing).- Chapter 2 provides a detailed description about what your team propose to do to address the technical requirements above.
- Deliverable 2: (tentatively after Spring Break)
- 10-minute in-class demonstration without CI/CD service.
- For coin-miner, cosmetic changes (C-level) are expected.
- Brief update on technical challenges/difficulties.
- Prediction on the feasibility of successful completion of the project.
- Updated the Technical Report with Chapter 3 describing the current progress/accomplishment/challenges
- Deliverable 3:
- 10-minute in-class presentation of the project
- Final chapter of Written Project Report with the project description in full, self-evaluation regarding whether the project has met all technical requirements specified in Chapter 2. The Reference section must include link to the GitHub repository of the team project.
7. Technical Report Requirements (strict)
- PDF format only for final submission. Word documents will not be considered.
- Cover page with Project Title and Member Names
- A single page with a short summary that describes the project.
- Technical Report (Chapter 1 through 4)
- Reference page
- Members’ resume
- Summary and Technical Report must be kept to a 11-point Arial/Time News Roman font, single space, 1-inch margin.
- Correct grammar, vocabulary, and clear and concise sentences are required.
Key Points
Be fearless
Why Cloud
Overview
Teaching: 0 min
Exercises: 0 minQuestions
Should we move to the cloud or should we stay on-premise?
Objectives
Understand necessity for cloud
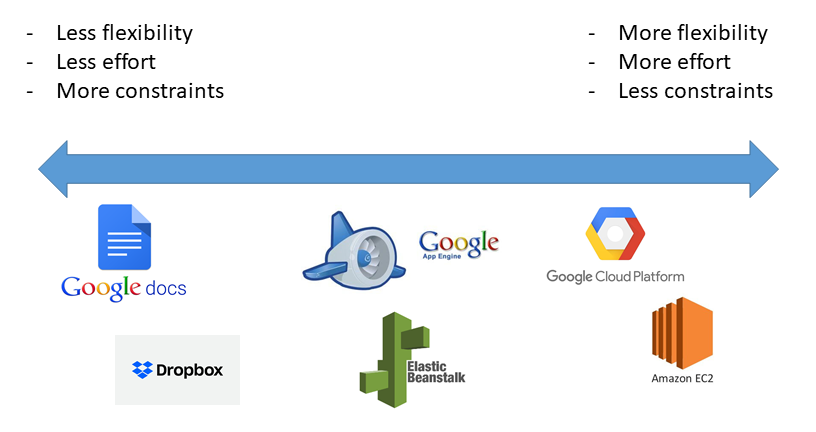
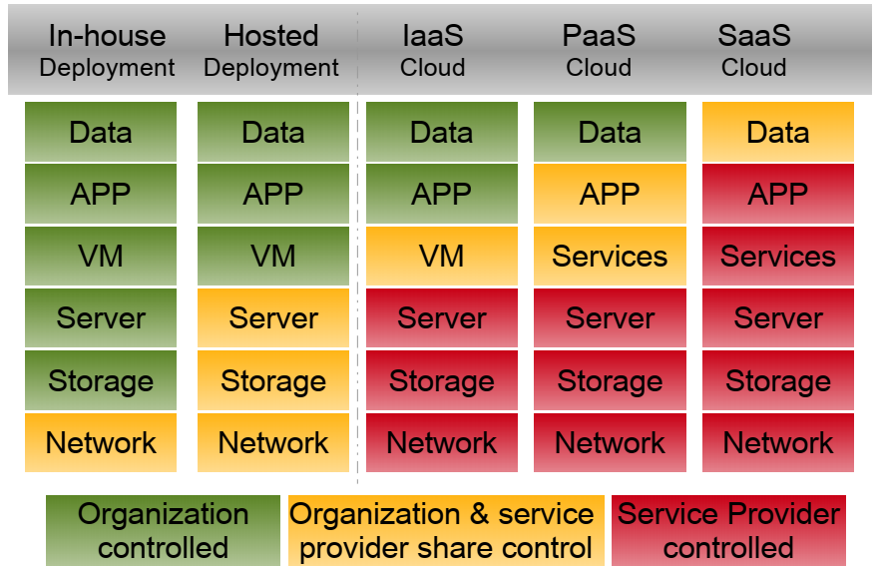
1. What services does Cloud offer?
- Before we can evaluate the necessity of moving to the cloud, we need to to know what services are available.
- SaaS: Software-as-a-Service
- PaaS: Platform-as-a-Service
- IaaS: Infrastructure-as-a-Service
- Vendor: cloud service provider.
2. SaaS: Software-as-a-Service
- Vendor controlled applications that are accessed over the network by users.
- Characteristics:
- Network-based access
- Multi-tenancy
- Single software release for all
- Examples:
- Applications in the Google Suite
- Dropbox
- Cisco WebEx
3. SaaS: Application Design
- Net native
- Cloud-specific design, development, and deployment
- Multi-tenant data
- Built-in metering and management
- Browser-based
- Customization via configuration
- High degree of configurability, efficiency, and scalability
4. SaaS: Disadvantages
- SaaS providers are dependent on network and cloud service providers.
- Performance is dependent on individual client’s bandwidth.
- Security
- Good: Better security than personal computers
- Bad: SaaS vendors (and cloud providers) are in charge of the data
- Ugly: Privacy
4. SaaS and Privacy
- Who owns your data in SaaS?
- Google Drive ToS
5. SaaS and Privacy
- Who has access to your data in SaaS?
- Google ToS
6. PaaS: Platform-as-a-Service
- Vendors provide development environment.
- Tools and technologies are selected by vendors.
- Users maintain control over data (application) life-cycle.
- Examples:
- Google App Engine
- AWS Elastic Beanstalk
- Heroku
7. PaaS: Architectural characteristics
- Support multi-tenancy at various scale: sessions, processes, and data.
- Isolation at: physical, virtual, and logical levels
- Microsoft’s offerings of isolation choices
- Native scalability
- Load balancing and fail-over (AWS Elastic Beanstalk)
- Native integrated management
- Performance
- Resource consumption/utilization
- Load
7. PaaS: Disadvantages
- Inherits all from SaaS
- Options on technologies and tools are limited by the PaaS vendors
8. IaaS: Infrastructure-as-a-Service
- Vendors provide computing resources.
- Users provision computing resources.
- Compute resources include processing, storage, memory, network etc.
- Users are provided with customized virtual machines.
- Users maintain control over:
- Operating system, memory
- Storage,
- Servers and deployment configurations, and
- Some limited control over network resources via software-defined networking
8. IaaS: Advantages
- Infrastructure scalability
- Native-integrated management via vendors’ utilities
- Performance, resource consumption/utilization, load
- Economical cost
- Hardware, IT support
9. IaaS: Disadvantages
- Require more technical efforts than SaaS and PaaS.
10. Comparing service models
11. Comparing services models
12. XaaS: Everything-as-a-Service
- Composite second level services
- NIST Evaluation of Cloud Computing Services (2018) p. 20
13. NIST: Four deployment models
- Private Cloud
- Community Cloud
- Public Cloud
- Hybrid Cloud
14. Private cloud
- Infrastructure is organized solely for an organization
- Infrastructure is managed by the organization or by a third party
15. Community cloud
- Supports a specific community
- Infrastructure is shared by several organizations
- Examples: CloudLab
16. Public cloud
- Infrastructure is made available to the general public
- Infrastructure is owned by an organization selling cloud services
- Example: Azure Notebook free tier.
17. Hybrid cloud
- Infrastructure is a composition of two or more clouds deployment models.
- Enables data and application portability
18. Cloud Security: who is doing what
- The cloud provider is responsible for the security OF the Cloud.
- The cloud consumer (users) is responsible for the security IN the Cloud.
19. Cloud consumer
- SaaS/PaaS:
- Standard security procedure for online presences.
- IaaS:
- Standard security procedure as any on-premise infrastructures.
- Benefits from native administrative tools from the Cloud Provider.
20. Cloud provider: SaaS security
- SaaS:
- Web application security: OWASP’s Top 10
- Multi-tenancy: data isolation/leakage
- Data security: accessibility versus security trade-off
21. Cloud provider: PaaS security
- Similar security concerns as SaaS
- Complex security schemes due to potential third-party relationships.
- Development Lifecycle
- Users depend on PaaS providers to patch security issues of the individual tools.
22. Cloud provider: IaaS security
- Standard security measures.
- To Cloud Provider, cloud resources are on-premise.
- Concerns with virtual machines’ security
- Concerns with virtual networking security
Key Points
It depends!
There is never an easy answer to investment in infrastructure.
Virtualization in Cloud Computing
Overview
Teaching: 0 min
Exercises: 0 minQuestions
What is virtualization?
Is it something specific to cloud?
Objectives
Understand how the virtualization concepts in OS are extended toward cloud computing models
1. What is virtualization?
- Operating System concept: The abstraction of available resources
- Virtualization technologies encompass a variety of mechanisms and techniques used to address computer system problems such as security, performance, and reliability by decoupling the architecture and user-perceived behavior of hardware and software resources from their physical implementation. (https:/www.computer.org/csdl/mags/co/2005/05/r5028.html/)
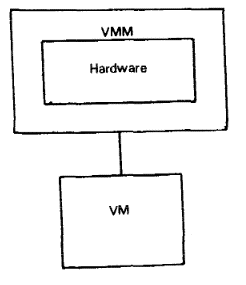
2. Virtualization
- Formal requirements for virtualizeable third generation architectures
- A virtual machine is taken to be an efficient, isolated duplicate of the real machine.
- These notions can be explained through the idea of a virtual machine monitor.
- Essential characteristics of VMM:
- Essentially identical to the physical resource
- Efficiency
- Complete control of system resources (with regard to the processes running inside the VM)
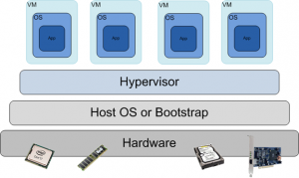
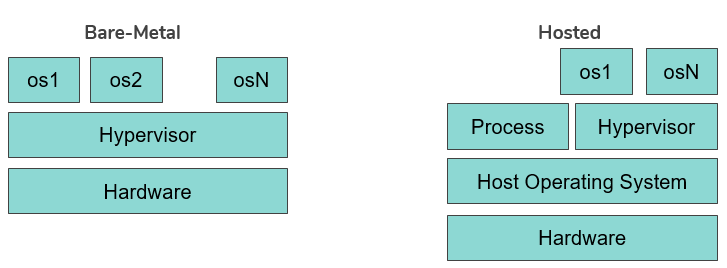
3. Virtualization
- Virtualization Layer: The Virtual Machine Monitor (or its modern name: Hypervisor) provides an interface between hardware and virtual operating systems.
- Type of hypervisors:
- Bare-metal
- Hosted
4. Issues that virtualization can help with
- Under-utilized resources
- Complicated system management
- Limited access to shared resources
- Inefficient power consumption
- Tight coupling with underlying resources
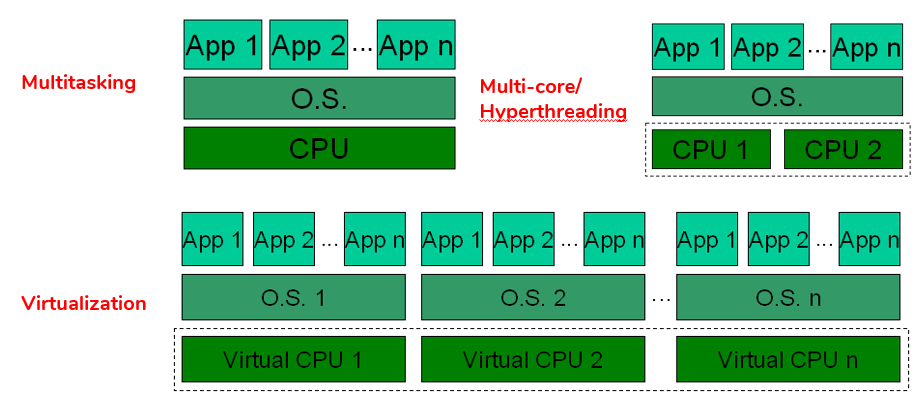
5. Virtualization versus multitasking versus multicore/hyperthreading
6. Types of virtualization
- Platform Virtualization
- Memory Virtualization
- Desktop Virtualization
- Application Virtualization
- Network Virtualization
- Storage Virtualization
7. Platform virtualization
- Full Virtualization
- Para Virtualization
- Hardware assisted virtualization
- OS level virtualization
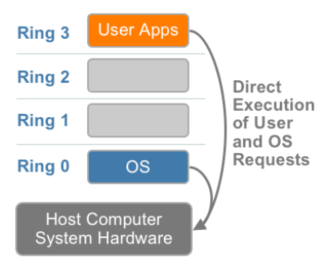
8. Without virtualization
- x86 offers four levels of privilege (Ring 0 through 3)
- OS needs to have access to hardware and run on ring 0
- Application runs on ring 3, gain access to hardware by trapping into kernel mode for privileged instructions.
- Virtualizing x86 requires a layer under OS (which already at lowest level) to create and manage the VM
- Sensitive instructions must be executed in ring 0
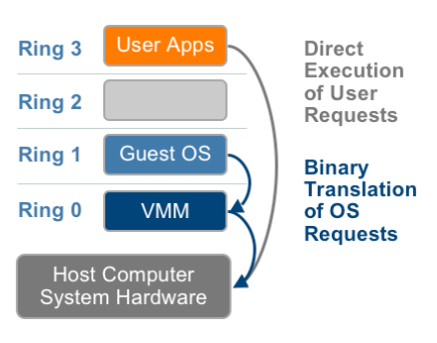
9. Full virtualization
- Guess OS is unaware of host OS.
- VMM provides virtual BIOS, virtual devices, and virtual memory management.
- Non-critical instructions run directly on hardware.
- Runtime translation of critical non-virtualizable instructions happens in the hypervisor.
- Provide best isolation and security at the cost of performance.
10. Para virtualization
- Thin layer interfaces between each guest OS and underlying hardware.
- Need guest kernel modification.
- No need of runtime translation for critical instructions.
- Superior in performance.
- Requires expertise to patch the kernels.

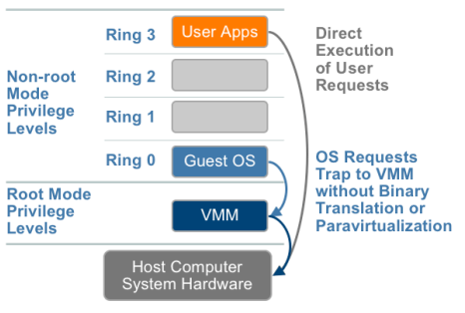
11. Hardware-assisted virtualization
- Hardware provides support to run instructions independently.
- Intel Virtualization Technology (VT-x)
- AMD Virtualization Technology (AMD-V)
- No need to patch the kernels.
- Runtime translation not required.
- Better performance in comparison to other variants.
- Greater stability
12. Virtualization at OS level
- Same OS for both host and guest machines.
- User space is completely isolated.
- High performance.
- Extremely light-weight.
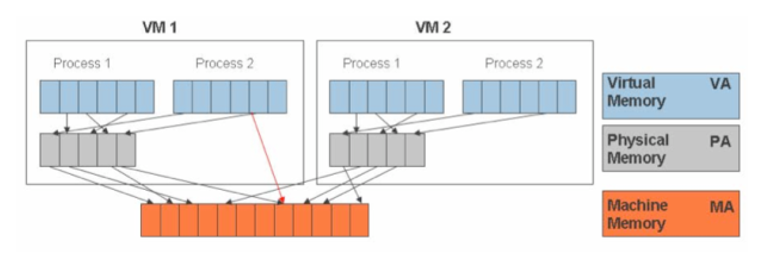
13. Memory virtualization
- How to share physical system memory and dynamically allocating it to virtual machines.
- Guess OS maps virtual memory space (of VM) to physical memory space (of VM).
- VMM translates physical memory space (of VM) to physical memory space (of main machine), but also enables direct mapping (shadow table) to avoid overhead.
14. Summary
Full Virtualization with Binary Translation Hardware Assisted Virtualization OS Assisted Virtualization/Para Virtualization Guest modification/Compatibility Unmodified Guest OS, excellent compatibility Unmodified Guest OS, excellent compatibility Guest OS codified to run Hypercall, cannot run of native hardware or other hypervisors. Poort compatibility Performance Good Fair Better on certain cases Guest OS Hypervisor Independent Yes Yes Xen Linux runs only on Xen Hypervisor. VMI-Linux is Hypervisor agnostic
15. Desktop and application virtualization
- Desktop and Applications run on servers.
- Stateless thin clients connected to servers.
- Efficient system management.
- Requires high-end servers for system stability
16. Network and storage virtualization
- Similar idea of providing an abstraction layer to the physical infrastructures
- In networks, abstraction will
- Be at the level of routers, switches, gateway, firewalls, load balancers, …
- Enabled by software-defined networking
- In storage, single storage backends can be used for different requirements
- Ephemeral
- Persistent
- Specialize storage backends
17. Virtualization: concept of overcommits
- Allocating more than the available physical resources to the Guest OS
- Common types of overcommit:
- CPU
- Memory
- Storage
18. Virtualization: concept of overcommits
- Advantages:
- Favorable economic model
- Efficient resource utilization
- Support green computing
- Disadvantages:
- Performance loss or unstable system response
- Complex system understanding
- VM shutdown by the hypervisor
19. Virtualization: CPU and memory overcommits
- Allows more virtual CPUs than physically available
- Openstack KVM: overcommit-number = 16.0
- Allow more memory than physically available
- Overstack KVM: overcommit-number = 1.5GB
20. Virtualization hypervisors
- Contribution from industry and academia
- Xen: Project from Cambridge Computer Laboratory
- VMware: Commercial product
- Also comes from academic research (see Mendel Rosenblum ACM)
- KVM: Initiated by the Open Virtualization Alliance, later dissolved and is now managed by the Linux Foundation
- Qemu: Open source machine emulator and virtualizer
21. Virtualization in the cloud
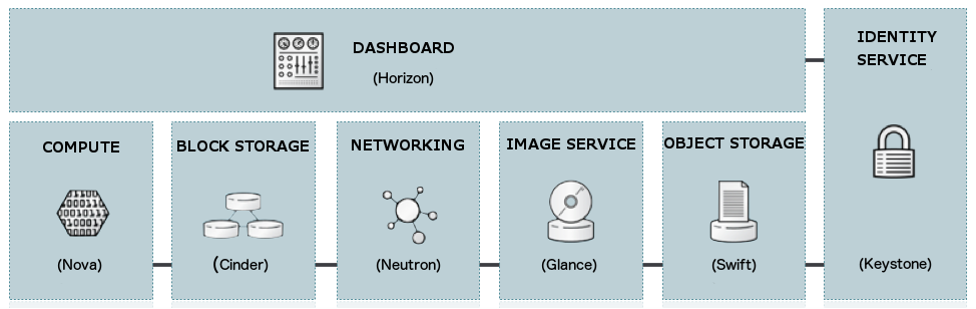
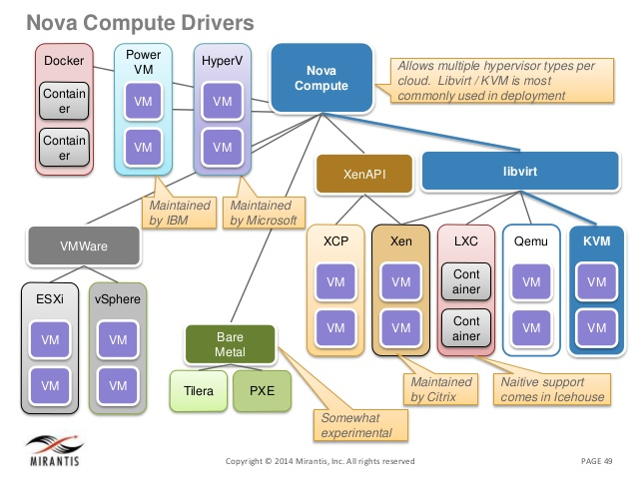
22. Openstack: Compute
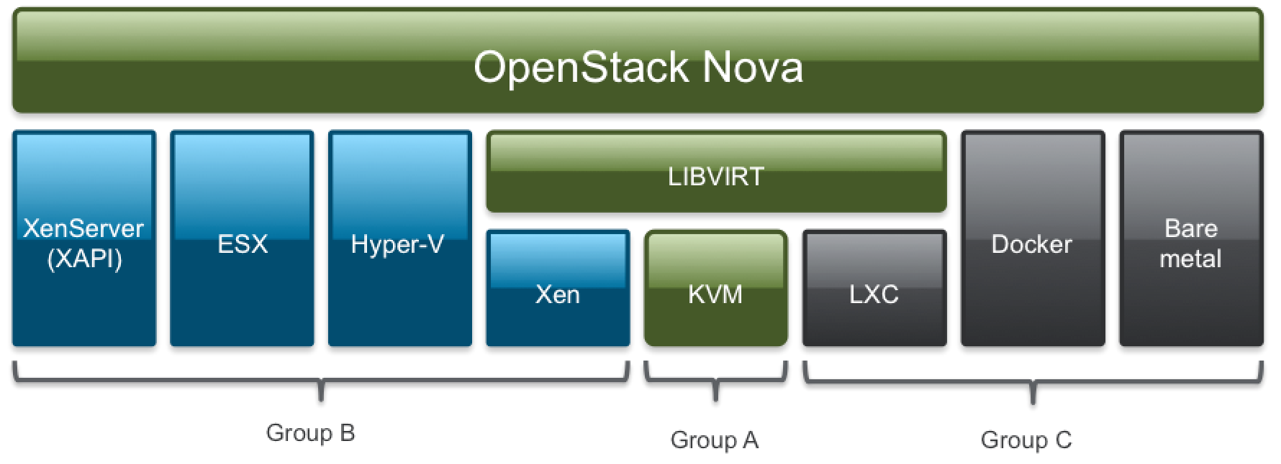
23. Openstack: Compute
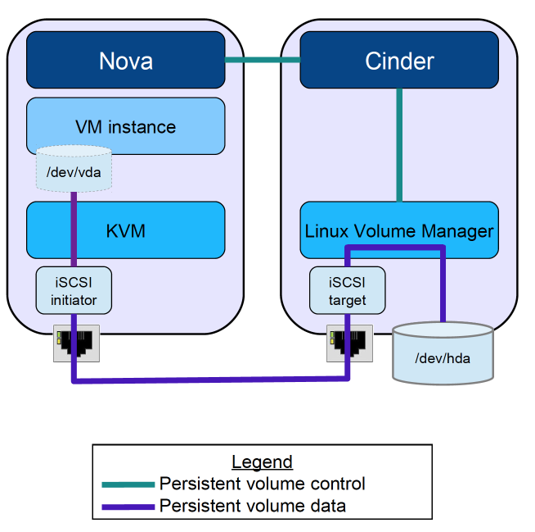
24. Openstack: Cinder
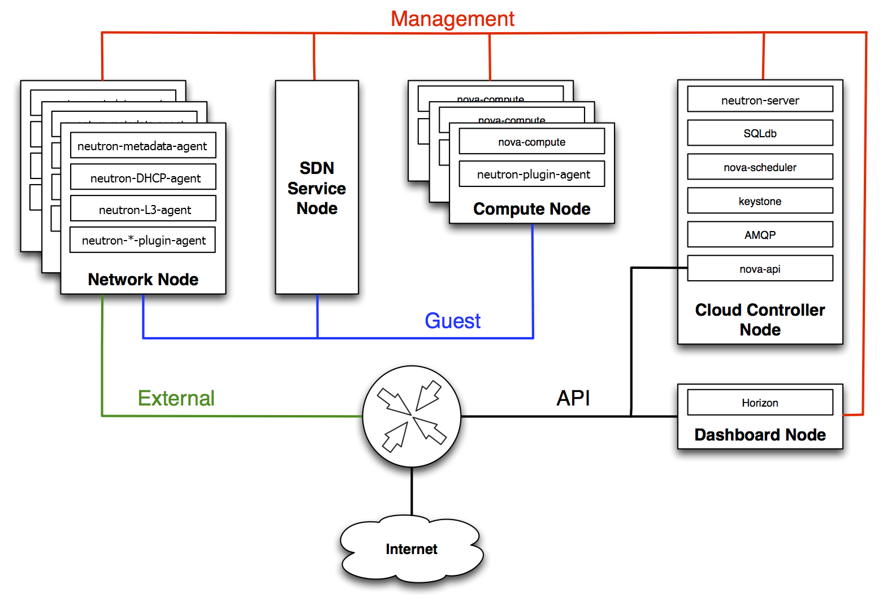
25. Openstack: Neutron
- Management: internal comm between OpenStack components, reachable only within the data center.
- Guest: Used for VM data communication within the Cloud Deployment.
- External: Provide VM with Internet access.
- API: Exposed all the Stack’s API to the public.
Key Points
Cloud computing is another way to abstract computing resources and infrastructures for users
Programmatic Deployment of Infrastructures
Overview
Teaching: 0 min
Exercises: 0 minQuestions
Be able to launch OpenStack on CloudLab
Understand the management of resources, including memory, CPU, storage, network, and security in the Cloud
1. OpenStack on CloudLab
- Log into CloudLab
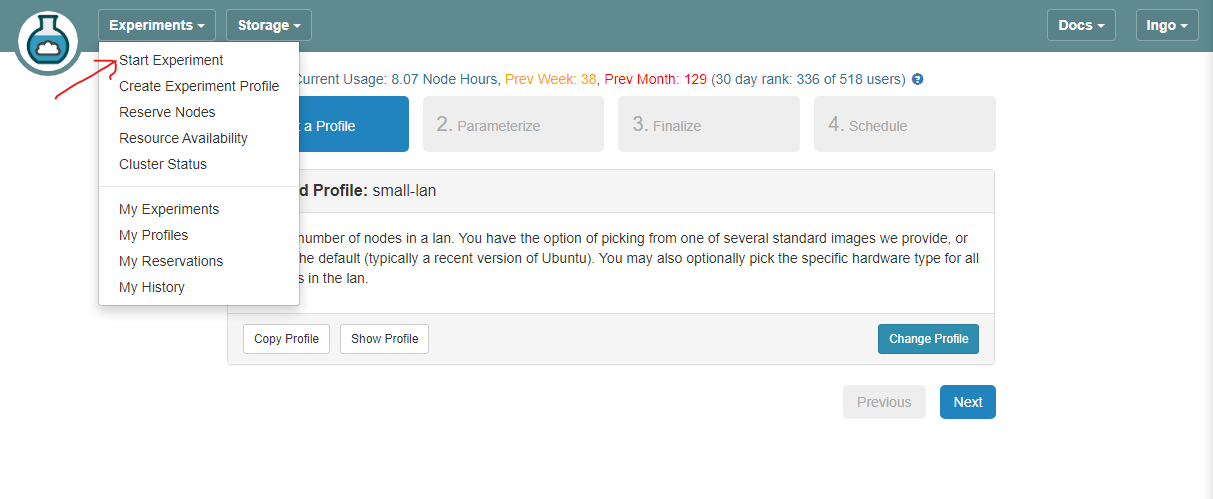
- Under Experiments drop down box, select Start Experiment.
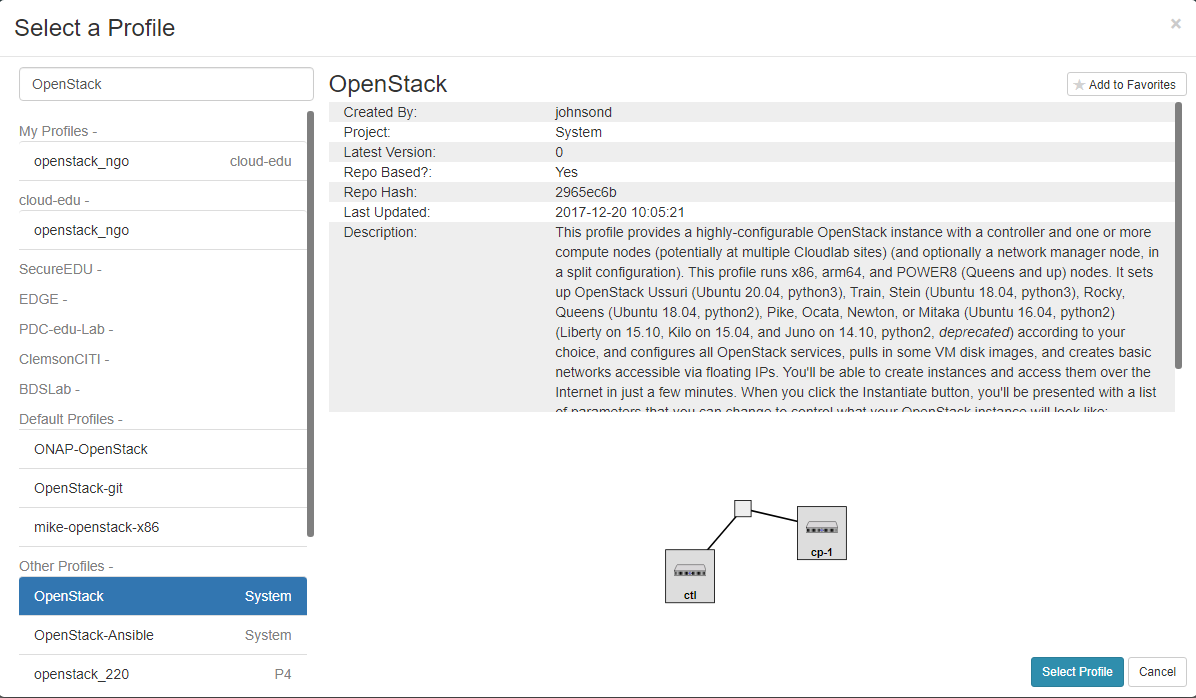
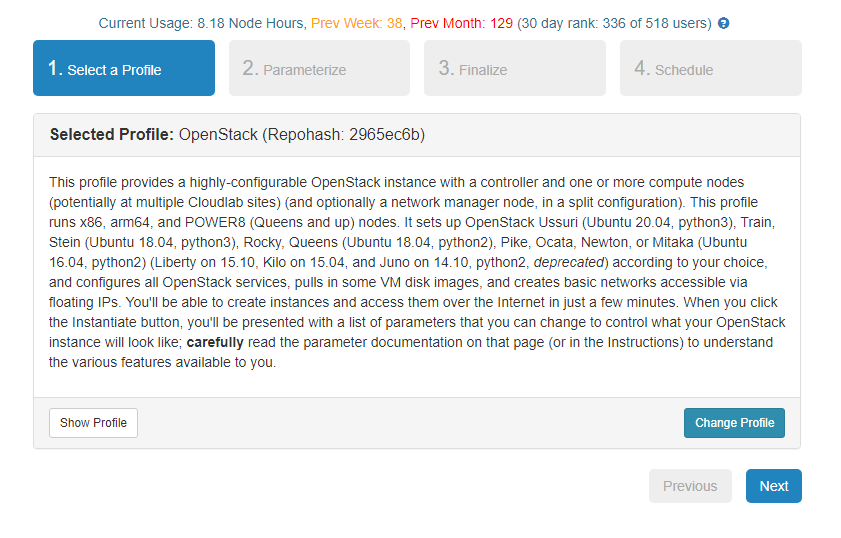
- Click Change Profile.
- Type OpenStack in the search box, and select the profile OpenStack as shown in the figure below.
- Click Select Profile when done.
- Click Next.
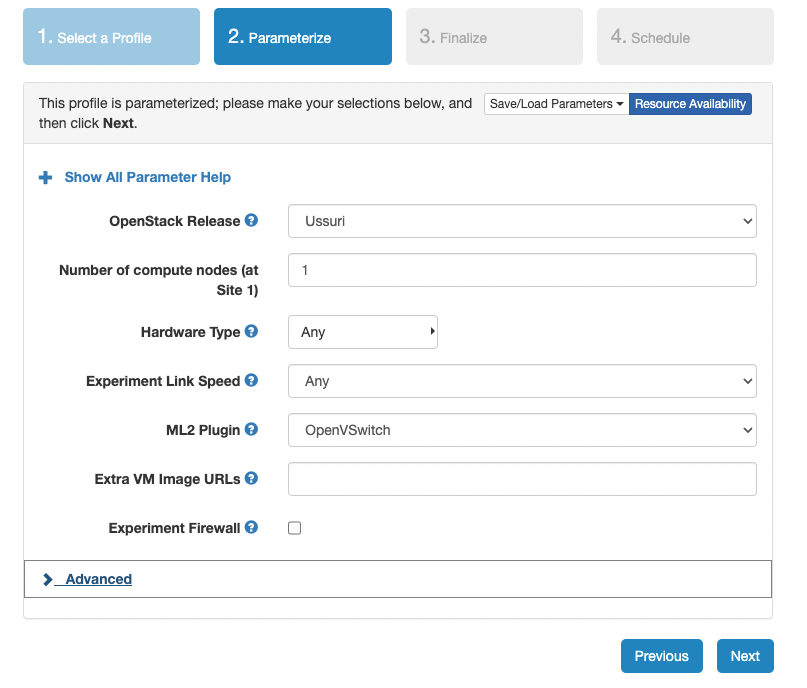
- Select the options similar to the figure below.
- If the Parameterize tab does not look like this, click Previous to go back one step, and then click Next again.
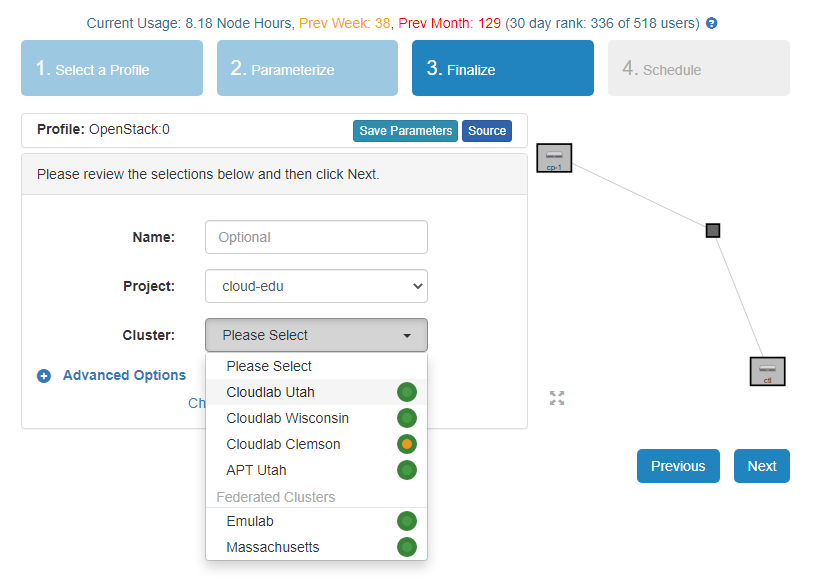
- Only Utah, Wisconsin, and Clemson have been known to work with this profile.
- I will use Utah for the remaining steps.
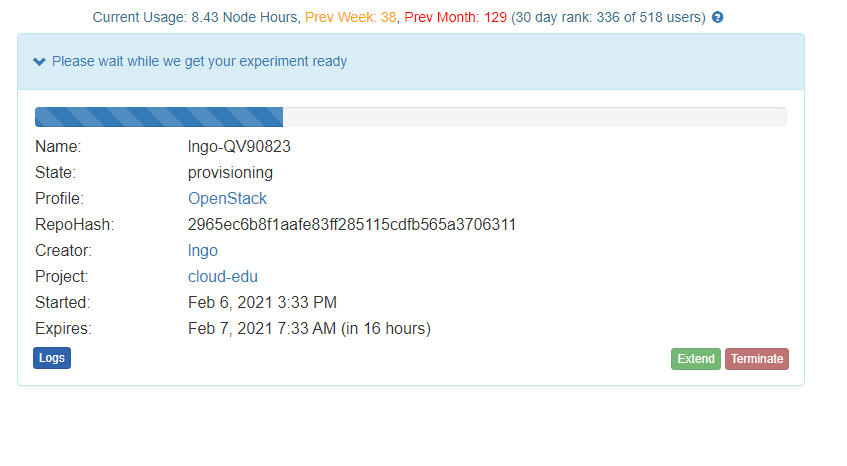
- Do not change anything on the Schedule step and click Finish.
- The startup scripts of this profile will take sometimes to run, approximately thirty minutes to one hour.
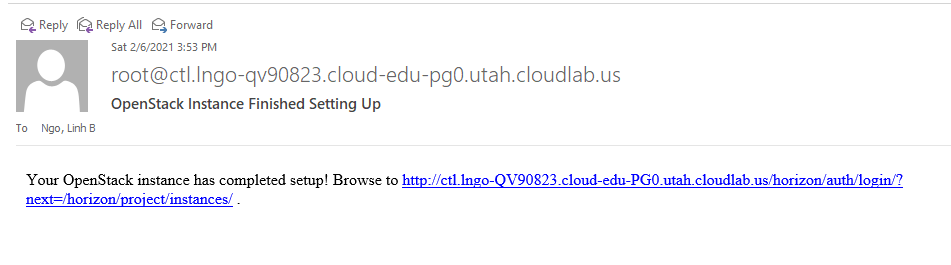
- You will receive an email from CloudLab (to the registered) to inform you when the experiment is ready.
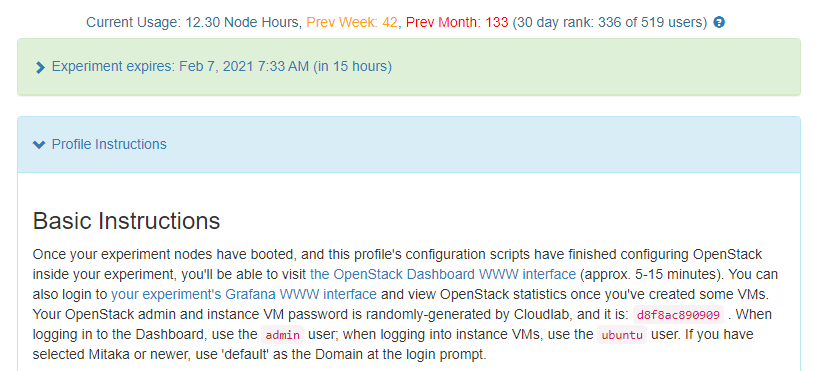
- Go to the experiment, and open the blue *Profile Instructions** box.
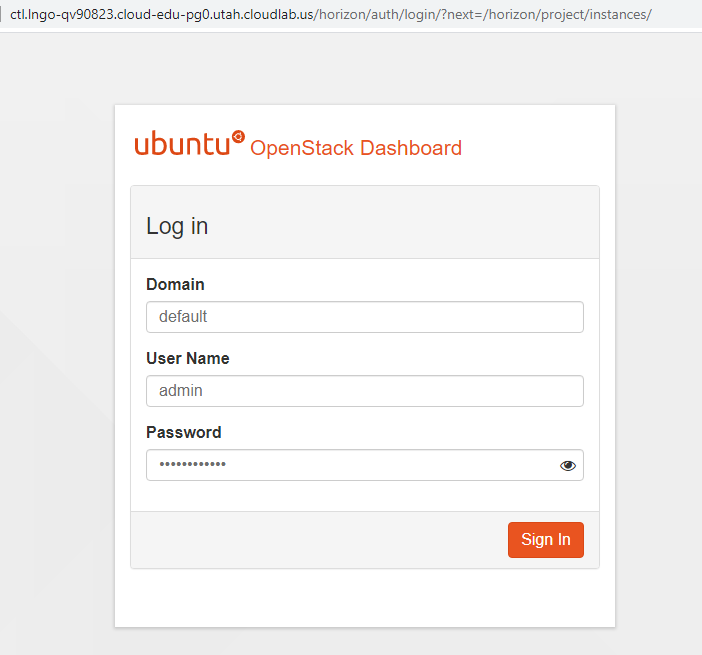
- Follow the instructions to login to OpenStack dashboard. Your passwords will be randomly generated and unique to each experiment.
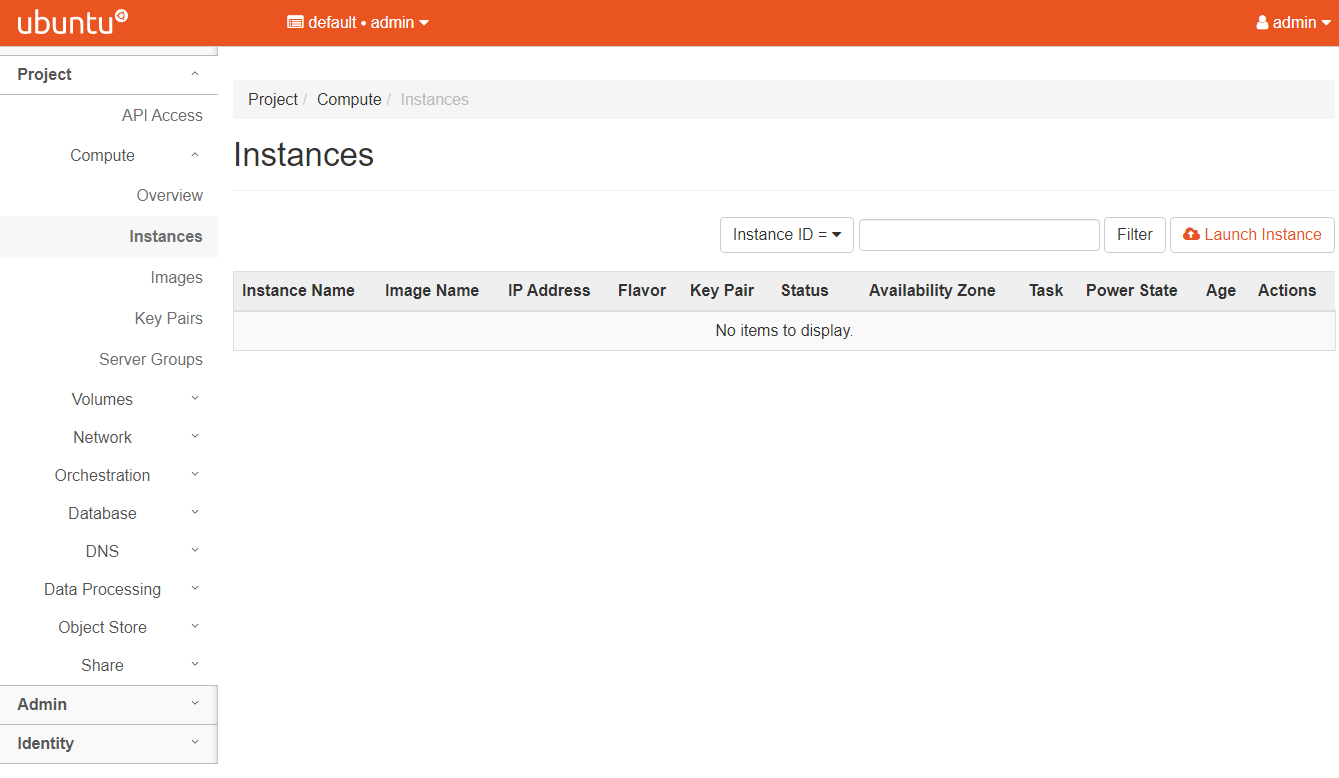
- You will see a Dashboard on a successful deployment as follows.

2. Deploying compute resources from OpenStack
- In the next sequence of hands-on, we will look at how OpenStack can support the deployment of a virtual machine inside its Nova compute components.
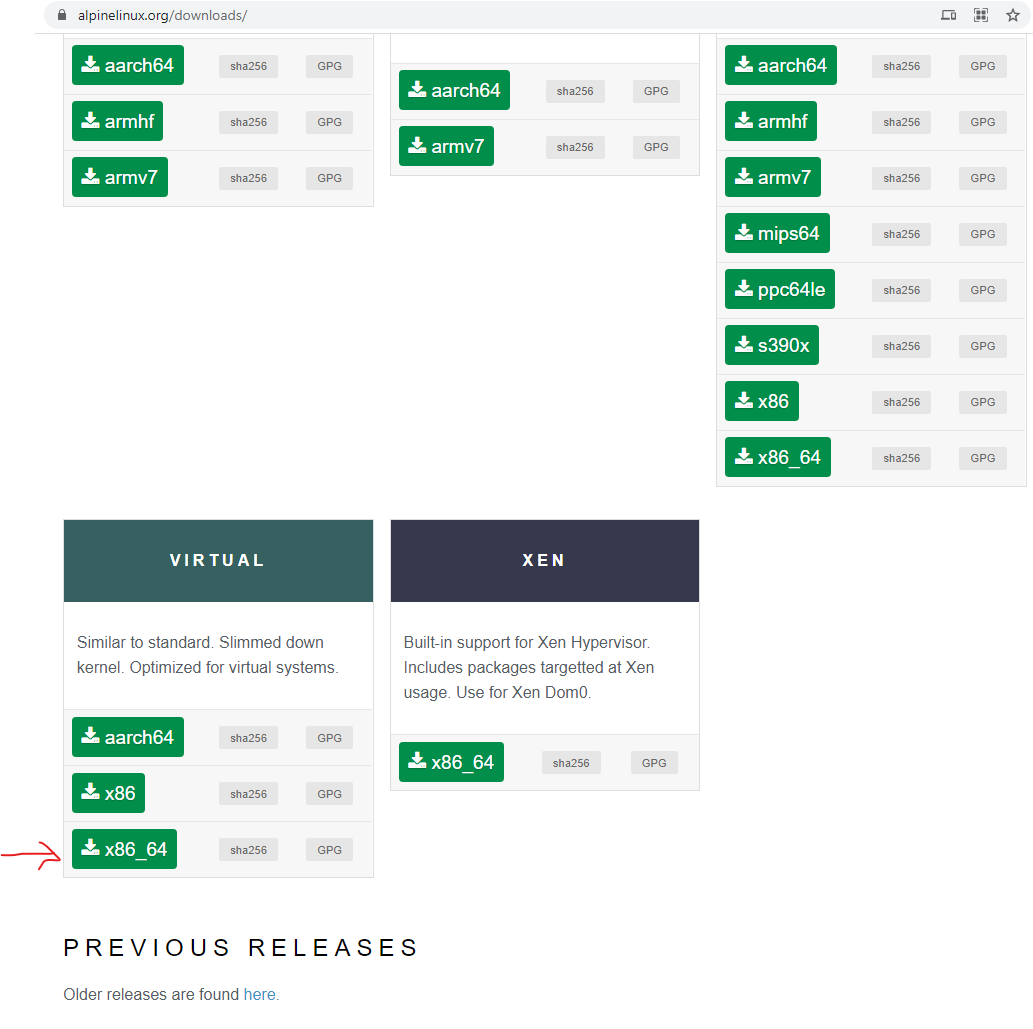
3. Hands-on: Download Linux distribution
- We will use Alpine Linux, a light-weight distribution that was created for containerization/cloud deployment.
- From Alpine Download Page, select the x86_64 Virtual version.
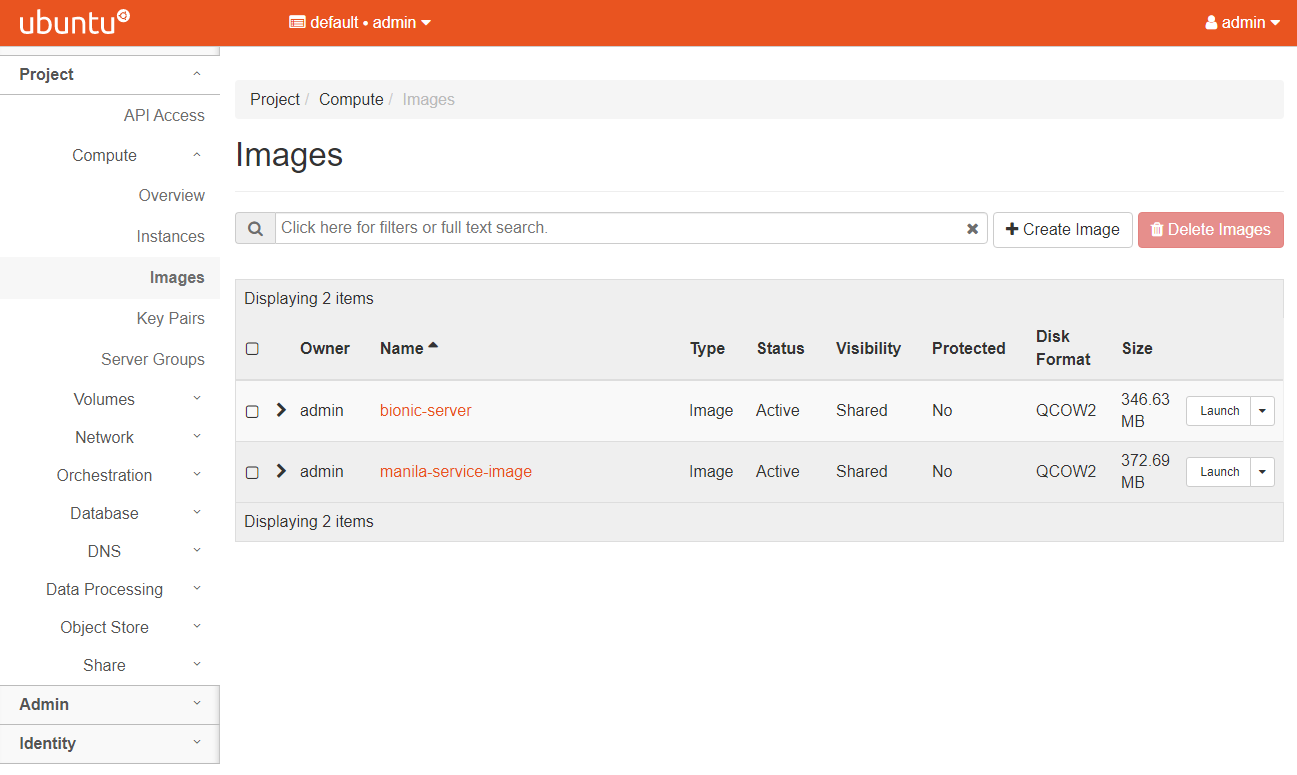
4. Hands-on: Create cloud image
- Go to your CloudLab Dashboard.
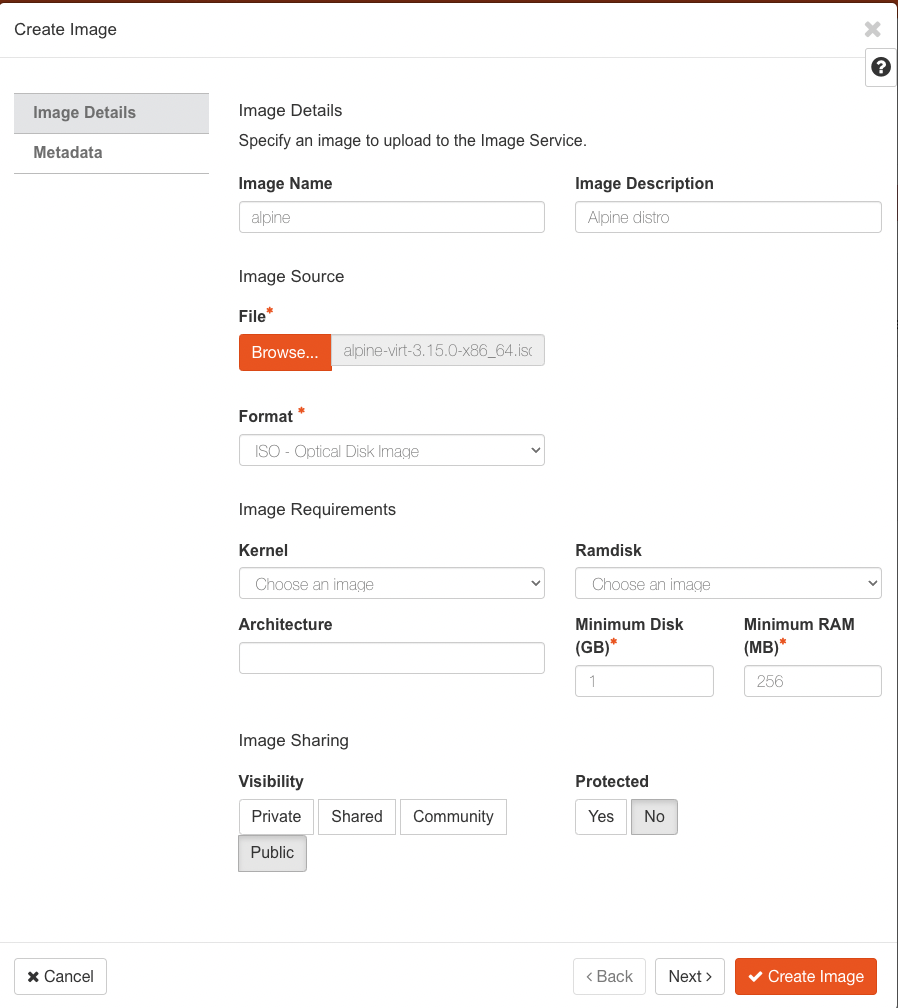
- Go to Compute/Images, then click on Create Image.
- Click Browse and find and select the downloaded ISO file from the the previous slide.
- Set the other parameters as shown in the figure below.
- Click Create Image when done.
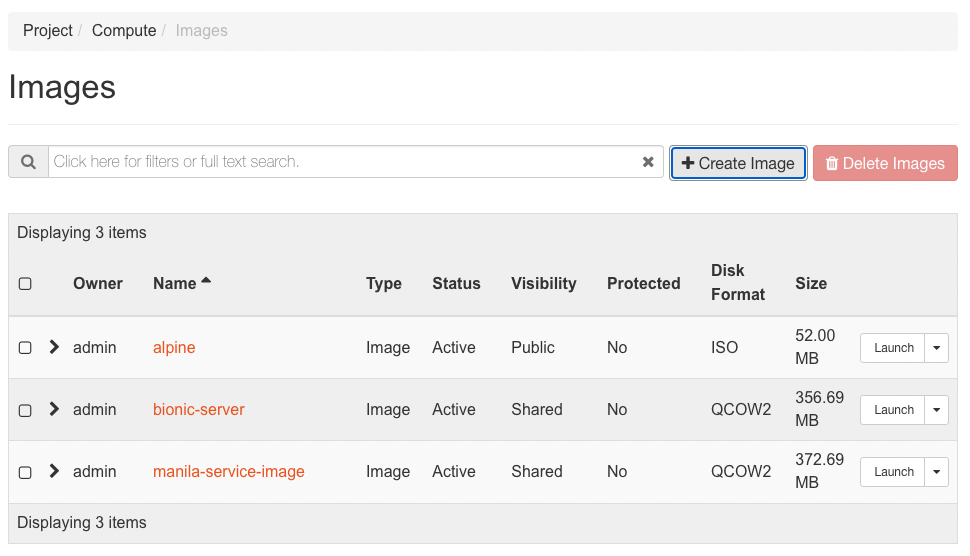
- The image will show up in the Images tab.
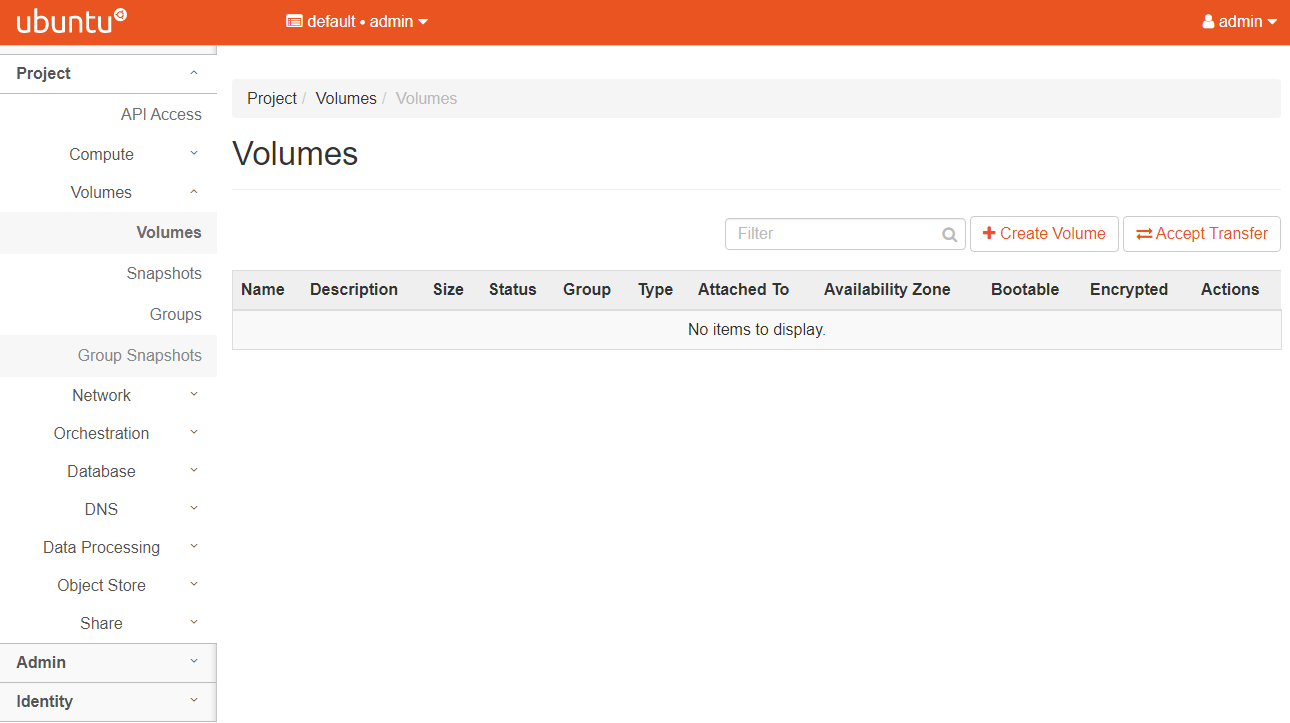
5. Hands-on: Create volumes
- Go to your CloudLab Dashboard.
- Go to Volumes/Volumes, then click on Create Volume.
- Set the other parameters as shown in the figure below.
- Alpine takes up a small amount of storage, so 2GB is more than enough for a simple installation.
- Click Create Volume when done.
- The volume will show up in the Volumes tab.


6. Hands-on: Launching a compute instance
- Go to your CloudLab Dashboard.
- Go to Compute/Instances and click on Launch Instance.
- Set the instance name and other parameters, then click Next
- Use the up arrow to select the alpine image as the allocated image. Click Next.
- Select m1.tiny as the compute flavor. Click Next.
- Select flat-lan-1-net as the connected network. Click Launch Instance.
- It should take a few minute for the instance to become ready.


7. Hands-on: Volume attachment and Linux installation
- Go to your CloudLab Dashboard.
- Go to Compute/Instances
- Click on the drop-down arrow under Actions for the alpine instance, then click Attach Volume.
- Select your
sda_****volume ID created earlier, then click Attach Volume
- Click on the drop-down arrow under Actions for the alpine instance.
- Select Console.
- Right click on Click here to show only console and select Open link in new tab.
- This helps with navigating back and forth.
- A new console tab appears!
- You are now booting from the Alpine distro.
- Type root into the
localhost login:prompt and hit Enter to log in.
- A quick review of Alpine installation process can be found on their wiki
- Type
setup-alpineand hit Enter to start the installation process.- Use the following options:
Select keyboard layout:usSelect variant:usEnter system hostname ...: Hit Enter to accept default.Which one do you want to initialize?: Hit Enter to accepteth0as the default interface.Ip address for eth0: Hit Enter to acceptdhcpas the default value.Do you want to do any manual network configuration?: Hit Enter to acceptnas the default value.- Enter a complex password for root. DO NOT MAKE AN EASY PASSWORD. If your cloud instance got hacked and used for malicious purposes, you will be banned from CloudLab. Retype the password.
Which timezone are you in?: TypeESTand hit Enter.HTTP/FTP proxy URL?: Hit Enter to acceptnoneas the default value.- For the mirror question, type
30(the one from princeton), then hit Enter.Which SSH server?: Hit Enter to acceptopensshas the default value.Which disk(s) would you like to use?: Review the lines above, and select the listed disk. There should be one as we already attached a volume to this instance. For me, it isvdb, so I type invdaand hit Enter.How would you like to use it?: Typesysand hit Enter.WARNING: Erase the above disk(s) and continue?: Typeyand hit Enter.
- Once the installation process is completed, Leave this console running and return to the Dashboard.
- Go to Compute/Instances
- Click on the drop-down arrow under Actions for the alpine instance.
- Select the
sda_****volume ID selected earlier, then click Detach Volume
- Select the
sda_****volume ID created earlier, then click Detach Volume
- Go to your CloudLab Dashboard.
- Go to Volumes/Volumes.
- In the Actions box of
sda_****, click the drop-down arrow and select Upload to Image.
- Set Image Name to
alpine-diskand Disk Format asRaw, then click Upload.
- Successful upload:


8. Challenge
- Launch another compute instance using the newly created
alpine-diskimage.
- Pay attention to the flavor.
- Log into the console and confirm that you can use the root password created earlier to log in
Expected Outcome:

9. Setup Apache webserver (from the volume-based Alpine from Challenge 8)
- You should be inside the console after log in as root and have the root password.
- Run the following commands to install Apache webserver
$ apk update
$ apk add apache2
$ rc-service apache2 start
{ :.language-bash}

10. Setup public IP address
- To expose the webserver, we need a public IP address.
- Go to your CloudLab Dashboard.
- Go to Compute/Instances
- Click on the drop-down arrow under Actions for the alpine instance, then click Associate Floating IP.
- Click on the
+sign to allocate IP address.
- Click on Allocate IP.
- Click on Associate.
- You should see the public IP address with your instance
- Try visiting this IP address now, anything?


12. Cloud security basic
- In the cloud,
egressmeans traffic that’s leaving from inside the private network out to the public internet (similar to standard network definition).- In the cloud,
ingressrefers to unsolicited traffic sent from an address in public internet to the private network – it is not a response to a request initiated by an inside system. In this case, firewalls are designed to decline this request unless there are specific policy and configuration that allows ingress connections.


11. Handle security
- Go to your CloudLab Dashboard.
- Go to Network/Security Group
- Click on Manage Rules.
- Click
Add Rules
- In the
Ruledrop down box, selectHTTP, then clickAdd.
- You can see the new
Ingressrule for HTTP.
- The apache webserver is now visible


Key Points
Virtualization for cloud computing: KVM, docker, singularity, and podman
Overview
Teaching: 0 min
Exercises: 0 minQuestions
What are some of the common virtualization platforms?
How do they differ from one another?
Objectives
Know various virtualization solutions, including KVM, docker, singularity, and podman.
1. History of KVM
- Created by Avi Kivity at Qumranet
- Become part of the Linux kernel in 2007
- Hardware-based virtualization
2. History of KVM
- Virtualizing the x86 architecture (Intel and AMD)
- Hardware vendors provide the following extensions to the x86 architectures
- A new guest operating mode: the CPU can switch into a guest mode that allows system software to trap specific privileged instructions or accesses.
- Hardware state switch: Hardware is responsible for switching the control registers that affect the CPU operation modes and relevant segment registers.
- Exit reason reporting: When a switch from guest to host happens, the hardware reports the reason so that the software can take appropriate responses.
- KVM has been developed to take advantage of these extensions.
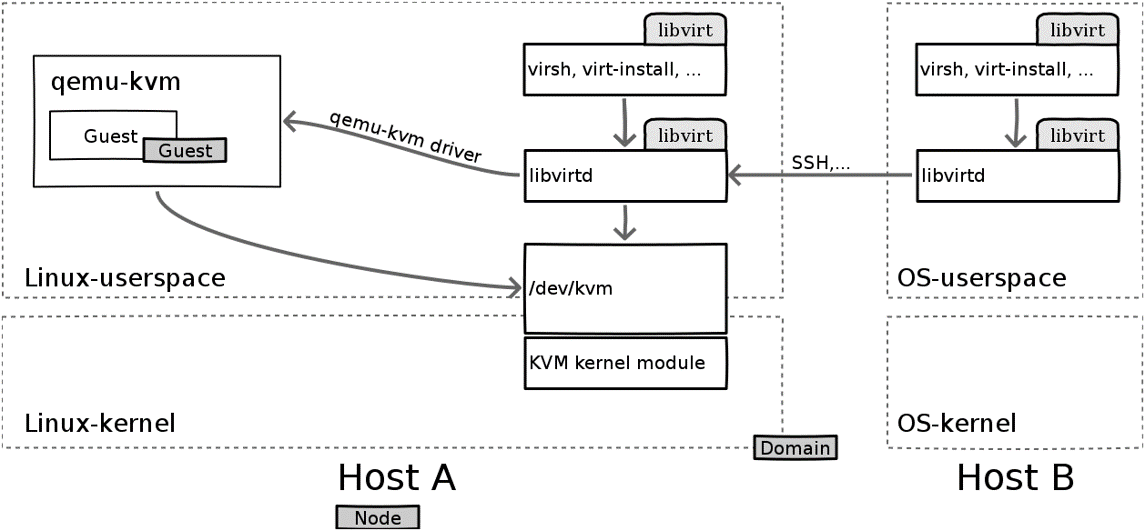
3. General architecture
- Virtual machines are created by opening a device node (/dev/kvm) - essentially a file.
- Operations provides by /dev/kvm includes:
- Create a new VM
- Allocate memory to a VM
- Reading and writing virtual CPU registers
- Injecting an interrupt into a virtual CPU
- Running a virtual CPU
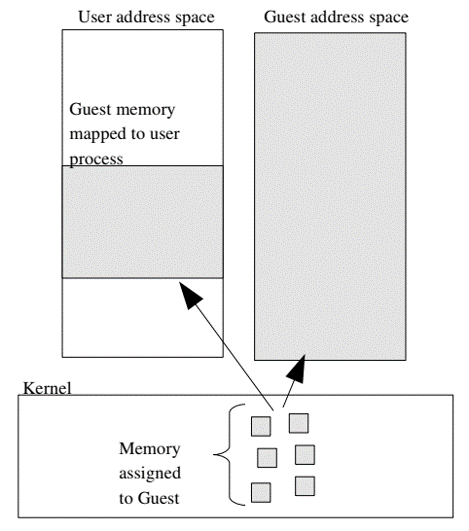
4. Memory mapping
- Kernel allocates discontiguous pages to form the Guest address space.
- User address space (of processes inside the VM) can
mmapdirectly to these allocation to provide direct-memory-access capability.
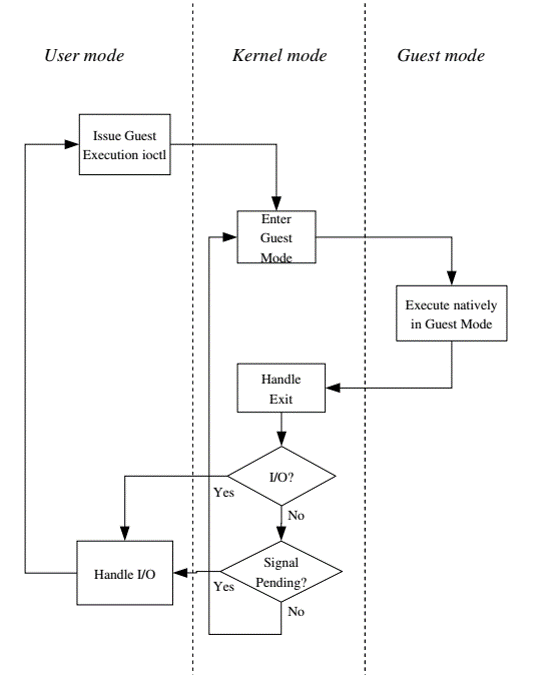
5. CPU execution
- A new mode is added called
guest mode.- User space calls the kernel to execute guest code.
- Kernel causes hardware to enter guest mode and handles interrupts when CPU exits guest mode.
- Hardware execute guest code until it encounters instructions that needs assistance.
- Intel versus AMD
- X86 family has different branches
- KVM uses C’s function pointer vector (kvm_arch_ops) to call the appropriate function that handles each architecture.
6. Virtualizing the MMU (memory management unit)
- MMU: Translate virtual address space (from users’ perspective) to physical addresses.
- Page table: virtual-to-physical translation, located in hardware registers
- Page faults mechanism (missing translation)
- On-chip cache (translation lookaside buffer) that accelerates lookup of the page table.
- Hardware support mmu virtualization:
- Provides support for guest_virtual to guest_physical
- Does not account for guest_physical to host_physical
- Solutions: shadow page table that performs the later task.
7. Initial implementation
- Less complicated, but also sacrificed performance.
- Copy the contents changes due to guest instructions that require access to TLB’s page tables.
- Most common TLB instruction is context_switch, which invalidate the entire TLB (impacting shadow table).
- Rebuilding the shadow table is expensive.
- Impact guest’s workload with multiple processes
8. Caching virtual mmu
- Virtual MMU implementation (from hardware vendor) was enhanced to allow page tables to be cached across context switches.
- Guest memory pages (on physical host) that are shadowed by KVM need to be write-protected.
- Write access to guest page table needs to be emulated (rather than trying to use the host x86 instructions) so that we know exactly what happens to the guest memory and to the shadow page table.
9. I/O Virtualization
- Software uses programmed I/O (pio) and memory mapped I/O (mmio) to communicate with hardware devices.
- KVM needs to be able to trap and emulate pio and mmio request (from guest to physical host) and simulate interrupts from virtual hardware to programs running in guest.
10. Why
- Essential characteristics of VMM:
- Essentially identical to the physical resource
- Efficiency
- Complete control of system resources (with regard to the processes running inside the VM)
- Support advanced complex devices in modern computers
- Graphical devices
- High speed storage devices
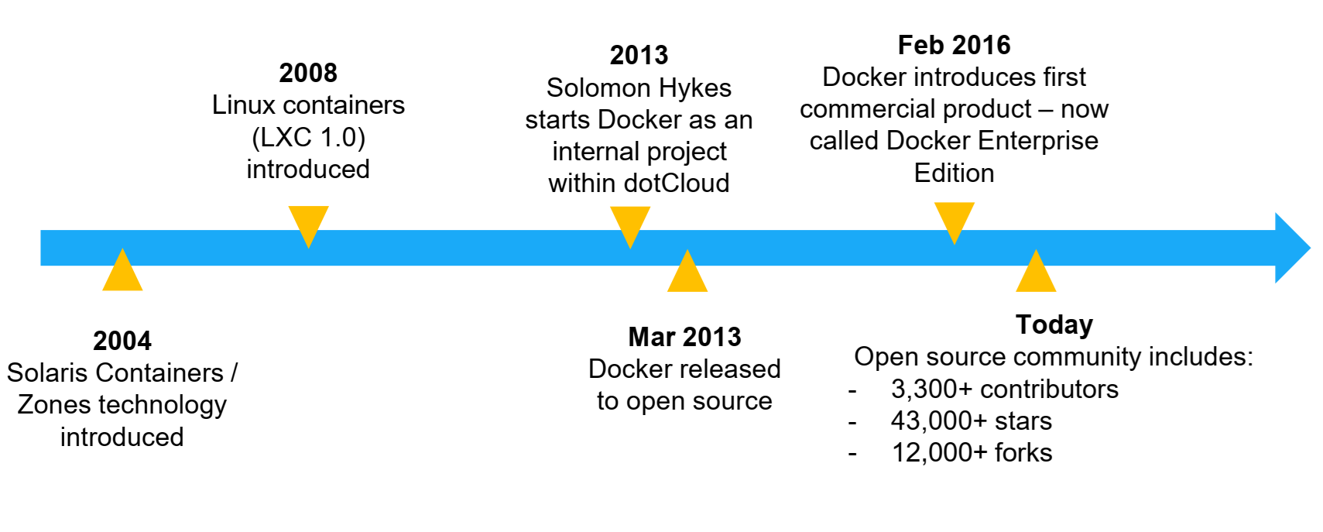
11. Docker history
- Benefits of VM
- Better resource pooling
- One physical machine divided into multiple VMs
- Easier to scale
- VMs in the Cloud
- Rapid elasticity
- Pay as you go model
- Limitation of VM
- Each VM still requires
- CPU allocation
- Storage
- RAM
- An entire guest OS
- The more VM you runs, the more overhead resources you need
- Guest OS means wasted resources
- Application portability is not guaranteed
12. What is a container
- Standardized packaging for software and dependencies
- Isolate apps from each other
- Share the same OS kernel
- Work with all major Linux and Windows server
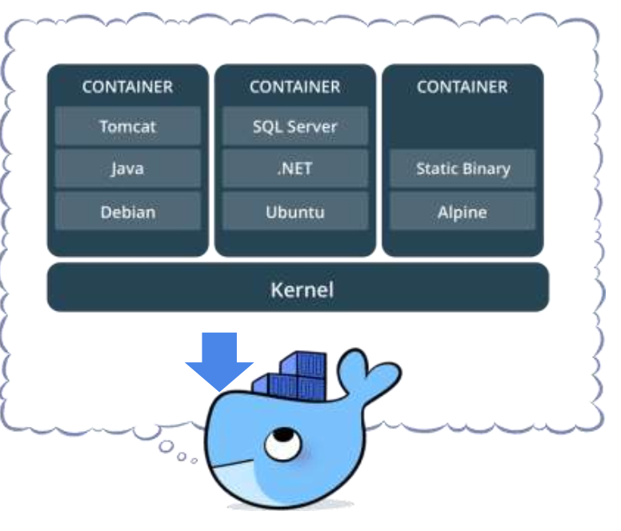
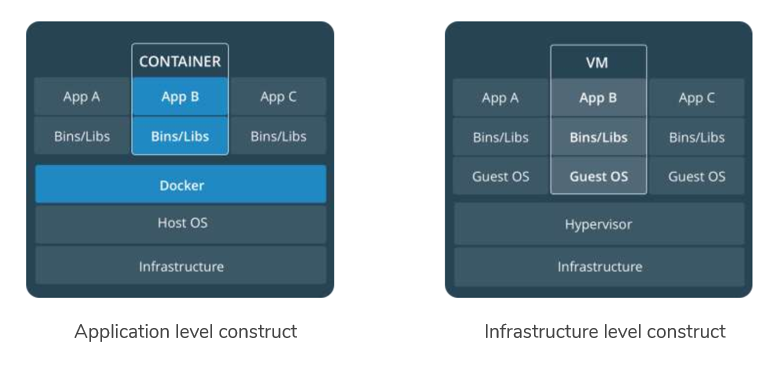
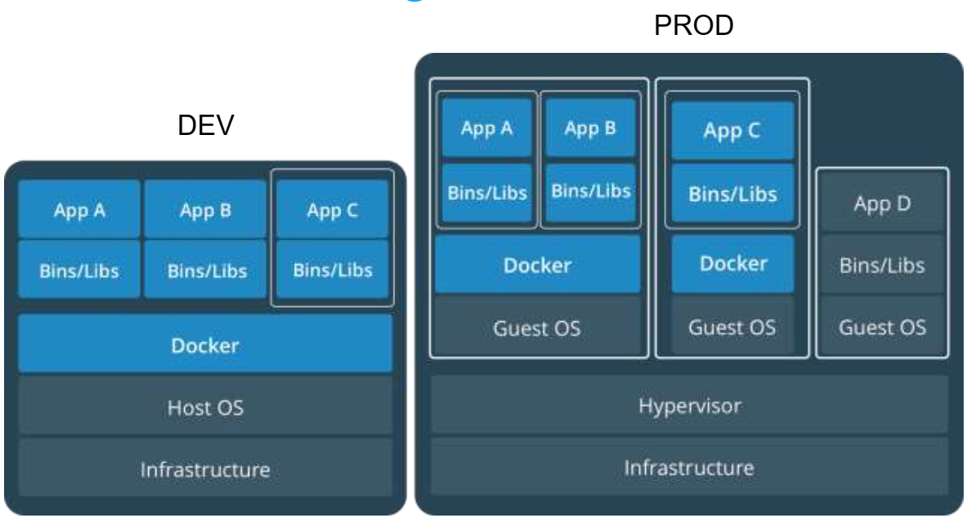
13. Containers and VMs together
14. Key benefits of Dockers
- Speed
- No OS to boot
- Portability
- Less dependencies between process layers
- Efficiency
- Less OS overhead
- Improved VM density
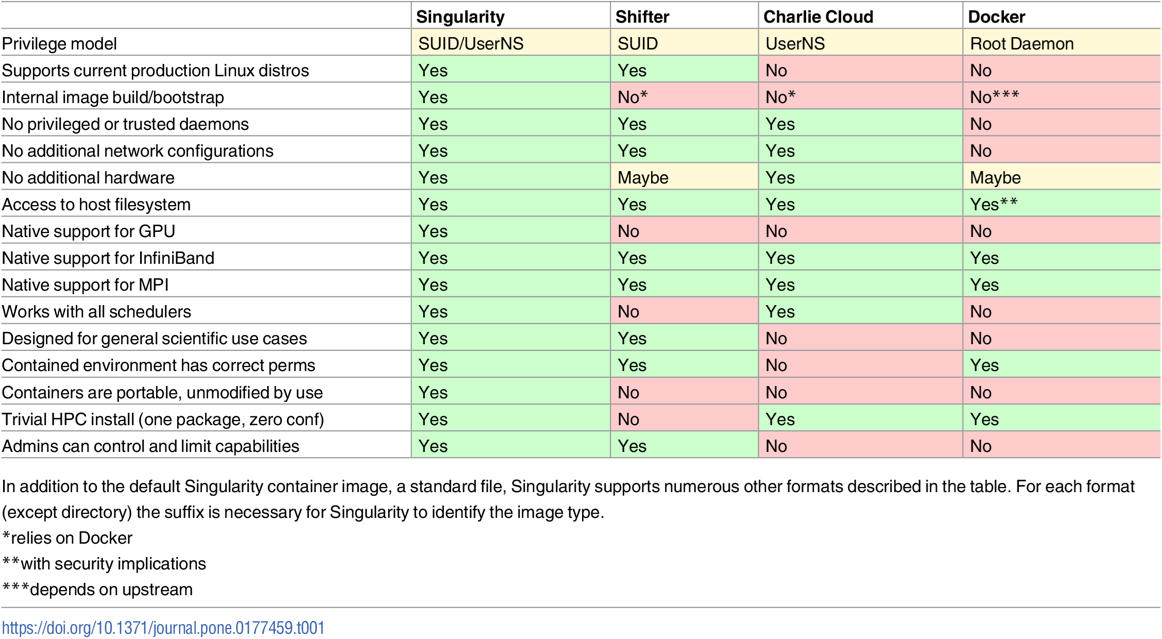
15. Singularity
- Begin as an open source project in 2015 at Lawrence Berkeley National Laboratory.
- Released until BSD License
- Top 5 new technologies to watch in 2016-2017 (HPCWire)
- Being used in academic:
- Standard University Research Computing Center
- National Institute of Health
- 60% of the Open Science Grid Consortium.
- Ohio State, Michigan State, TACC, SDSC, and Oak Ridge National Lab
- Supports for native high performance interconnects (InfiniBand, OmniPath)
- Supports for native graphic accelerators
- Supports for Open MPI, including a hybrid mode (inside and outside of containers)
- Useful for new advanced research areas such as ML, Deep Learning, and data-intensive workloads
16. Motivation: container software unit for scaled science
- Current approaches suitable for industry’s micro-service virtualization and web-enabled cloud application.
- Wiki: Microservices are a
software developmenttechnique—a variant of theservice-oriented architecture(SOA) architectural style that structures anapplicationas a collection ofloosely coupled services. In amicroservicesarchitecture, services arefine-grainedand theprotocolsare lightweight.- Not quite suitable for scientific world, and HPC communities.
- The reproducibility and portability aspects of containers are highly desirable.
- Security level of Docker is not good enough for a shared research environment.
17. The needs of scientists
- Technological innovation of container-based environments
- The needs for scalable and reproducible products
- Preference for usability
- Necessity to operate on everything from laptops to large-scale HPC
- Before: Scientists exchange data files and source codes
- Today: Scientists exchange workflows
- These two things need to be encapsulated into a single computing environment
- Challenges with Docker:
- Security concerns: Docker’s containers are spawned as a child of a root-owned Docker daemon
- Potential issue: privilege leakage
- Lack of administrative control in what’s being run/monitored (opposite of an industry environment)
18. What Singularity aims to solve
- Specific accomplishments
- Mobility of Compute
- Distributable image format that encapsulates the entire container and software stack into a single image file.
- Reproducibility
- Utilize single files, which allow snapshot, archive, and lock-down for reusability purposes.
- No external influence from the host OS.
- User freedom
- Can install any relevant dependencies inside the system without worrying about the host OS.
- Support existing traditional HPC resources.
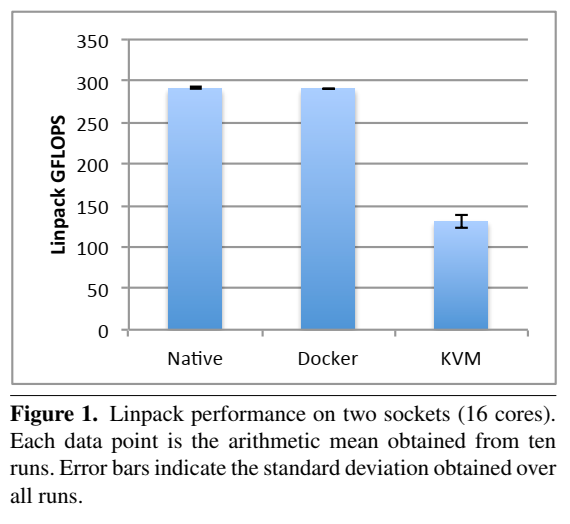
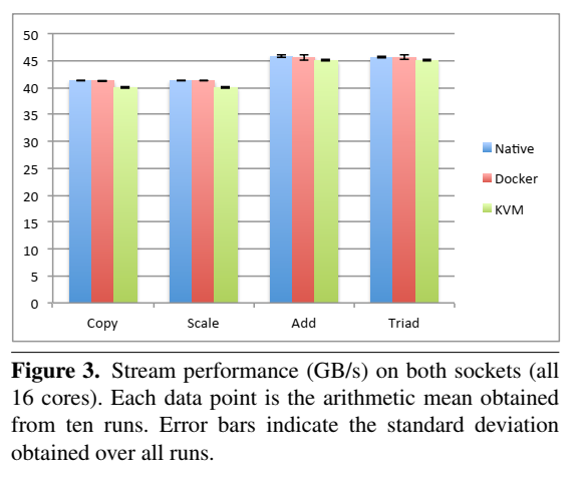
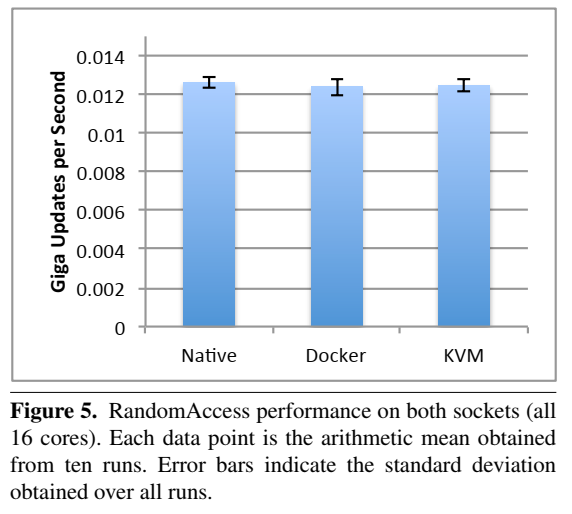
19. Performance evaluation (Singularity is not included)
- Always need to look at latest papers, as software have been improving over time.
- Felter, W., Ferreira, A., Rajamony, R. and Rubio, J., 2015, March. An updated performance comparison of virtual machines and linux containers. In 2015 IEEE international symposium on performance analysis of systems and software (ISPASS) (pp. 171-172). IEEE.
- System setting:
- Dual 2.4-3.0 GHz Intel Sandy Bridge Xeon E5-2665 processors (16 cores total)
- 256GB of RAM
- Ubuntu 13.10 (Linux kernel 3.11.0)
- Docker 1.0
- QEMU 1.5.0
- Libvirt 1.1.1
- Benchmark
- CPU Benchmark: Linpack
- Memory bandwidth: Stream
- Random memory access: RandomAccess
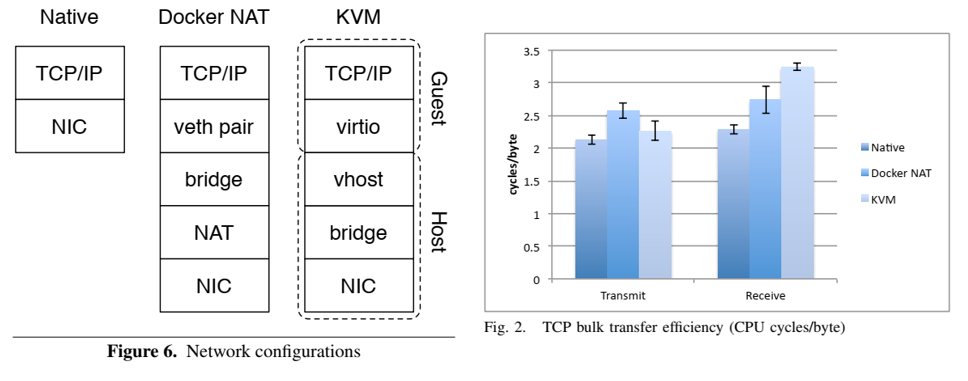
- Network bandwidth: nuttcp
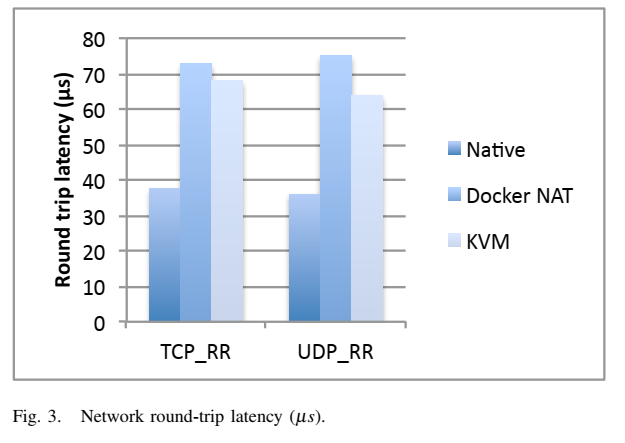
- Network latency: netperf
- Block I/O: fio (20TB IBM Flash system SSD)
- Storage: Redis
- Database: MySQL
- CPU benchmark
- Memory benchmark
- Random memory access
- Network bandwidth
- Network latency
20. Podman
- Container engine developed by RedHat.
- Addressing issues with Docker
- Persistent daemon on host.
- Root/privileged concerns
- OCI: Open Container Initiative (2015).
- Podman
- Client-only tool, based on Docker CLI
- No Daemon
- Similar CLI experience as Docker CLI
- Build and run containers as non-root
- Simple CLI, no client-server architecture.
Key Points
Docker Containers
Overview
Teaching: 0 min
Exercises: 0 minQuestions
What motivates the creation of containers?
How do container work?
Objectives
Understand the operational model of Docker containers
Understand the concept of layers
Being able to launch, monitor, and modify Docker containers/images
0. Setup
- Go to your GitHub project repository (on the first day), create a new branch called
dockerfrom themain branch, and modify to add the following components from this link:
- The
docker_configdirectory and its content (daemon.json).- The
install_docker.shfile.- The
profile.pyfile.- Check and make sure all the contents are correctly copied!
- Go to CloudLab, open your profile, switch to
Editmode and clickUpdate. The newdockerbranch should show up.- Instantiate an experiment from this branch.
- Only login after the Startup column becomes Finished and type the following command:
sudo docker info | grep "Docker Root Dir"- Confirm that you have something similar to the screenshot below

1. Why do we want container?

2. The issue: who does what?
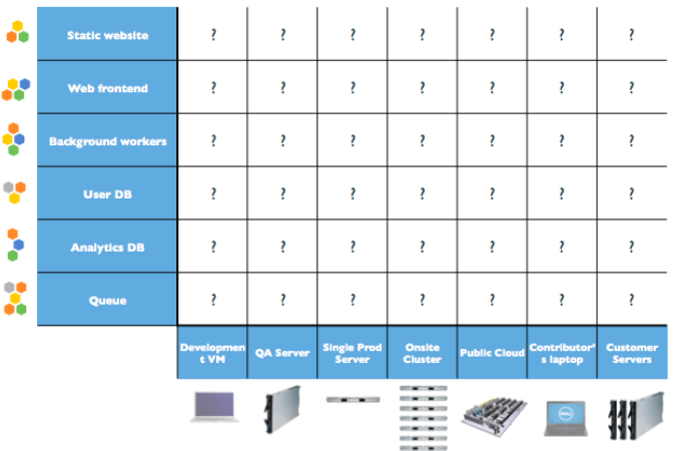
3. Inspiration for Docker
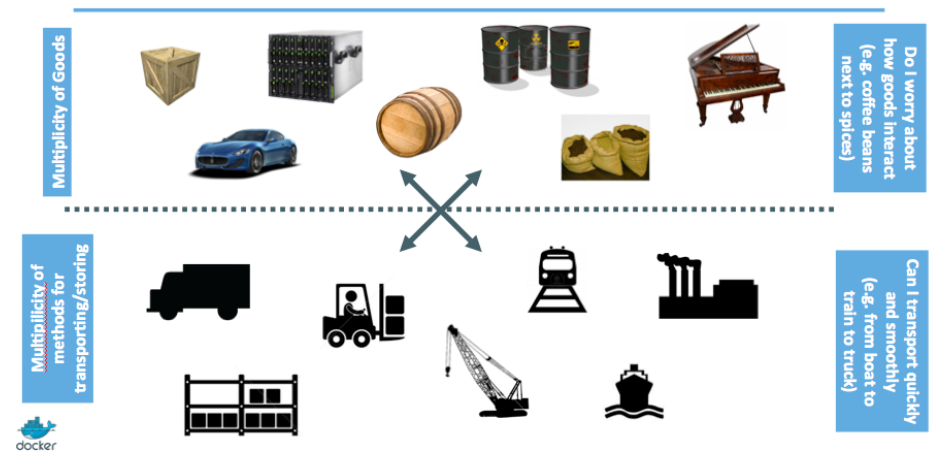
4. Inspiration for Docker: intermodal shipping containers
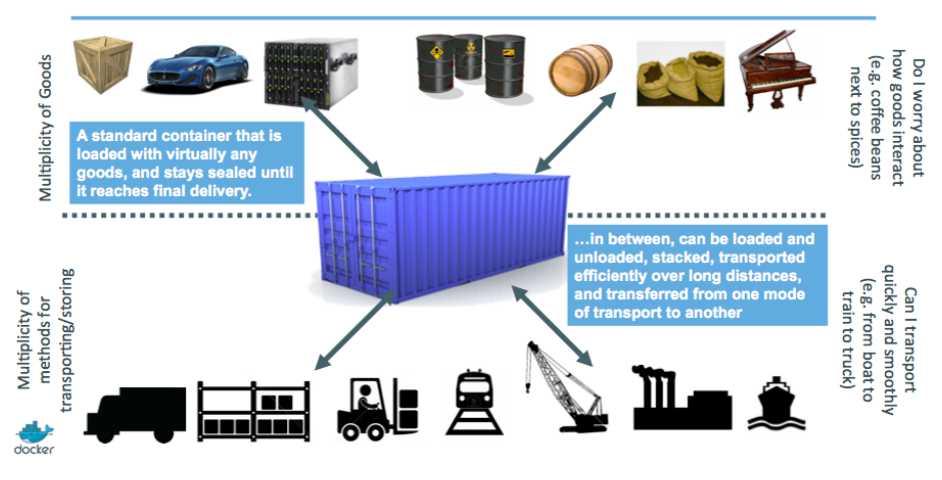
5. Modern shipping ecosystem

6. A shipping container system for applications
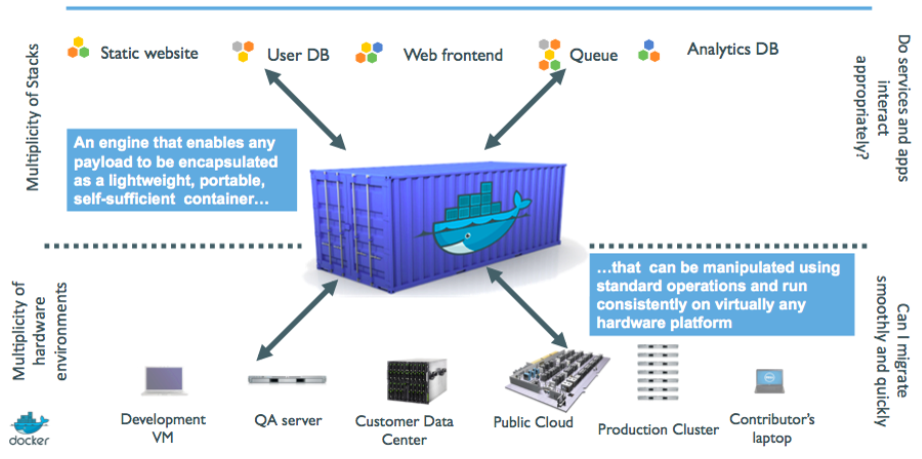
7. Who does what? We don’t care …
8. Cloud-native applications on container
9. Hands-on: Getting started
- SSH into your CloudLab experiment.
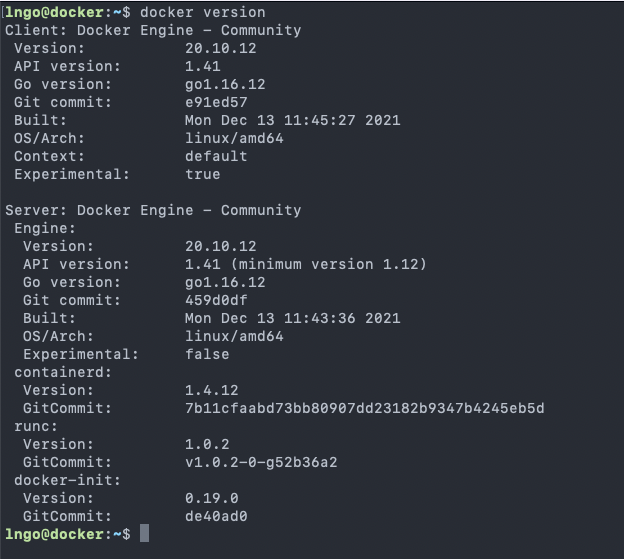
- Check version of Docker:
$ docker version
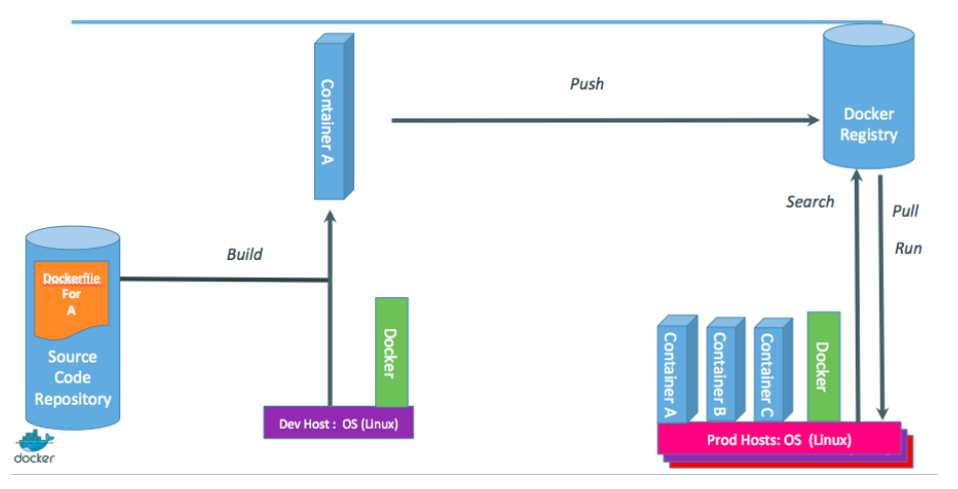
- Docker is client-server application.
- Docker daemon (Engine): receives and processes incoming Docker API request and requires root privilege.
- Docker Hub registry: collection of public images (https://hub.docker.com/).
- Docker client : Talks to the Docker daemon via the docker API and the registry API.
10. Hands-on: Hello world
- Docker
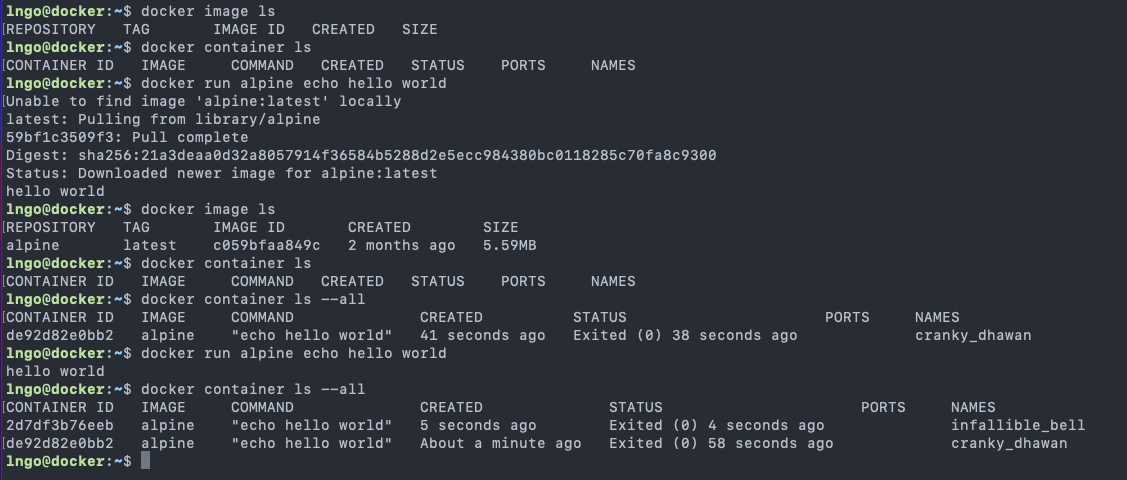
containersare instantiated from Dockerimages.- You can check availability of local
imagesandcontainers.$ docker image ls $ docker container ls
- We can issue the following to start a service that will echo
hello worldto the screen.- This requires a Linux container to run the
echocommand.$ docker run alpine echo hello world
docker: invoke the container engine.run: subcommand to run a container.alpine: name of the image based on which a container will be launched.echo hello world: the command to be executed in the container environment.$ docker image ls $ docker container ls $ docker container ls --all $ docker run alpine echo hello world $ docker container ls --all

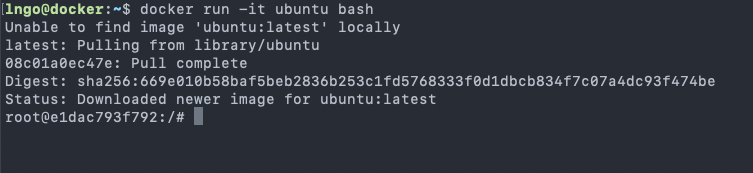
11. Hands-on: Interactive container
- We can launch a container and get into the shell of the container.
$ docker run -it ubuntu bash
- You are now in a new prompt: a shell inside the container
-it: combination of-iand-t.
-itells Docker to connect to the container’s stdin for interactive mode-ttells Docker that we want a pseudo-terminal
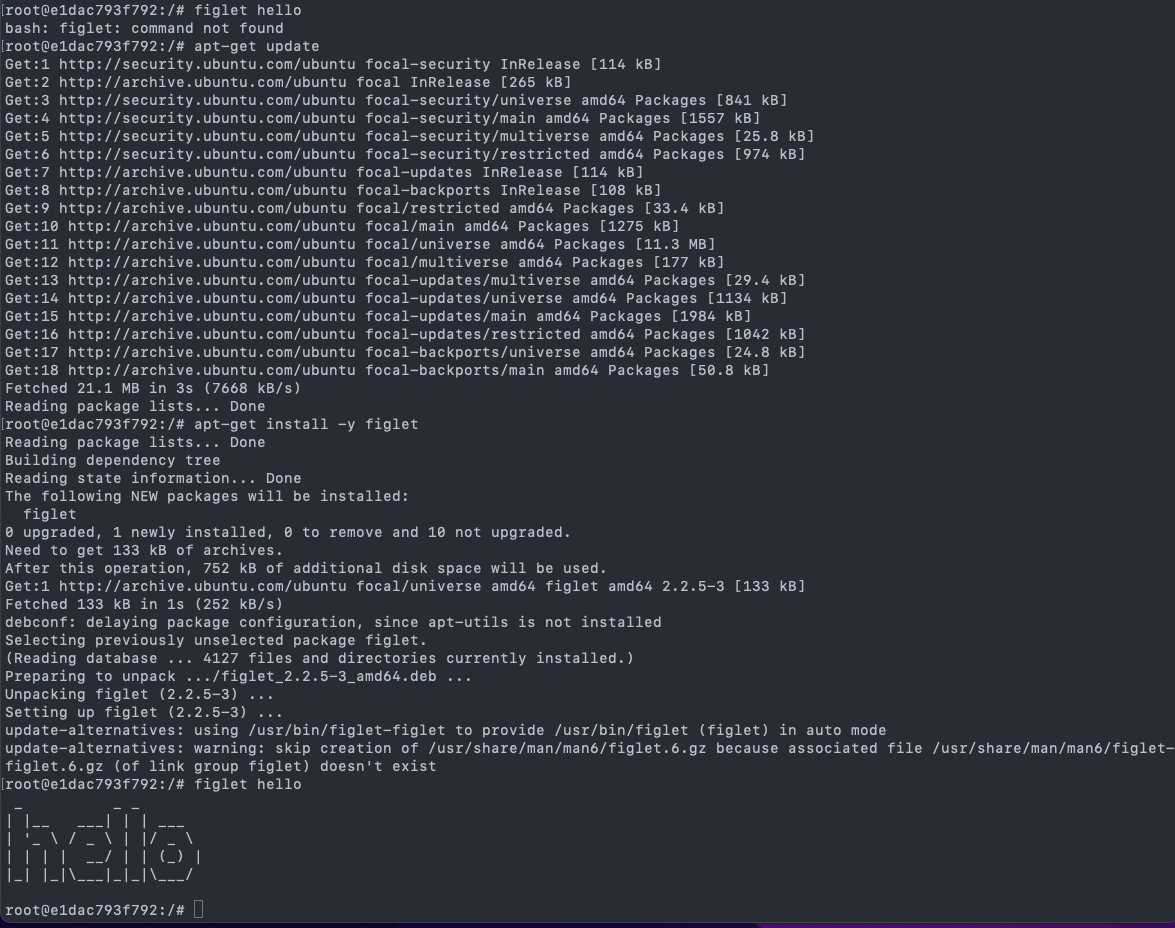
12. Hands-on: run something interactively
- The following commands are done inside the container.
- Let’s attempt to run
figlet# figlet hello
- There will be an error.
- The current container does not have the
figletprogram yet.
13. Hands-on: installing and then running
- The following commands are done inside the container.
# apt-get update
# apt-get install -y figlet
# figlet hello
14. Exercise
- Type
exitto shutdown the container and back to your normal terminal.- Repeat the process of launching an interactive container from start and try running
figletagain.- Is the program still there?
15. Hands-on: Background container
- You should have already exited out of the container shell and back to the CloudLab environment.
- Run the following command
- Press
Ctrl-Cto stop after a few time stamps.$ docker run jpetazzo/clock
16. Hands-on: Background container
- Run the following command
$ docker run -d jpetazzo/clock
$ docker ps
17. Hands-on: View log of your background container
- Use the first four characters of your container ID to view the log of the running Docker container
- Use
--tail Nto only look at the tail of the log.~~~ $ docker container ls $ docker logs –tail 5 YOUR_CONTAINER_ID
~~~
18. Exercise
- Find out how to kill a running container by using
docker kill.
19. Docker images
- Image = files + metadata
- The files form the root filesystem of the container
- The metadata describes things such as:
- The author of the image
- The command to execute in container when starting it
- Environment variables to be set
- …
- Images are made of layers, conceptually stacked on top of each other.
- Each layer can add, change, and remove files and/or metadata.
- Images can share layers to optimize disk usage, transfer times, and memory use.
20. Example of a Java webapp
- CentOS base layer
- Packages and configuration files added by our local IT
- JRE
- Tomcat
- Our application’s dependencies
- Our application code and assets
- Our application configuration
21. The read-write layer

22. Containers versus images
- An image is a read-only filesystem.
- A container is an encapsulated set of processes running in a read-write copy of that filesystem.
- To optimize container boot time, copy-on-write is used instead of regular copy.
docker runstarts a container from a given image.
- Object-oriented analogy
- Images are conceptually similar to classes
- Layers are conceptually similar to inheritance
- Containers are conceptually similar to instances

23. How do we change an image?
- It is read-only, we don’t.
- We create a new container from the image
- We make changes to the container.
- When we are satisfied with the changes, we transform them into a new layer.
- A new image is created by stacking the new layer on top of the old image.
24. Image namespaces
- Official images (ubuntu, busybox, …)
- Root namespace.
- Small, distro images to be used as bases for the building process.
- Ready-to-use components and services (redis, postgresl …)
- User (and organizations) images:
<registry_name>/<image_name>:[version]
- jpetazzo/clock:latest
- linhbngo/csc331:latest
- Self-hosted images
- Images hosted by third party registry
URL/<image_name>
25. Hands-on: show current images
- If this is a new experiment, go ahead and run the following commands to get some images loaded.
$ docker run hello-world
$ docker run alpine echo This is alpine
$ docker run ubuntu echo This is ubuntu
$ docker image ls

26. Hands-on: search images
- We can search for available images in the public Docker Hub
$ docker search mysql

27. General steps to create an image
- Create a container using an appropriate base distro
- Inside the container, install and setup the necessary software
- Review the changes in the container
- Turn the container into a new image
- Tag the image

28. Hands-on: create a container with a base distro
- Remember to note your container ID.
$ docker run -it ubuntu
29. Hands-on: install software inside the container
# apt-get update
# apt-get install -y figlet
# exit

30. Hands-on: check for differences
- Remember to note your container ID.
$ docker diff 16b0
- A: A file or directory was added
- D: A file or directory was deleted
- C: A file or directory was changed

31. Hands-on: commit changes into a new image
- Remember to note your container ID.
$ docker commit 16b0 ubuntu_figlet_$USER
$ docker image ls
$ docker history fe101
- From the screenshot:
- The
docker commit ...command created a new image namedubuntu_figlet_lngothat has the following unique id:fe101865e2ed.- The
docker image lscommand shows this image.- The
docker history fe101shows the layers making up this image, which include the layer that is the base ubuntu image54c9d.

32. Exercise
- Test run the new
ubuntu_figletimage by launching an interactive container using this image, then immediately runfiglet hello world.
33. Automatic image construction: Dockerfile
- A build recipe for a container image.
- Contains a series of instructions telling Docker/Podman how an image is to be constructed.
- The
docker buildcommand builds an image from a Dockerfile.
34. Hands on: writing the first Dockerfile
- The following commands are done in the terminal (Ubuntu WSL on Windows/Mac Terminal).
$ cd
$ mkdir myimage
$ cd myimage
$ nano Dockerfile
- Type the following contents into the nano editor
FROM: the base image for the buildRUN: represents one layer of execution.RUNcommands must be non-interactive.Save and quit after you are done.
- To build the image
35. Hands on: build the image
- The following commands are done in the terminal (Ubuntu WSL on Windows/Mac Terminal).
- Check that you are still inside
myimage$ pwd $ docker build -t figlet_$USER .
-tindicates a tag namedfigletwill be applied to the image..indicates that theDockerfilefile is in the current directory.
- The build context is the
Dockerfilefile in the current directory (.) and is sent to the container engine. This context allows constructions of images with additional resources from local files inside the build context.- The base image is
Ubuntu.- For each
RUNstatement, a container is created from the base image for the execution of the- commands. Afterward, the resulting container is committed into an image that becomes the base for the next
RUN.

36. Exercise
- Use
docker image lsanddocker history ...to check which layer is reused for this image.- Test run the new
ubuntu_figletimage by launching an interactive container using this image, then immediately runfiglet hello world.
37. Hands on: CMD
- Edit your Dockerfile so that it has the following content
CMD: The command to be run if the container is invoked without any command.- Rebuild the image with the tag
figlet_cmd_$USER.- Run the following command
$ docker run figlet_cmd_$USER
- Question: Did we use any additional storage for this new image?

38. Hands on: Overriding CMD
- With CMD, the
-itflag does not behave as expected without a parameter.- To override CMD, we can provide a command
$ docker run -it figlet_cmd_$USER
$ docker run -it figlet_cmd_$USER bash

39. Hands on: ENTRYPOINT
-
ENTRYPOINTdefines a base command (and its parameters) for the container.
- The command line arguments are appended to those parameters.
- Edit
Dockerfileas follows:
- Rebuild the image with the tag
figlet_entry_$USER.- Run the followings:
$ docker run figlet_entry_$USER golden rams

40. Hands on: Why not both
ENTRYPOINTandCMDcan be used together.- The command line arguments are appended to those parameters.
- Edit
Dockerfileas follows:
- Rebuild the image with the tag
figlet_both_$USER.- Run the followings:
$ docker run figlet_both_$USER golden rams
$ docker run figlet_both_$USER

41. Hands on: Caveat
/bin/bashdoes not work as expected.$ docker run -it figlet_both_$USER bash $ docker run -it --entrypoint bash figlet_both_$USER # exit

42. Hands on: Importing and building external code
- Create the following file called
hello.c:
- Create the following Dockerfile called
Dockerfile.hello:
- You can build an image with a specific Dockerfile
$ docker build -t hello_$USER -f Dockerfile.hello .
$ docker run hello_$USER
43. Challenge
- Create an account on Docker Hub.
- Find out how to login from the command line and push the recently created
helloimage to your Docker Hub account.
44. Networking for container
- How can services provided by a container become available to the world?

45. Hands on: a simple web server
$ docker run -d -P nginx
$ docker ps
-P: make this service reachable from other computers (--publish-all)-d: run in background- Where is the port?


47. Hands on: How does the container engine know which port to map?
- This is described in the
Dockerfileand can be inspected.- The keyword for this action is
EXPOSE.
- Why do we have to map ports?
- Containers cannot have public IPv4 addresses.
- We are running low on IPv4 addresses anyway.
- Internally to host, containers have their own private addresses
- Services have to be exposed port by port.
- These have to be mapped to avoid conflicts.

48. Hands on: manual allocation of port numbers
$ docker run -d -p 8000:80 nginx
$ docker run -d -p 8080:80 -p 8888:80 nginx
- Convention:
port-on-host:port-on-container- Check out the web servers at all of these ports
49. Integrating containers into your infrastructure
- Manually add the containers to the infrastructure via container-generated public port.
- Predetermine a port on the infrastructure, then set the corresponding port mapping when run the containers.
- Use a network plugin to connect the containers with network tunnels/VLANS …
- Deploy containers across a physical cluster using Kubernetes.
50. Container network model
- Provide the notion of a
networkto connect containers- Provide top level command to manipulate and observe these networks:
docker network$ docker network $ docker network ls
- What’s in a container network?
- Conceptually, it is a virtual switch
- It can be local to a single Engine (on a single host) or global (spanning multiple hosts).
- It has an associated IP subnet.
- The container engine will allocate IP addresses to the containers connected to a network.
- Containers can be connected to multiple networks.
- Containers can be given per-network names and aliases.
- The name and aliases can be resolved via an embedded DNS server.

51. Hands on: create a network
$ docker network create ramnet
$ docker network ls

52. Hands on: placing containers on a network
$ docker run -d --name es --net ramnet elasticsearch:2
$ docker run -it --net ramnet alpine sh
# ping es
# exit

Key Points
Docker Compose
Overview
Teaching: 0 min
Exercises: 0 minQuestions
How can we design the blueprint for a complex infrastructure?
Objectives
1. Preparation: individual!
- For this episode, deploy one CloudLab experiment per student.
- You can instantiate from your team’s Docker profile, but still, one experiment per student.
- Once the experiment is fully deployed, each student should confirm that they can run the following command:
$ docker info
$ docker run hello-world
2. Docker compose: why?
- Dockerfiles are great for building container images.
- Dockerfiles are not quite satisfactory if you have to link multiple containers into a complex infrastructure.
- We want the ability to write custom scripts (program everything!) to automatically build, run, and connect containers together.
- This is possible via Docker Compose.
- For Podman, it is called Buildah.
3. In a nutshell
- External, Python-based tool.
- Open source.
- Simple deployment workflow
- Checkout code
- Run
docker-compose up- Everything is up and running!
4. Overview of compose
- Design of a container stack is described in a YAML file called
docker-compose.yml.- Run
docker-compose up.- Compose automatically pulls images, builds containers, and starts them.
- Compose can
- Set up links, volumes, and other Docker options for the container stack.
- Run containers in the background or in the foreground.
5. Docker compose demonstration
- Run the following commands:
$ cd
$ git clone https://github.com/CSC468-WCU/ram_coin.git
$ cd ram_coin
$ docker-compose up
- Visit YOUR_CLOUDLAB_HEADNODE:8000 to see the deployed webserver.
- Does it work?
- Open another terminal, connect to your CloudLab headnode and run
docker psto see how many containers were deployed by the docker-compose.- Press
Ctrl-Cto stop the containers.
6. Sections of a compose file
- Use
catornanoto viewdocker-compose.yamlfile.versionis mandatory (“2” or later).servicesis mandatory. A service is one or more replicas of the same image running as containers.networksis optional and indicates to which networks containers should be connected. By default, containers will be connected on a private, per-compose-file network.volumesis optional and can define volumes to be used and/or shared by the containers.
7. Compose file versions
- Version 1 is legacy.
- Version 2 has support for networks and volumes.
- Version 3 has support for deployment options.
8. Containers in docker-compose.yaml
- Each service in the YAML file must container either
buildorimage.buildindicates a path containing a Dockerfile.imageindicates an image name (local or on registry).- If both are specified, an image will be built from the build directory and named
image- Other parameters are optional and typically what you would add to docker run
- command = CMD
- ports = -p
- volumes = -v
9. Hands-on: Rerun ram_coin in background
$ docker-compose -d up
$ docker-compose ps
10. Hands-on: cleanup
$ docker-compose kill
$ docker-compose rm
Key Points
Kubernetes
Overview
Teaching: 0 min
Exercises: 0 minQuestions
How does Kubernetes work with Docker?
Objectives
Knowing how to deploy services using Kubernetes
1. Preparation:
- This episode will provide the main framework to link the services of your project together.
- For this episode, each team only need to modify their project repository.
- Create a new branch called kubernetes from your Docker branch.
- Visit Dr. Ngo’s Kubernetes branch and and make sure that all files in your kubernetes branch match up with the files from
csc468cloud’s kubernetes branch.
- Having team members double/triple check!
- Each member then should instantiate from their team’s CloudLab project profile.
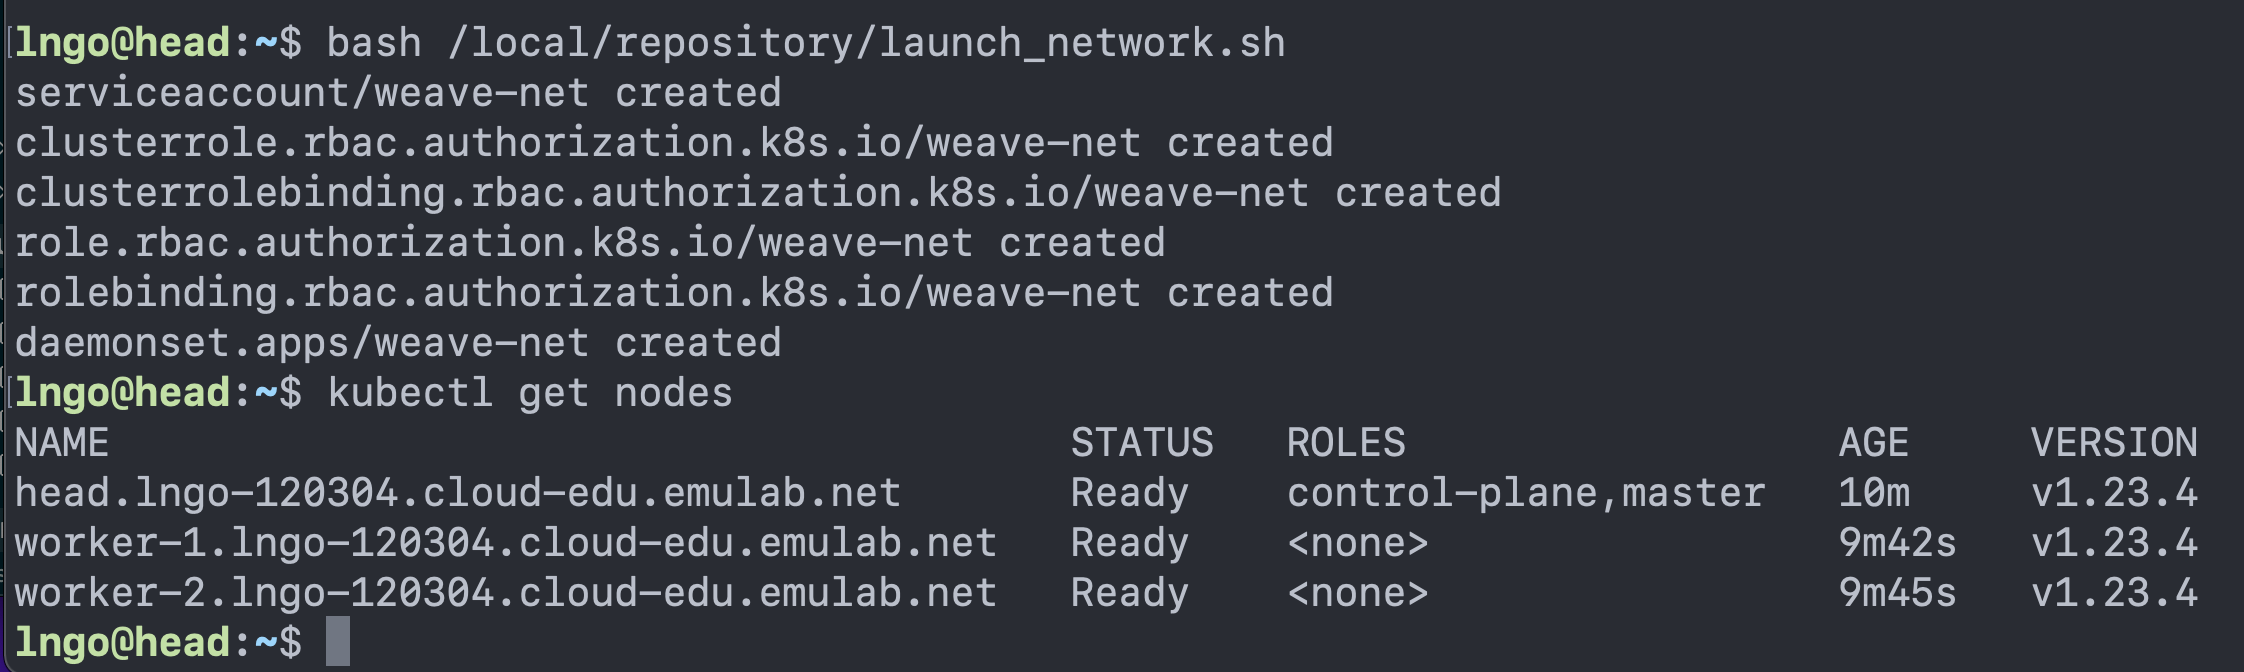
- Once the experiment is fully deployed, and all Startup Finished running:
- SSH into the head node and run the followings
$ cd
$ bash /local/repository/launch_network.sh
$ kubectl get nodes
2. Automated Kubernetes Deployment
- This is done via Kubernetes Objects, described through YAML files.
- Kubernetes objects are persistent entities in the Kubernetes system, which represent the state of your cluster.
- What containerized applications are running (and on which nodes)
- The resources available to those applications
- The policies around how those applications behave, such as restart policies, upgrades, and fault-tolerance
- A Kubernetes object is a “record of intent”–once you create the object, the Kubernetes system will constantly work to ensure that object exists. By creating an object, you’re effectively telling the Kubernetes system what you want your cluster’s workload to look like; this is your cluster’s desired state.
- Documentation
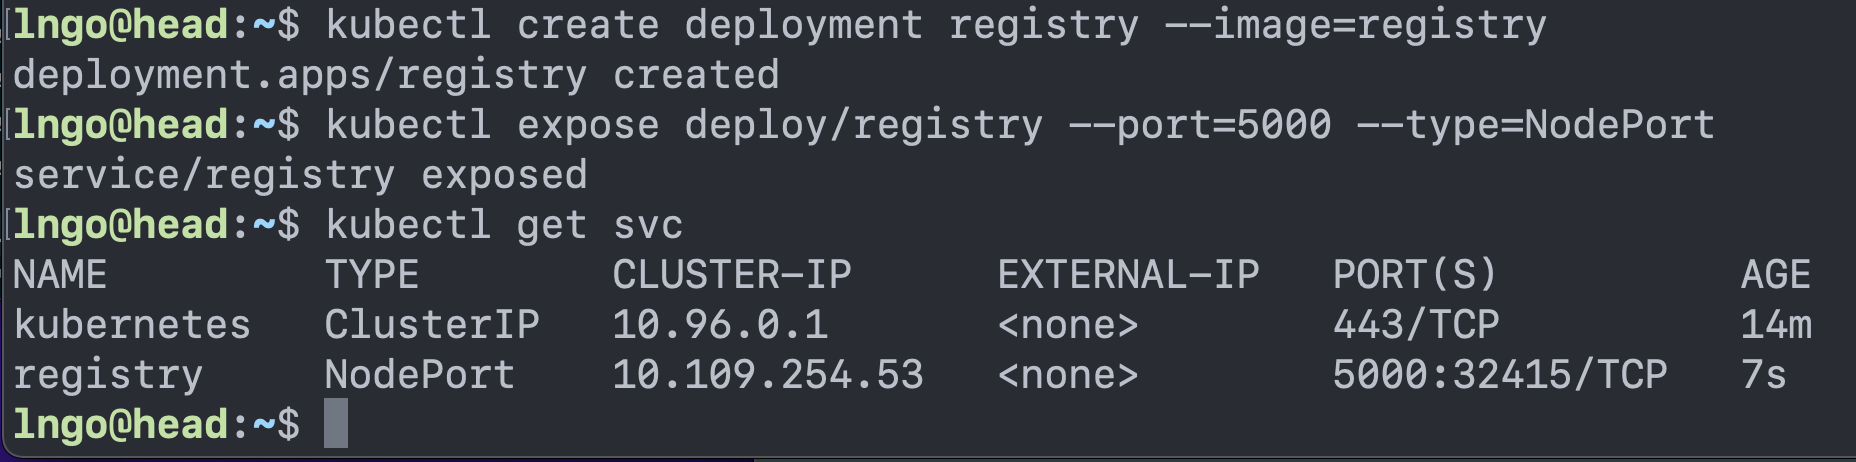
3. Sequence of commands to launch ram_coin on Kubernetes
- First, we deploy a registry service. This is equivalent to a local version of Docker Hub.
$ cd
$ kubectl create deployment registry --image=registry
$ kubectl expose deploy/registry --port=5000 --type=NodePort
$ kubectl get svc
- We can patch configurations of deployed services
$ kubectl patch service registry --type='json' --patch='[{"op": "replace", "path": "/spec/ports/0/nodePort", "value":30000}]'
$ kubectl get svc
- You can see the external port has now been changed (patched)

4. Building and pushing images for ramcoin
- We test our local registry by pulling
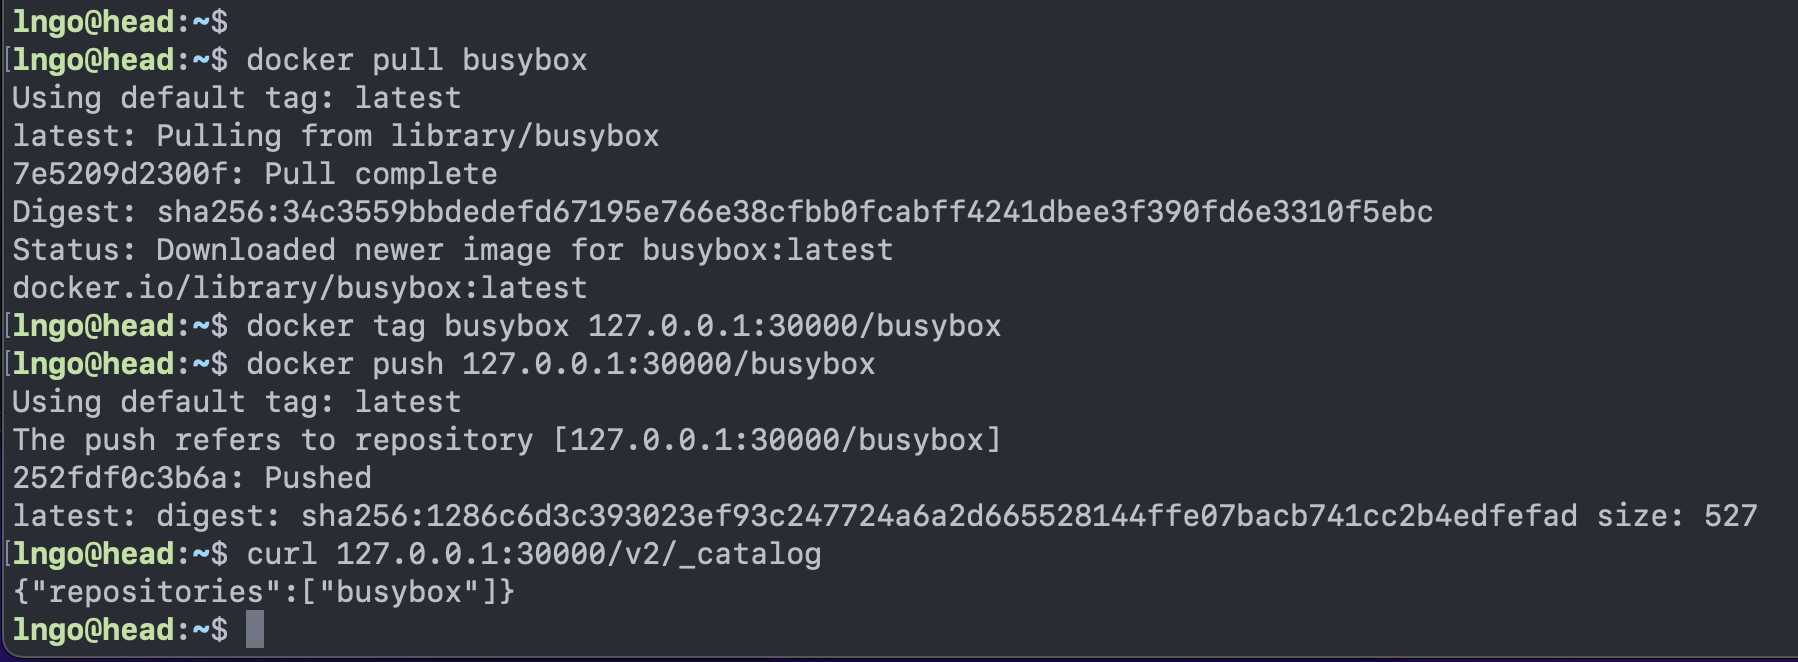
busyboxfrom Docker Hub and then tag/push it to our local registry.$ docker pull busybox $ docker tag busybox 127.0.0.1:30000/busybox $ docker push 127.0.0.1:30000/busybox $ curl 127.0.0.1:30000/v2/_catalog
- Next, we clone ramcoin repository
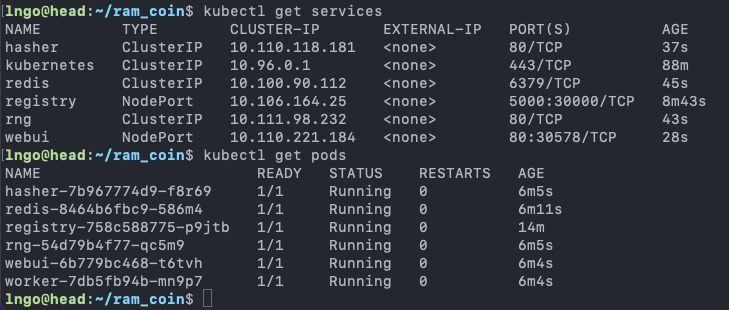
$ git clone https://github.com/CSC468-WCU/ram_coin.git
$ cd ~/ram_coin
$ docker-compose -f docker-compose.images.yml build
$ docker-compose -f docker-compose.images.yml push
$ curl 127.0.0.1:30000/v2/_catalog
$ kubectl create deployment redis --image=redis
$ for SERVICE in hasher rng webui worker; do kubectl create deployment $SERVICE --image=127.0.0.1:30000/$SERVICE:v0.1; done
$ kubectl expose deployment redis --port 6379
$ kubectl expose deployment rng --port 80
$ kubectl expose deployment hasher --port 80
$ kubectl expose deploy/webui --type=NodePort --port=80
$ kubectl get svc
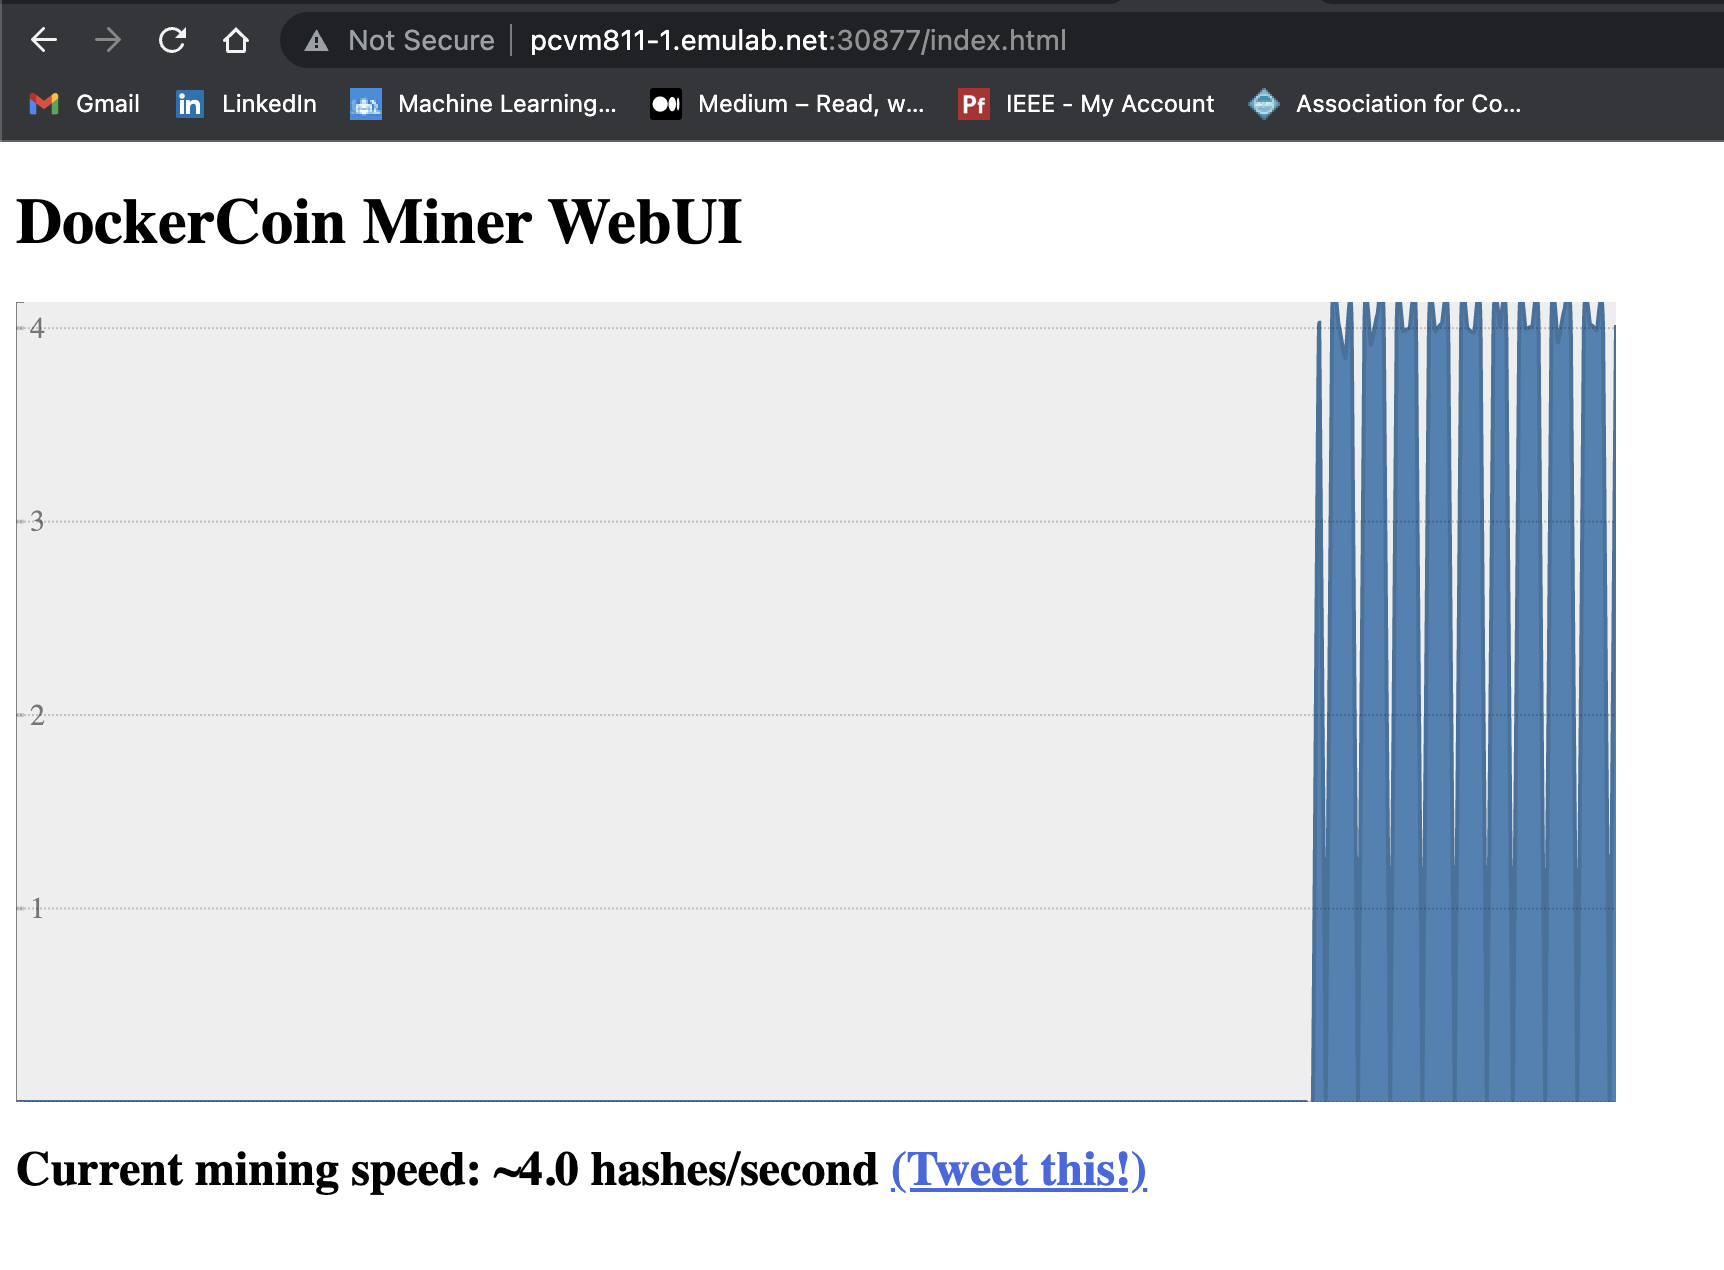
- Identify the port mapped to port 80/TCP for webui service. You can use this port and the hostname of the
headnode from CloudLab to access the now operational ram coin service.
svcis abbreviation forservices.- You can see the difference between
servicesandpods$ kubectl get services $ kubectl get pods

5. Exercise
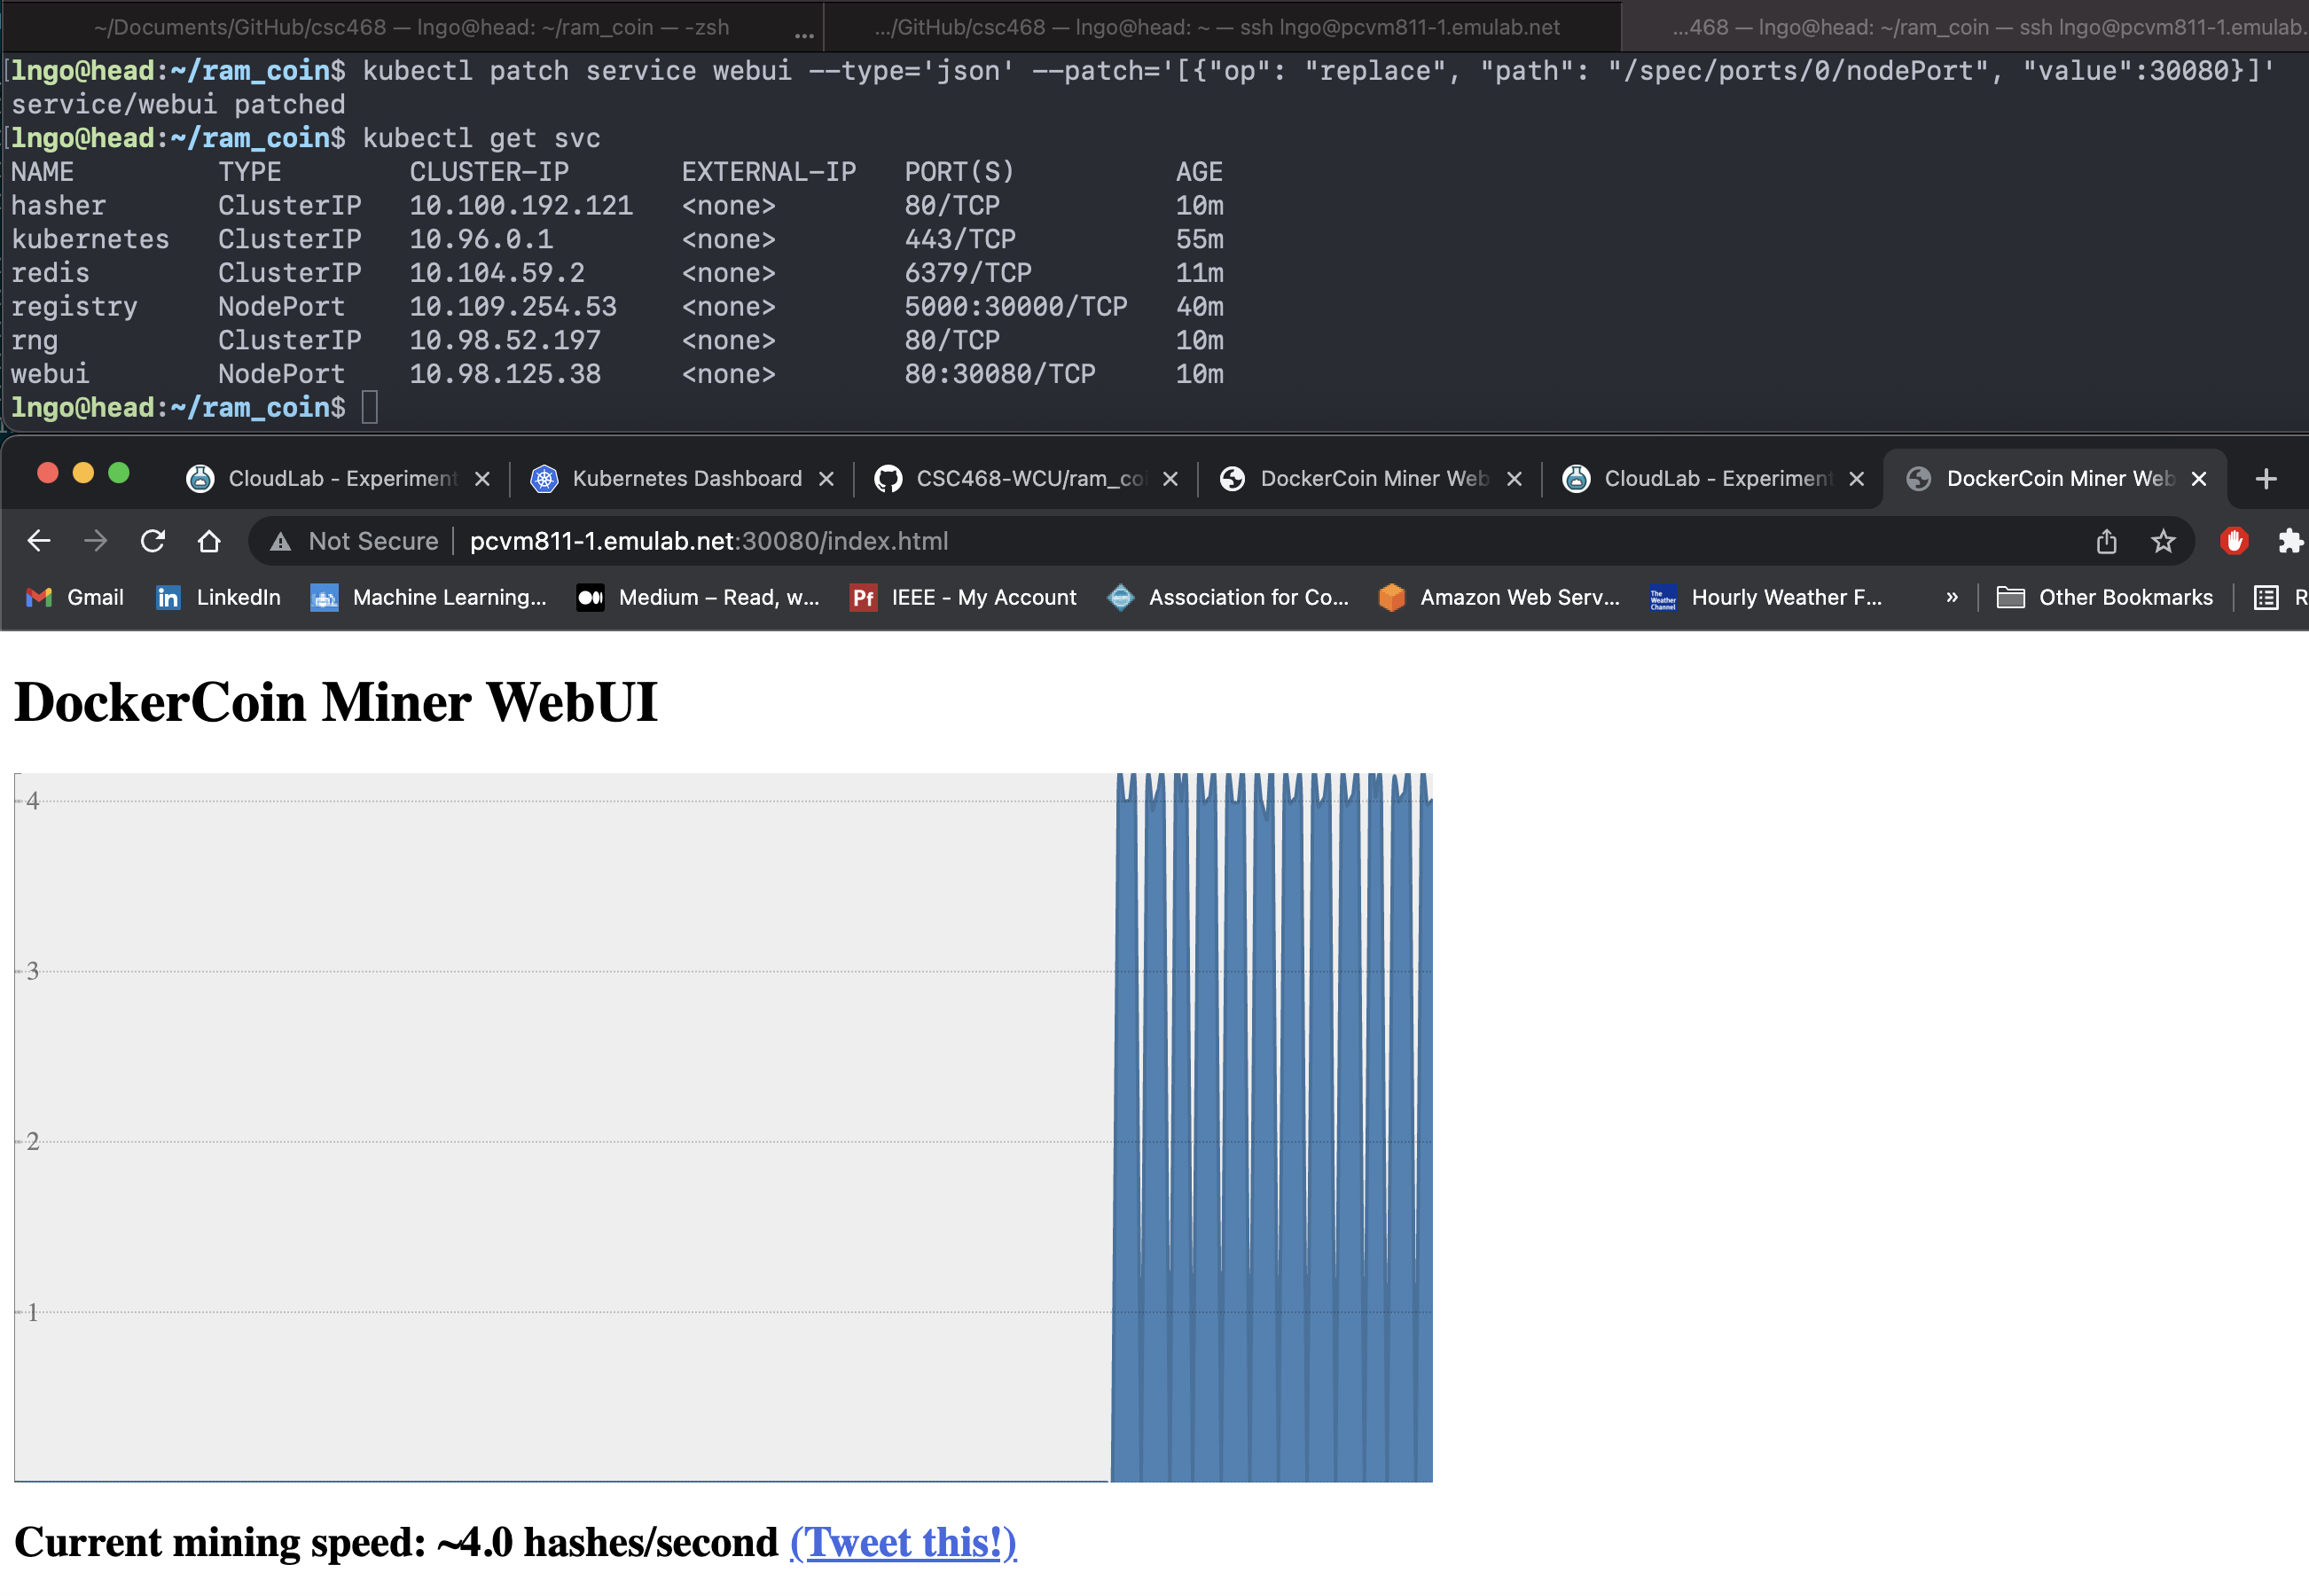
- Patch the webui service so that it uses port 30080 as the external port
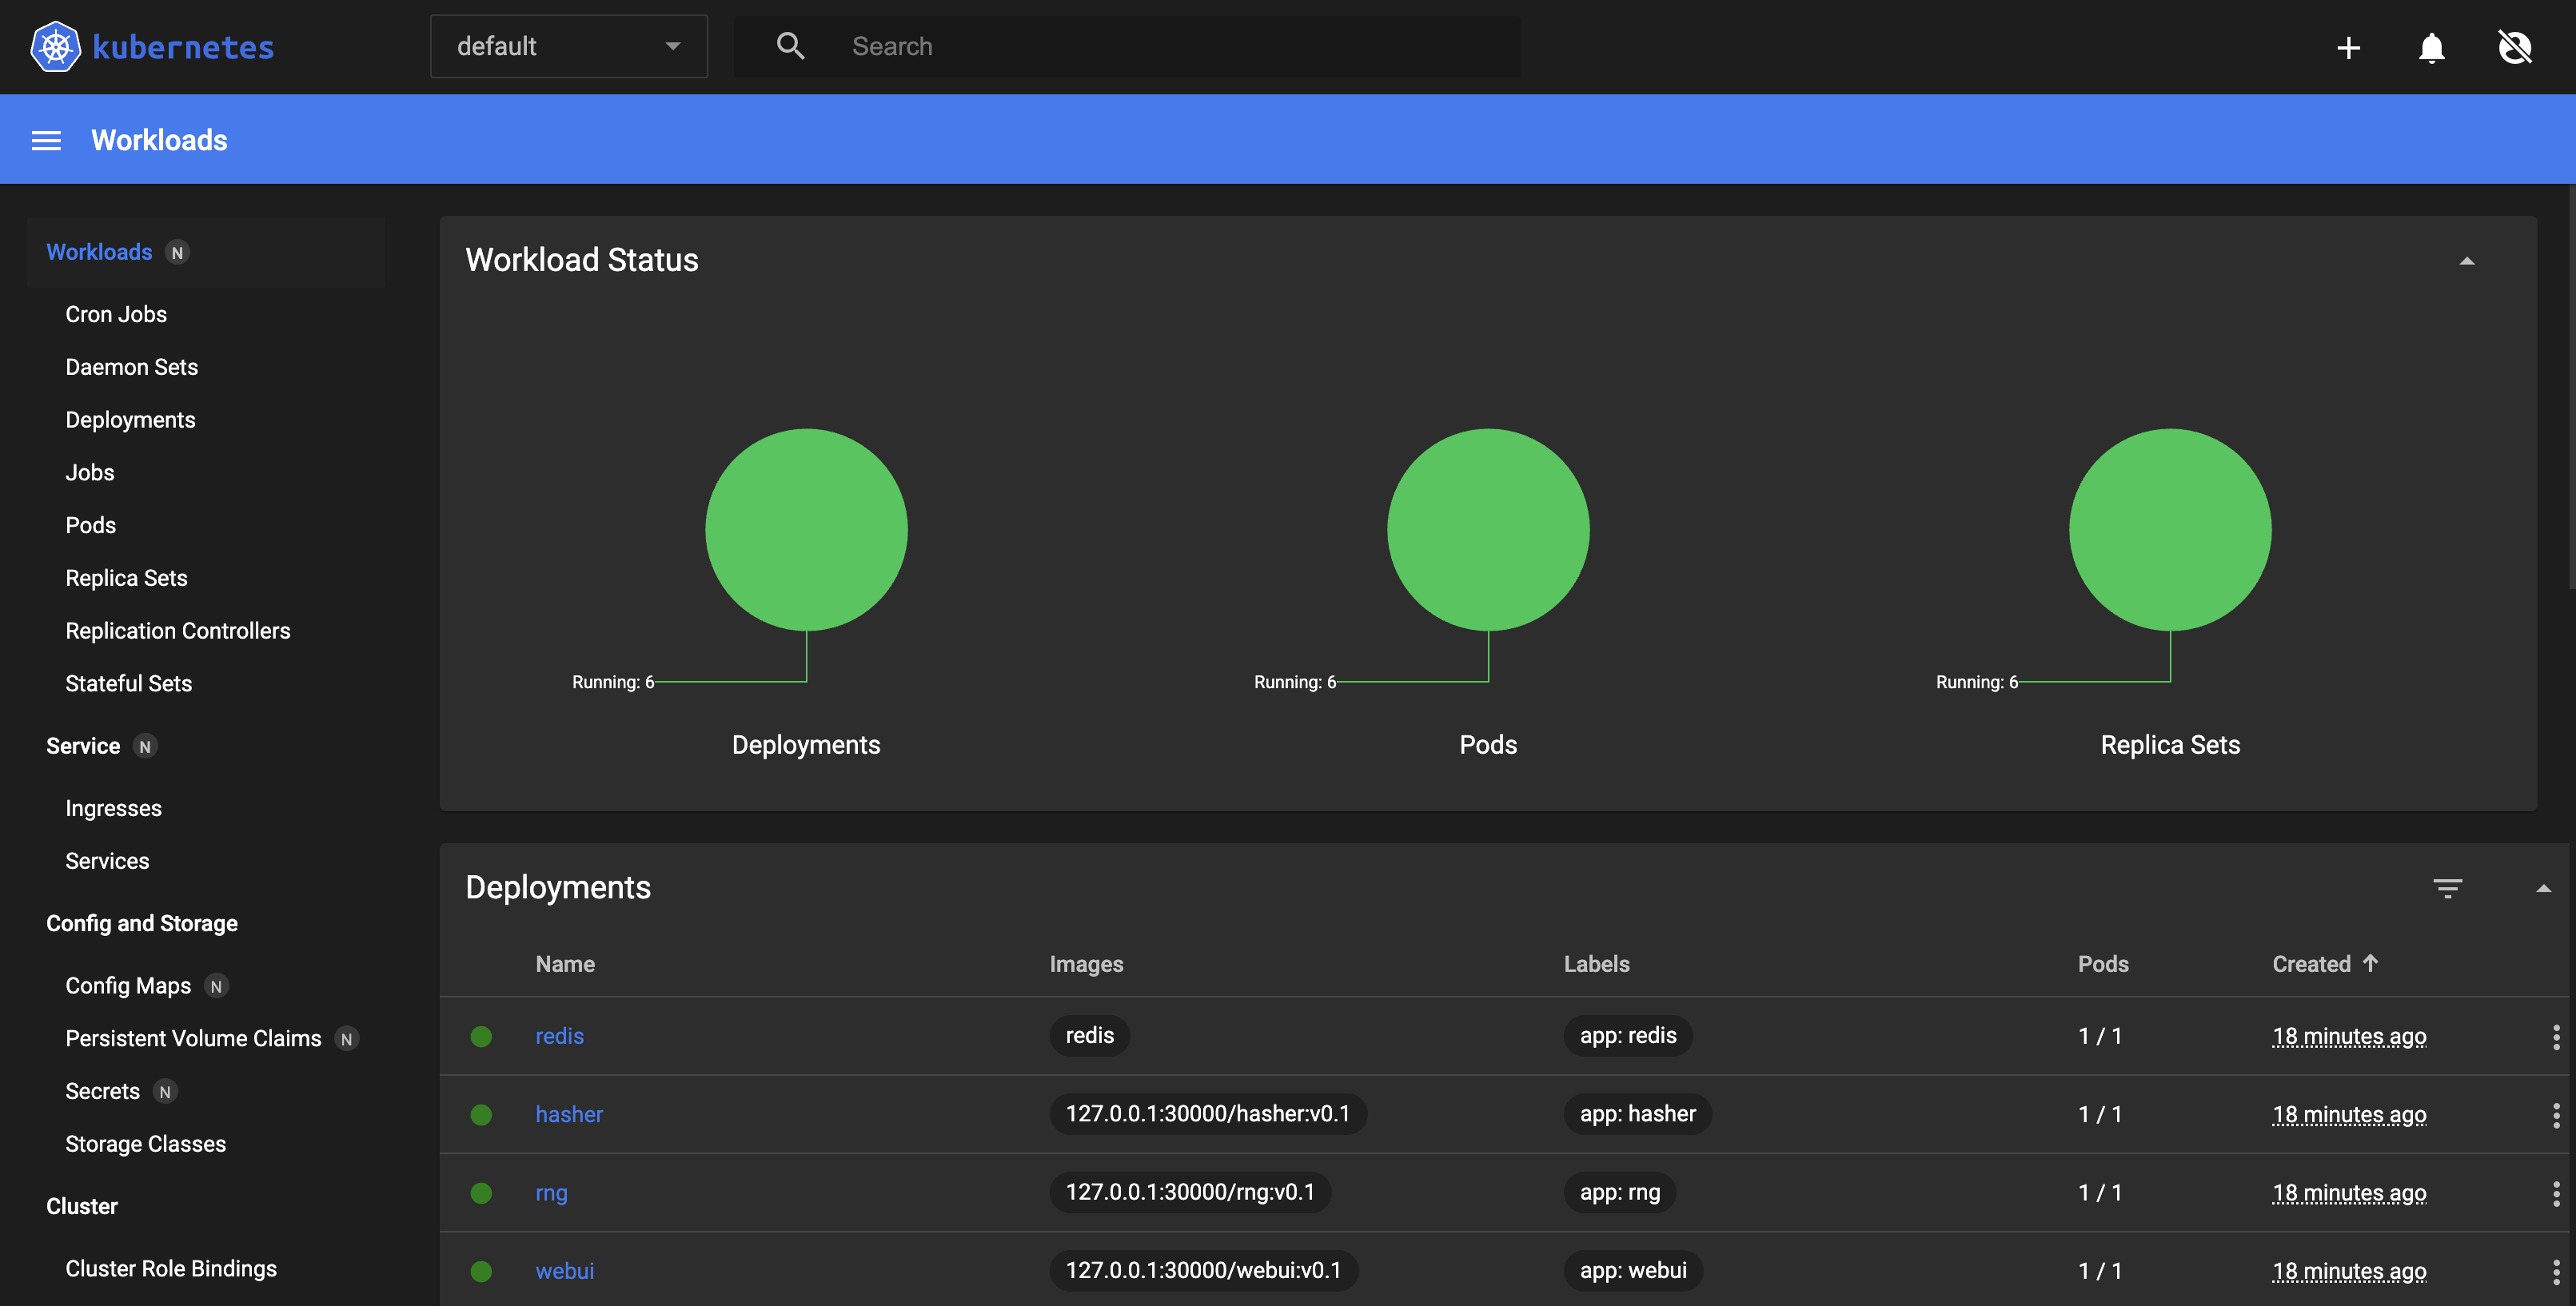
6. Setup a Kubernetes Dashboard
- Run the following commands from inside the
ram_coindirectory$ kubectl apply -f dashboard-insecure.yaml $ kubectl apply -f socat.yaml $ kubectl get namespace $ kubectl get svc --namespace=kubernetes-dashboard $ kubectl patch service kubernetes-dashboard -n kubernetes-dashboard --type='json' --patch='[{"op": "replace", "path": "/spec/ports/0/nodePort", "value":30082}]'
- Go to the
headnode URL at port30082forkubernetes-dashboard- Hit
skipto omit security (don’t do that at your job!).
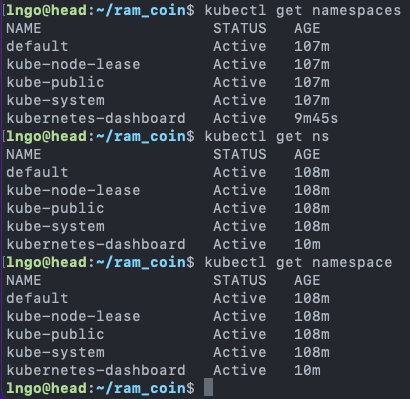
7. Kubernetes namespace
- Provides a mechanism for isolating groups of resources within a single cluster.
- Uniqueness is enforced only within a single namespace for namespaced objects (
DeploymentandServices)- Uniquess of other cluster-wide objects (
StorageClass,Nodes,PersistentVolumes, etc) is enforced across namespaces.- Run the following commands from inside the
ram_coindirectorynamespaces,namespaceorns$ kubectl get namespaces $ kubectl get ns $ kubectl get namespace
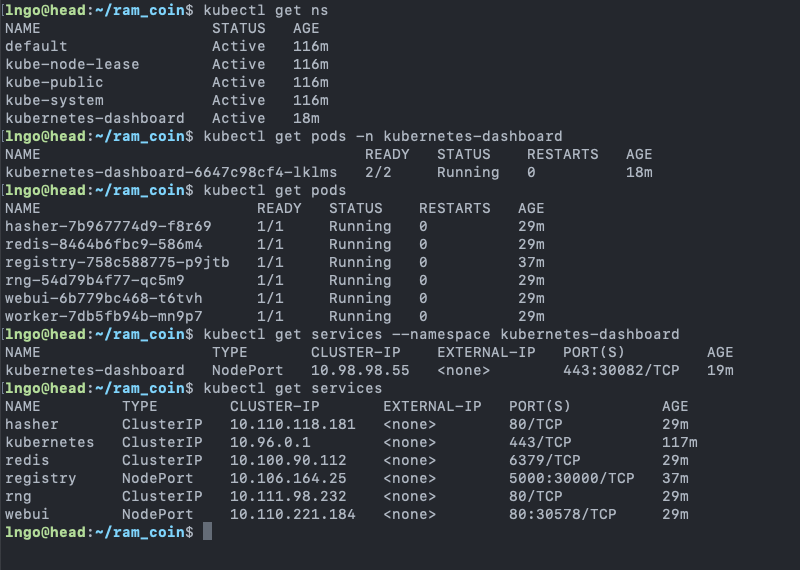
- Using
--namespaceor-nlet you specify a namespace and look at objects within that namespace.- Without any specification, it is the default namespace (
default)$ kubectl get ns $ kubectl get pods -n kubernetes-dashboard $ kubectl get pods $ kubectl get services --namespace kubernetes-dashboard $ kubectl get services
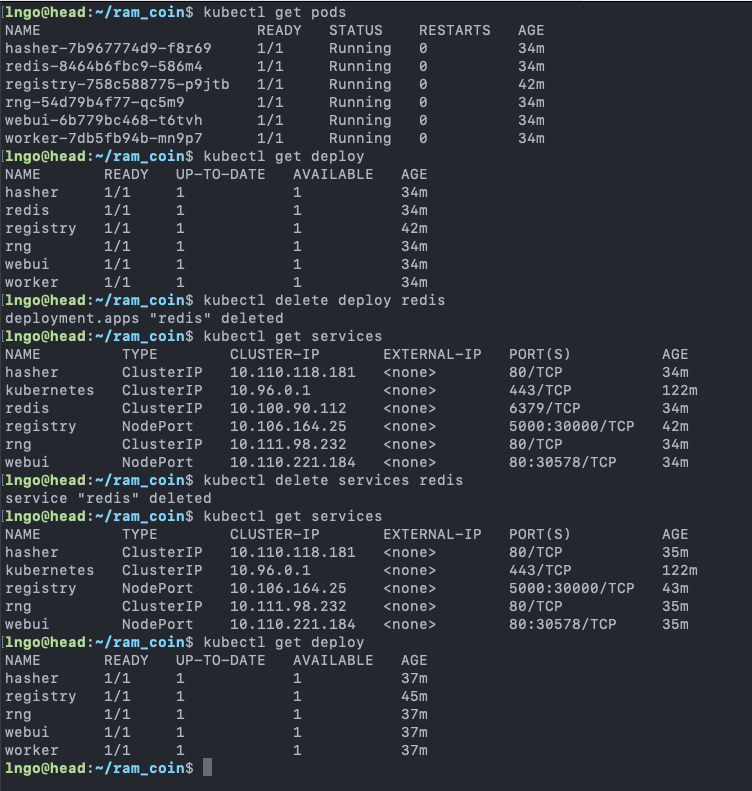
8. Remove pods and services
- Removing pods is equivalent to removing deployment
- Removing pods and services separately
$ kubectl get pods
$ kubectl get deploy
$ kubectl delete deploy redis
$ kubectl get services
$ kubectl delete services redis
$ kubectl get services
$ kubectl get deploy
9. Exercise
- Delete the rest of the ramcoin deployments and services in the default namespace
- Confirm via command line API and dashboard that everything stops running.
10. Automated Kubernetes Deployment
$ kubectl create namespace ramcoin
$ kubectl create -f ramcoin.yaml --namespace ramcoin
$ kubectl get pods -n ramcoin
$ kubectl create -f ramcoin-service.yaml --namespace ramcoin
$ kubectl get services --namespace ramcoin
11. Automated recovery
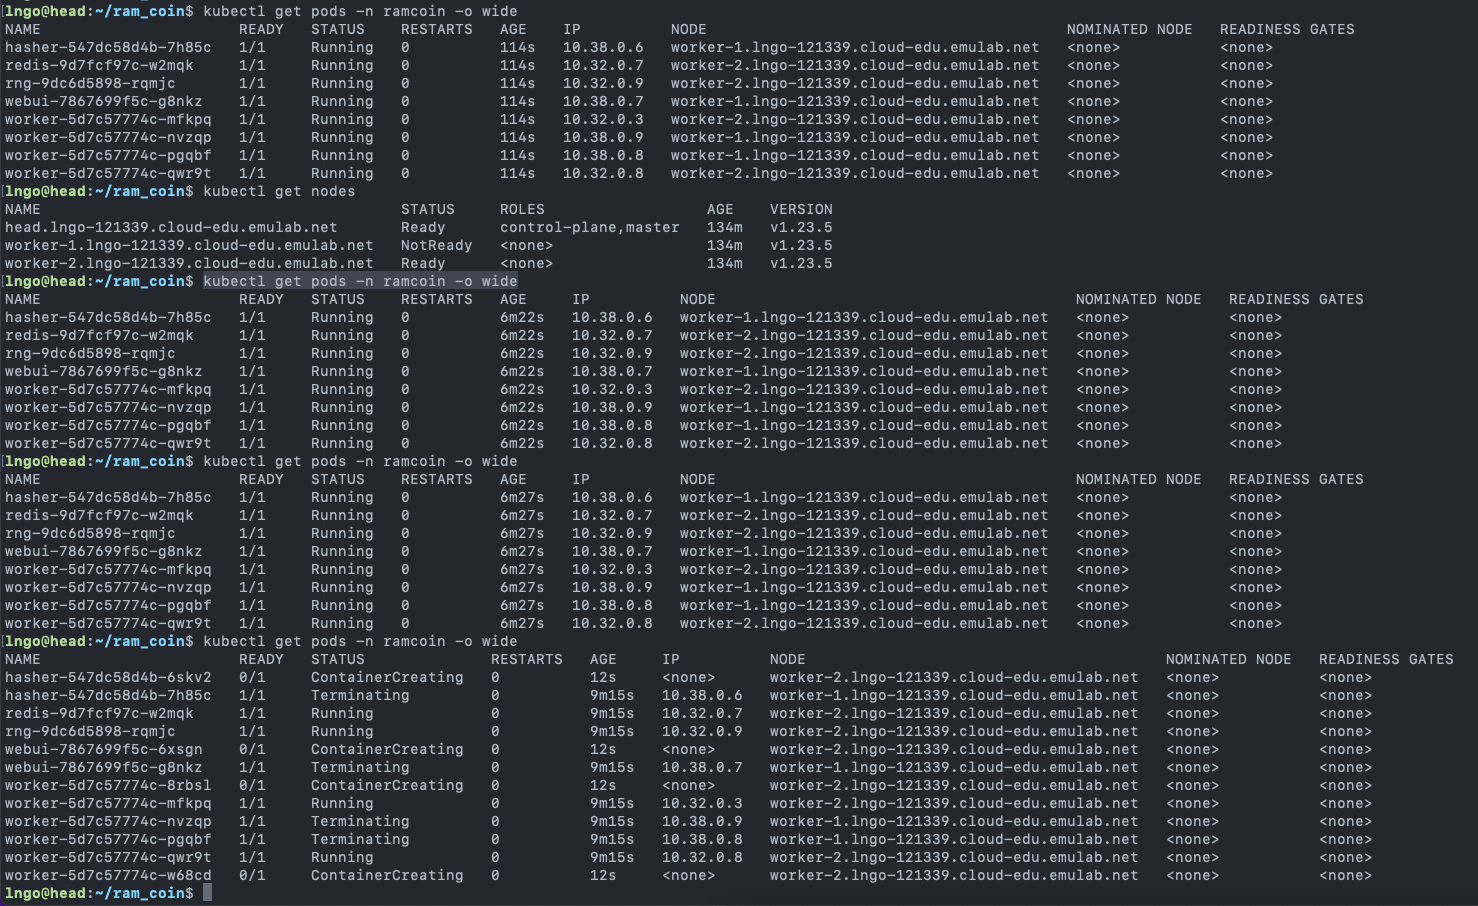
- Check status and deployment locations of all pods on the
headnode$ kubectl get pods -n ramcoin -o wide
- SSH into
worker-1and reset the Kubelet. Enterywhen asked.$ sudo kubeadm reset
- Run the following commands on
headto observe the events
- After a few minutes,
worker-1becomesNotReadyviakubectl get nodes- After five minutes,
kubectl get pods -n ramcoin -o widewill show that pods onworker-1being terminated and replications are launched onworker-2to recover the desired state of ramcoins.- The five-minute duration can be set by the
--pod-eviction-timeoutparameter.$ kubectl get nodes $ kubectl get pods -n ramcoin -o wide
Key Points
From Borg to Kubernetes
Overview
Teaching: 0 min
Exercises: 0 minQuestions
What does it mean to orchestrate?
What is the difference between traditional job management system and container management system?
Objectives
Understand the rise in abstraction levels as computing task moves from executing a job to running a container
Understand the relationship between container engine and container orchestration system
Be familiar with common open-source orchestration systems
1. What does orchestrate mean
- Dictionary definition: to arrange or combine so as to achieve a desired or maximum effect
- Recall Kubernetes documentation: We tell Kubernetes what the desired state of our system is like, and Kubernetes will work to maintain that
- Before containerization/virtualization, we have cluster of computers running jobs.
- Jobs = applications running on single or multiple computing nodes
- Applications’ dependencies are tied in to the supporting operating system on these nodes.
- Cluster management system only need to manage applications.
- Container is more than an application.
- A lightweight virtualization of an operating system and its components that help an application to run, including external libraries.
- A running container does not depending on a host computer’s libraries.
- Is the management process the same as a cluster management system?
2. Borg, a cluster management system
- Google’s Cluster Management System
- First developed in 2003.
- Abhishek Verma, Luis Pedrosa, Madhukar Korupolu, David Oppenheimer, Eric Tune, and John Wilkes. “Large-scale cluster management at Google with Borg.” In Proceedings of the Tenth European Conference on Computer Systems, p. 18. ACM, 2015.
- Manages hundreds of thousands of jobs, from many thousands of different applications, across clusters up to tens of thousands machines.
3. Why Borg and Kubernetes
- Borg is the predecessor of Kubernetes. Understand Borg helps understand the design decision in creating Kubernetes.
- Kubernetes is perhaps the most popular open-source container orchestration system today, for both academic and industry.
- Other container orchestration systems are either
- Deprecating (Docker Swarm)
- Integrates container management as part of the existing framework rather than developing a new management system (UC Berkeley’s Mesos and Twitter’s Aurora)
- We will briefly discuss them at the end of this episode.
4. Benefits of Borg
- Hides the details of resource management and failure handling so its users can focus on application development.
- Operates with very high reliability and availability, and supports applications that have similar requirements.
- Runs workloads across tens of thousands of machines efficiently.
- Is not the first system that can do these, but is one of the very few that can do it at such scale.
5. User’s perspective
- Work is submitted to Borg as jobs, which can have one or more tasks (binary).
- Each job runs in one Borg cell, consisting of multiple machines that are managed as a single unit.
- Job types:
- Long running services that should never goes down and have short-lived latency-sensitive requests: Gmail, Google Docs, Web Search …
- Batch jobs that take a few seconds to a few days to complete.
- Borg cells allow for not just applications, but applications frameworks
- One master job and one or more worker jobs.
- The framework can execute parallel applications itself.
- Examples of frameworks running on top of Borg:
- MapReduce
- FlumeJava: Data-Parallel Pipelines
- Millwheel: Fault-tolerant Stream Processing at Internet Scale
- Pregel: Large-scale graph processing
6. Clusters and cells in Borg
- Machines in cells belong to a single cluster, defined by the high-performance datacenter-scale network fabric connecting them.
- How is this different that the traditional cluster model?
- A Borg’s alloc defines a reserved set of resources on a machine in which one or more tasks can be run.
7. Jobs and tasks
- A job consists of multiple tasks
- Jobs have constraints that allow them to map to machines with satisfactory attributes
- Tasks:
- Each task maps to a set of Linux processes.
- Authors’ notes: Borg was not designed for virtualization (2003).
- Also has resource requirements (CPU cores, RAM, disk space, port available …)
- All Borgs’ programs are statically linked.
- What does this mean?
- Why?
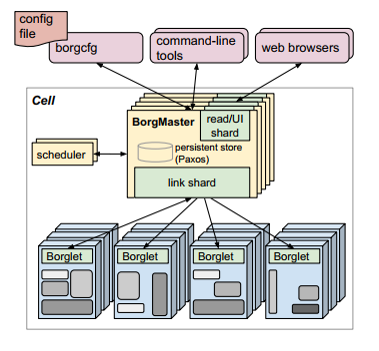
8. Borg’s architecture
- Borg Master
- Borglet
- Sound familiar? (Kuber Master and Kubelet)
9. Borg Master
- Consists of two process:
- The main Borgmaster process
- The scheduler
- Borgmaster:
- Replicated five times
- Contains in-memory copy of most of the state of the cell
- Handles client RPCs that either mutate state (create jobs) or provide read-only access to data.
- Manages state machines for all the objects in the system (machines, tasks, allocs …)
- Scheduler:
- Perform feasibility check to map tasks’ constraints to available resources.
- Picks one of the feasible machines to run the tasks.
10. Borglet
- Local Borg agent that is present on every machine in a cell.
- Starts and stops tasks, restarts if failed.
- Manages local resources through OS kernel manipulations
- Reports state of the machine to the Borgmaster.
11. Scalability of Borg Master
- Reported in the 2015 paper:
- Unsure of the ultimate scalability limit (flex anyone?)
- A single master can
- manage many thousands machines in a cell
- several cells have arrival rates of more than 10,000 tasks per minute.
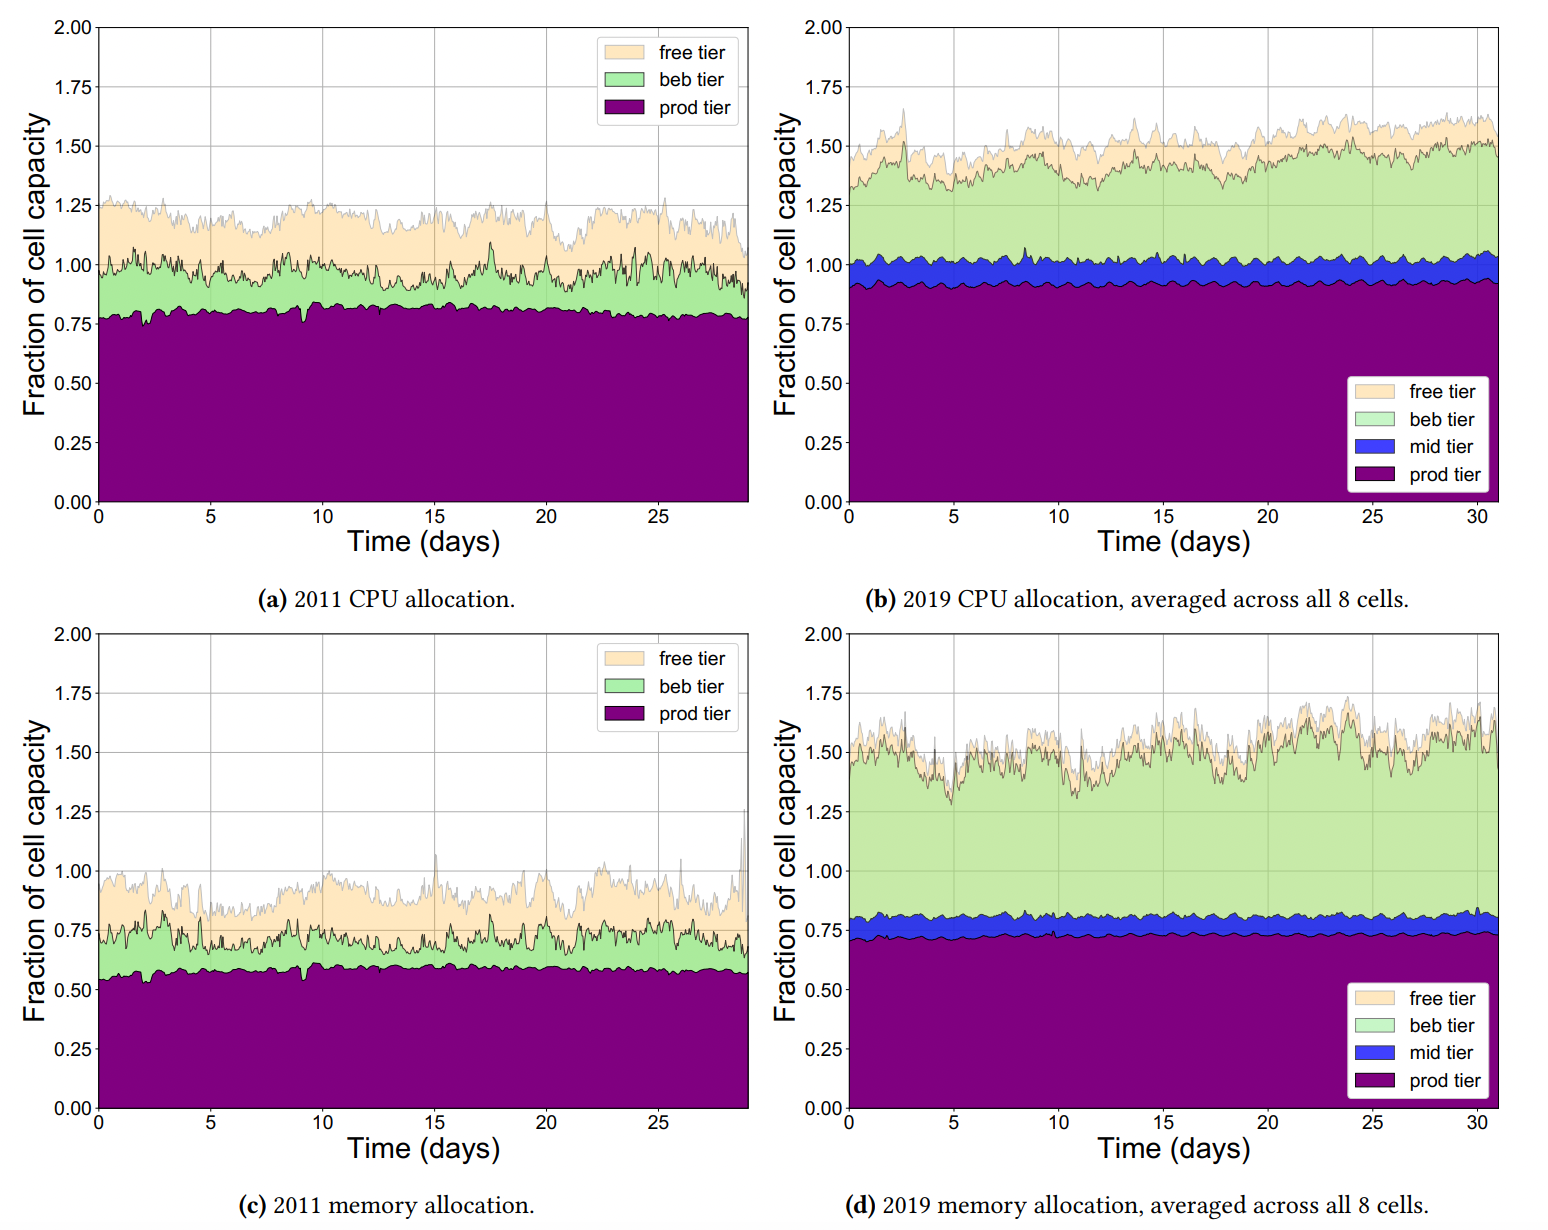
- 2020 Borg analysis report:
- (Muhamad Tirmazi, Adam Barker, Nan Deng, Md E. Haque, Zhijing Gene Qin, Steven Hand, Mor Harchol-Balter, and John Wilkes. “Borg: the next generation.” In Proceedings of the fifteenth European conference on computer systems)[https://dl.acm.org/doi/pdf/10.1145/3342195.3387517]
- 2011 log data: 1 cell, 12000 machines (40 GB compressed)
- 2020 log data: 8 cells, 96000 machines (350 GB compressed)
- The below graph show fraction of CPU and memory allocation of each category of priority queue **relative to cell’s capacity”.
- What is special about this?
- Keyword: overcommit since 2011.
12. Isolation
- Sharing machines between tasks help improving utilization
- Security Isolation:
- Need good security isolation mechanism among multiple tasks on the same machine.
chrootto jail processes. SSH-connection is used for communication.- VMs are utilized to sandbox external software (Google App Engine and Google Compute Engine). A VM is run as a single task.
- Performance isolation
- Application’s class: latency-sensitive and batch (batch can be allowed to starved)
- Resources:
- Compressible: rate-based and can be reclaimed without killing the tasks (CPU cycles, I/O bandwidth)
- Incompressible: cannot be reclaimed (memory, disk space)
13. Kubernetes: where does it come from
- Developed from lessons learned via Borg
- Become available with the initial release of Docker in March 2013
14. Kubernetes: applications versus services
- A service is a process that:
- is designed to do a small number of things (often just one).
- has no user interface and is invoked solely via some kind of API.
- An application is a process that:
- has a user interface (even if it’s just a command line) and
- often performs lots of different tasks. It can also expose an API,
- It is common for applications to call several service behind the scenes
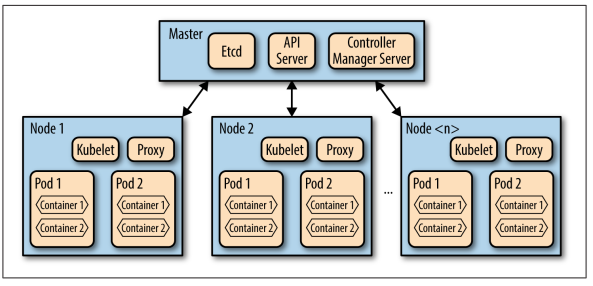
15. Kubernetes: what does it have?
- Kubelet: a special background process responsible for create, destroy, and monitor containers on a host.
- Proxy: a simple network proxy used to separate IP address of the container from the service it provides.
- cAdvisor: collects, aggregates, processes, and exports information about running containers.
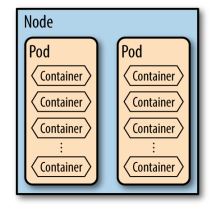
- Pods
- A collection of containers and volumes that are bundled and scheduled together because they share a common resource (same file system or IP address).
- Docker: Each container gets its own IP
- Kubernetes: Containers of a pod share the same address.
- A pod emulates a logical host (like a VM) to the containers.
- Important:
- Kubernetes schedules and orchestrates things at the pod level, not at the container level.
- Containers running in the same pod have to be managed together (shared fate).
- Management transparency: You don’t have to micromanage processes within a pod.
16. What Kubernetes learned from Borg
- Rejection of the
jobconcept and organize around the concept ofpods.
labelsare used to described theobjects(jobs,services, …) and their desired states.- IP addresses are mapped to
podsandservicesand not physical computers.- Optimizations for high-demand jobs.
- The perception of Kubernetes’ kernel as an operation system kernel for a distributed system.
17. Borg, Oemga, and Kubernetes
- Burns, Brendan, Brian Grant, David Oppenheimer, Eric Brewer, and John Wilkes. “Borg, Omega, and Kubernetes.” Queue 14, no. 1 (2016): 10.
- Borg:
- Isolation through the root file system (chroot, cgroups).
- A modern container is more than just an isolation mechanism: It is also an image, files that make up the applications that runs inside the container.
- Application-oriented infrastructure
- Containerization transform the data center from being machine-oriented to being application-oriented.
- Containers encapsulate the application environment, abstracting away many details of machines and OS from the application developer and the deployment infrastructure.
- Managing containers means managing applications rather than machines.
- Application environment
- Decoupling of image and OS.
- Hermetic image:
- What is hermetic?
- Encapsulation almost all dependencies except Linux kernel system-call interface.
- Containers as the unit of management
- Relieves application developers and operations teams from worrying about specific details of machines and OS.
- Provides the infrastructure team flexibility to roll out new hardware and upgrade the OS with minimal impact on running applications and their developers.
- Ties telemetry collected by the management system to applications rather than to machines.
18. Orchestration is only the beginning …
- Many new systems have been built around Borg to improve its container-management services
- Naming and service discovery
- Master election
- Application-aware load balancing
- Horizontal and vertical scaling
- …
- Kubernetes attempts to avoid escalating complexity through a consistent approach in its API.
19. Other container management system
- Recalling Hadoop YARN (Yet Another Resource Negotiator)
- Second generation scheduler for Hadoop (Open-source implementation of Google File System)
- Deployment of software frameworks as jobs
- Apache Mesos is more similar to YARN and Borg than Kubernetes
- Cluster management system
- Containers are executed as jobs.
- Twitter’s Aurora is a scheduler running on top of Mesos.
- Configurations are more complex, but is still a cluster management system.
Key Points
Container orchestration systems grow from traditional
Kubernetes Application: CI/CD pipeline - Part I
Overview
Teaching: 0 min
Exercises: 0 minQuestions
Being able to deploy a Jenkins server inside Kubernetes and integrate with GitHub for automated building/testing.
1. Preparation: individual!
- Each student should launch an experiment of their own.
- Visit Dr. Ngo’s Kubernetes-Jenkins branch and create a copy of this branch in your GitHub CloudLab profile repository.
- You can overwrite the existing main branch, or, even better, create a new branch.
- Once the experiment is fully deployed, and all Startup Finished running:
- SSH into the head node and run the followings
$ cd
$ bash /local/repository/launch_network.sh
$ kubectl get nodes
2. Introduction to Jenkins
- Jenkins
- Open-source automation server that allows continuous integration:
- Recognized whenever source code is changed and/or updated.
- Automatic building and testing of updated codes.
3. Deploy Jenkins on Kubernetes
- SSH to the headnode of your Kubernetes cluster.
$ kubectl create namespace jenkins
$ kubectl create -f /local/repository/jenkins.yaml --namespace jenkins
$ kubectl get pods -n jenkins
- Repeat the
kubectl get pods -ncommand a few time until you see that thejenkinspod is up and running.
- What did we just deploy: jenkins.yaml.
- Kubernetes’ deployment template.
spec.replicas: 1spec.containers:linhbngo/jenkins-gcc:latestspec.containers.ports:http-port:8000 andjnlp-port:50000- …
- Next, run the commands to create Service.
- A
Serviceis an abstraction that defines a logical set of Pods and a policy by which to access them.- The set of pods targeted by a service is determined by a
selector.- It allows the decoupling of the microservices provided by the pods and the actual pods themselves (which could be created and destroyed as needed).
- The service file for the Jenkins’ pod.
$ kubectl create -f /local/repository/jenkins-service.yaml --namespace jenkins
$ kubectl get services --namespace jenkins
$ kubectl get nodes -o wide
- Grab one of the values of
INTERNAL-IP, open a browser and go toINTERNAL-IP:30000
- To find the default password:
- Write down the
NAMEvalue from the first command and use that for the second command.$ kubectl get pods -n jenkins $ kubectl logs jenkins-794699f9bc-45tkq -n jenkins
- Copy and paste the initial admin password to the Jenkins’ page and hit
Continue.
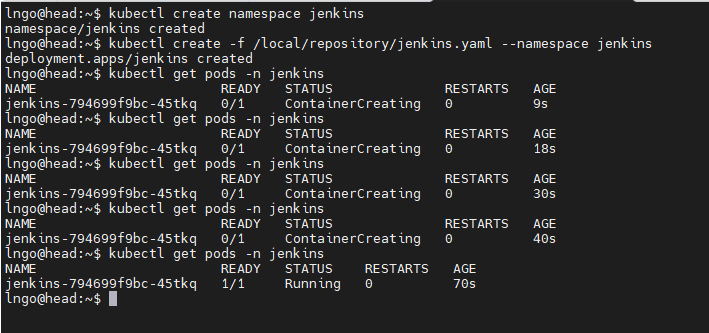

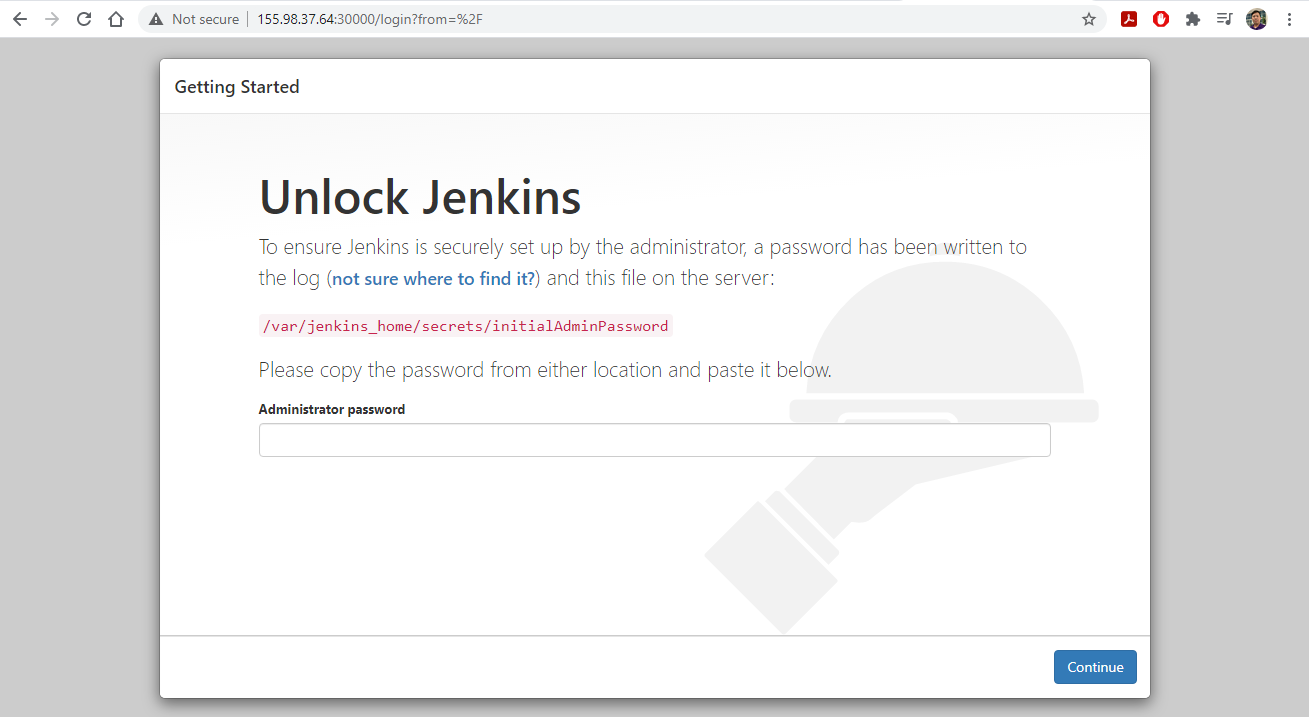
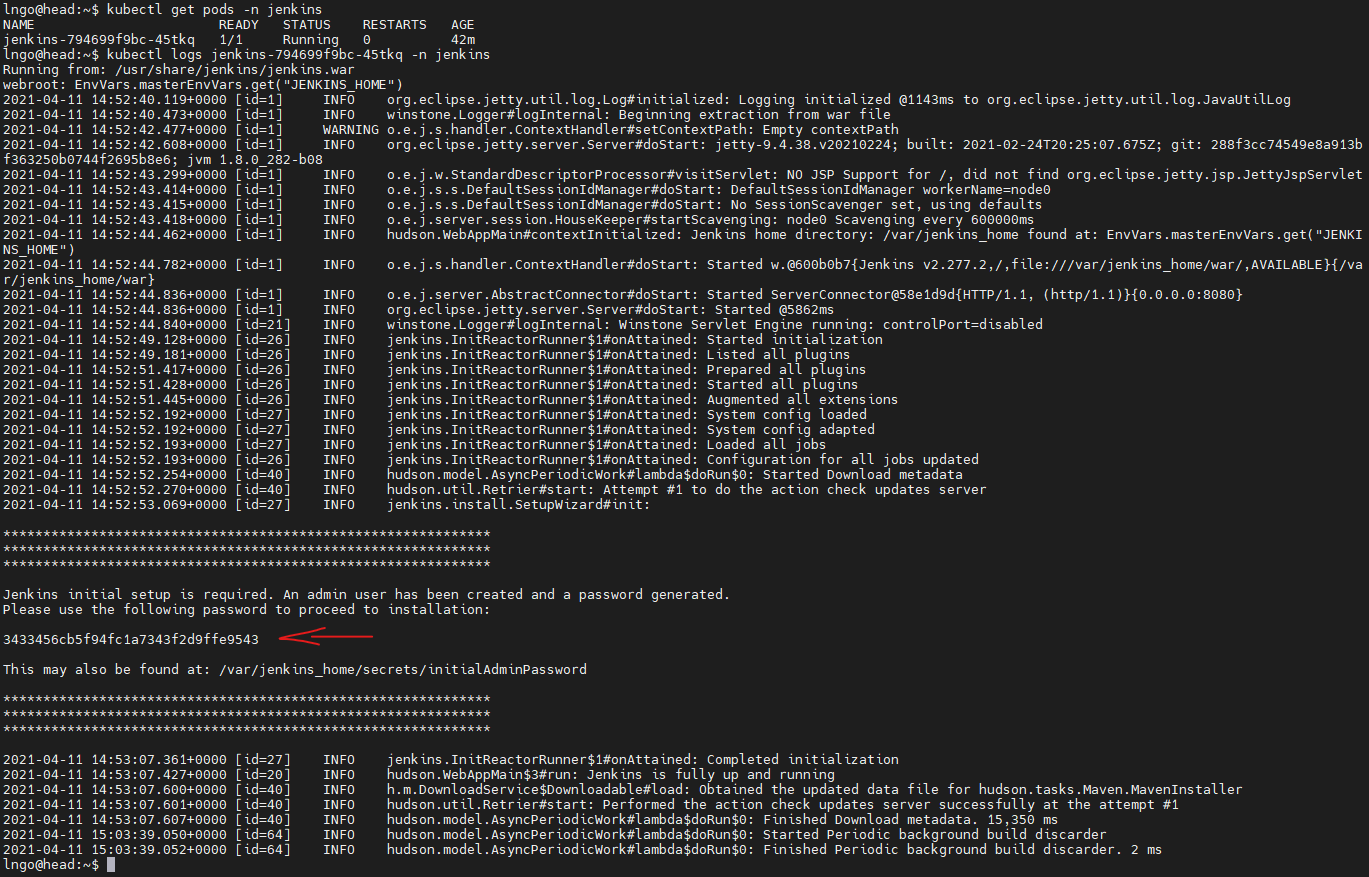
4. Configure Jenkins
- Click on
Install selected plugins
- You can either try to create the first admin user or Skip and continue as admin.
- Click
Save and Finish, thenStart using Jenkins
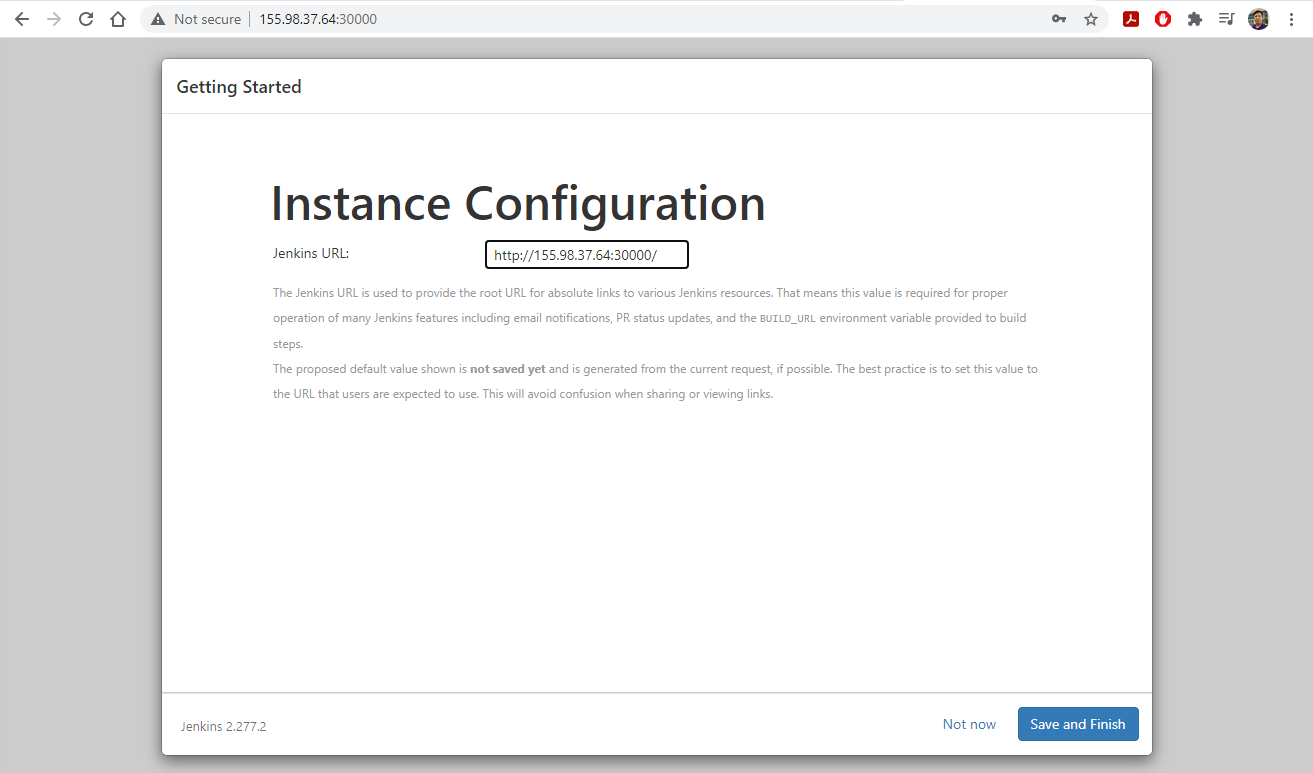
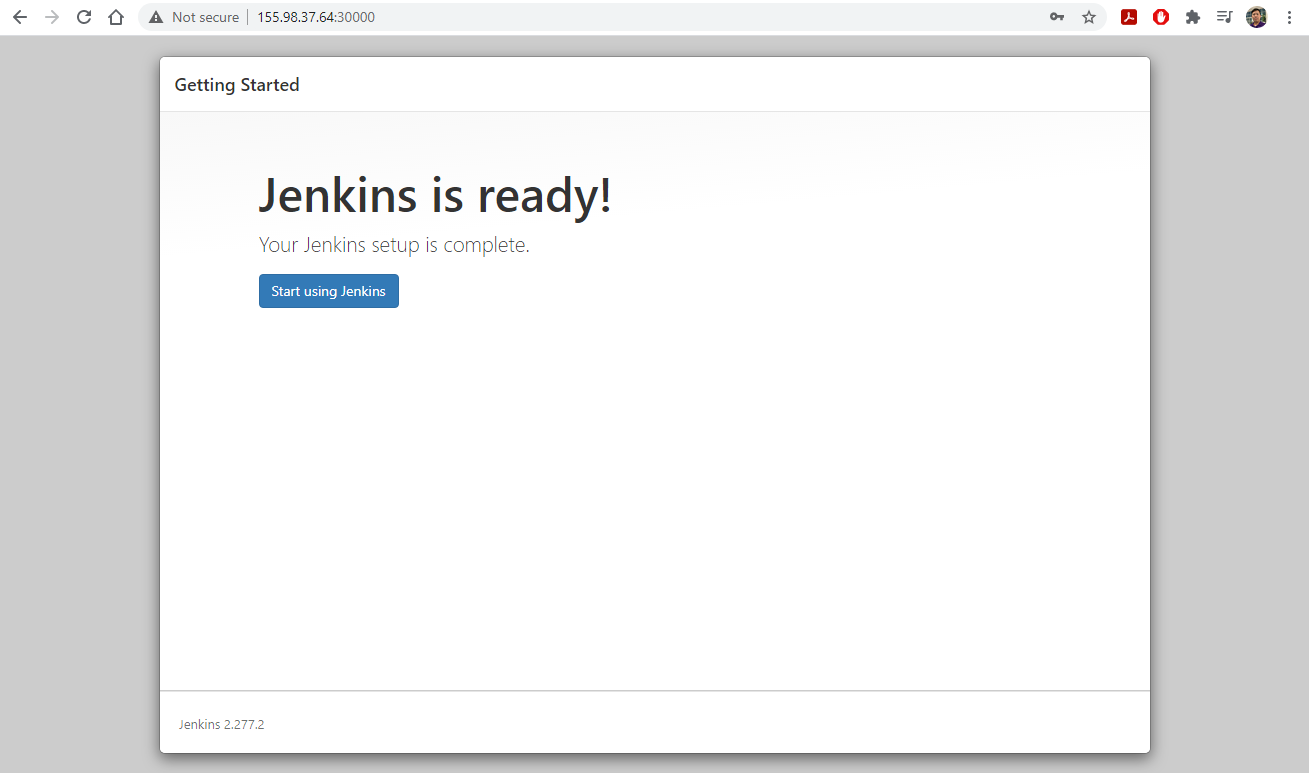
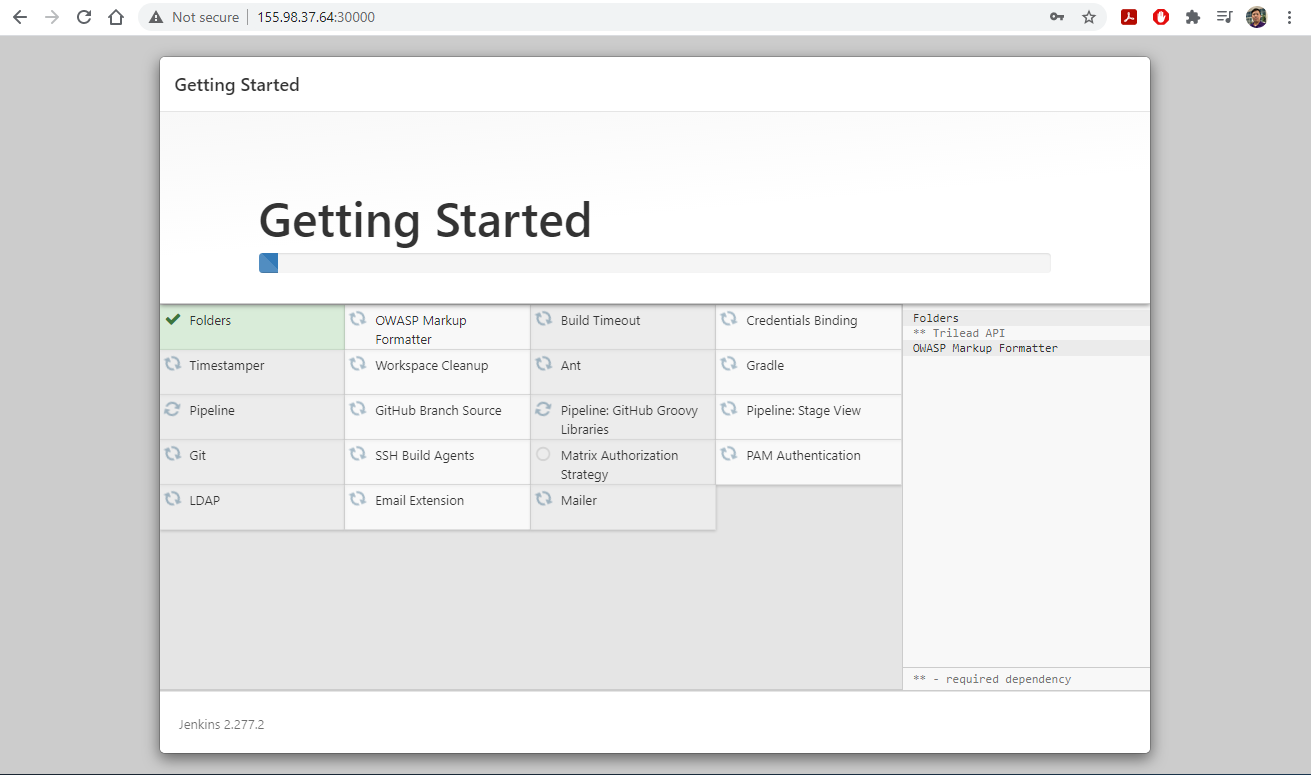
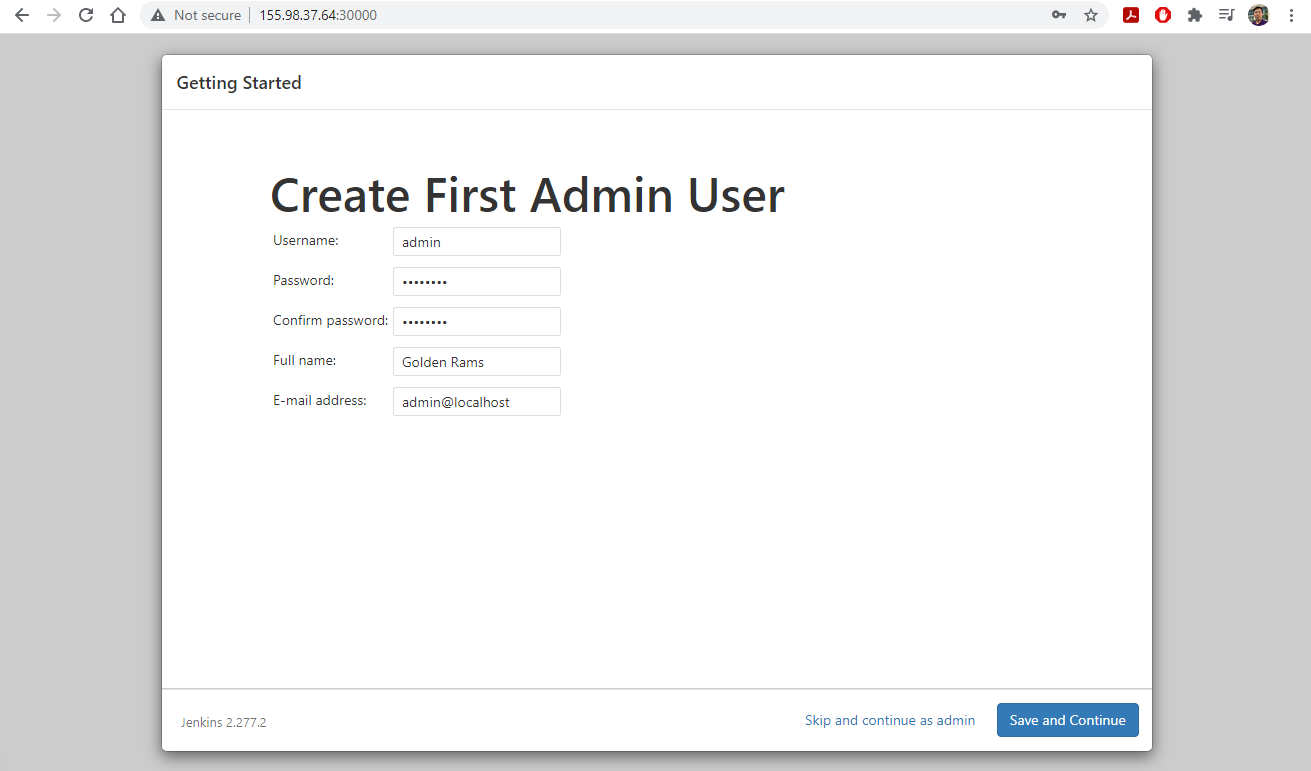
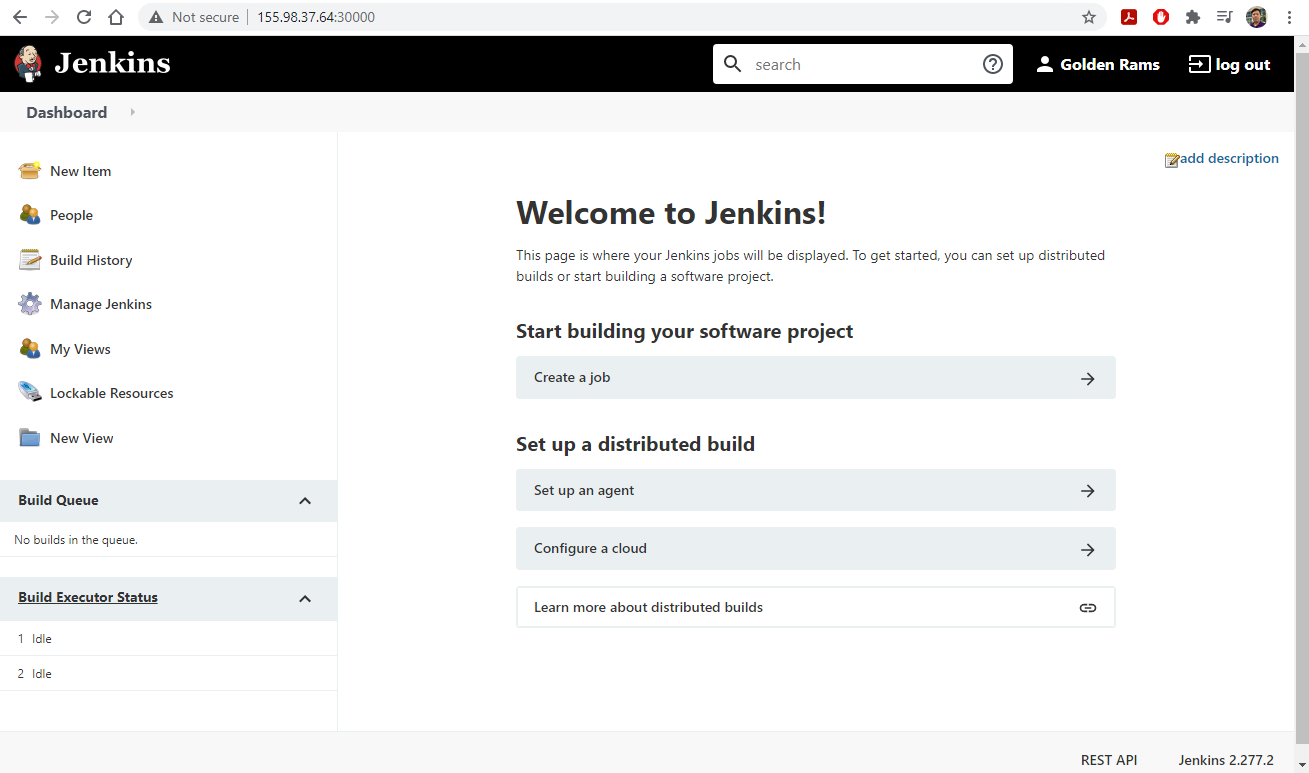
5. Integrate Git and Jenkins
- Create a new public GitHub repository named
hellowith the contents similar to this repository- In your
hellorepo, go toSettings/Webhooksand add a new webhook with the settings similar to the screenshot.
- NOTE: The Payload URL should be YOUR jenkin server URL.
- Click
Add webhookwhen done.
- On your Jenkins dashboard, select
New Item, then setup the new project with the settings similar to the screenshot below. CliclOKwhen done.
- Click
Source Code Management:
- Click
Build Triggersand selectGitHub hook trigger for GITScm polling.- Click
Build/Add build stepand selectExecute shell.
- Enter
makein the Command box, then clickSave.
- Make an edit to your C file in the hello repo and observe how the jenkins server launches a build.
- Explore the interface to learn more about the details of the build.
- Try to push an incorrect edit to the C file and see how the Jenkins server update the build.
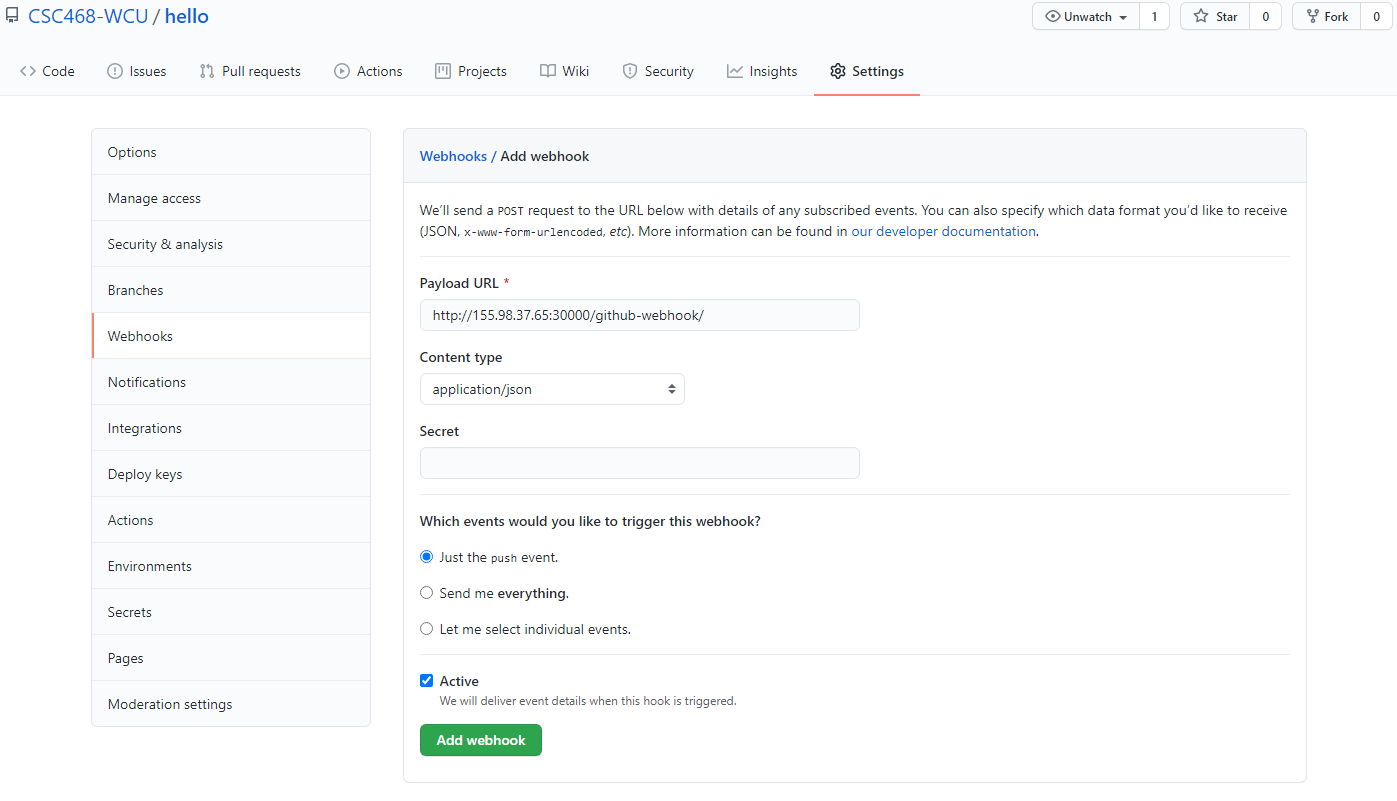


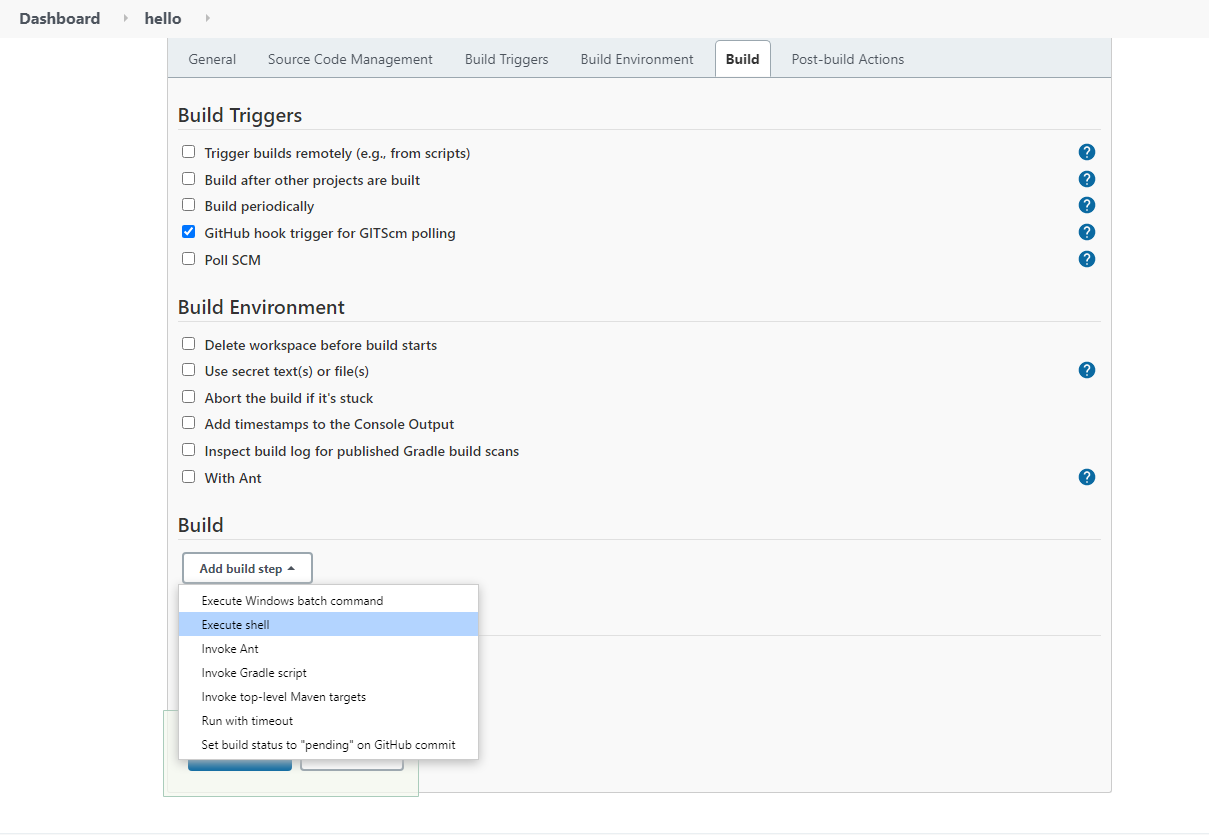
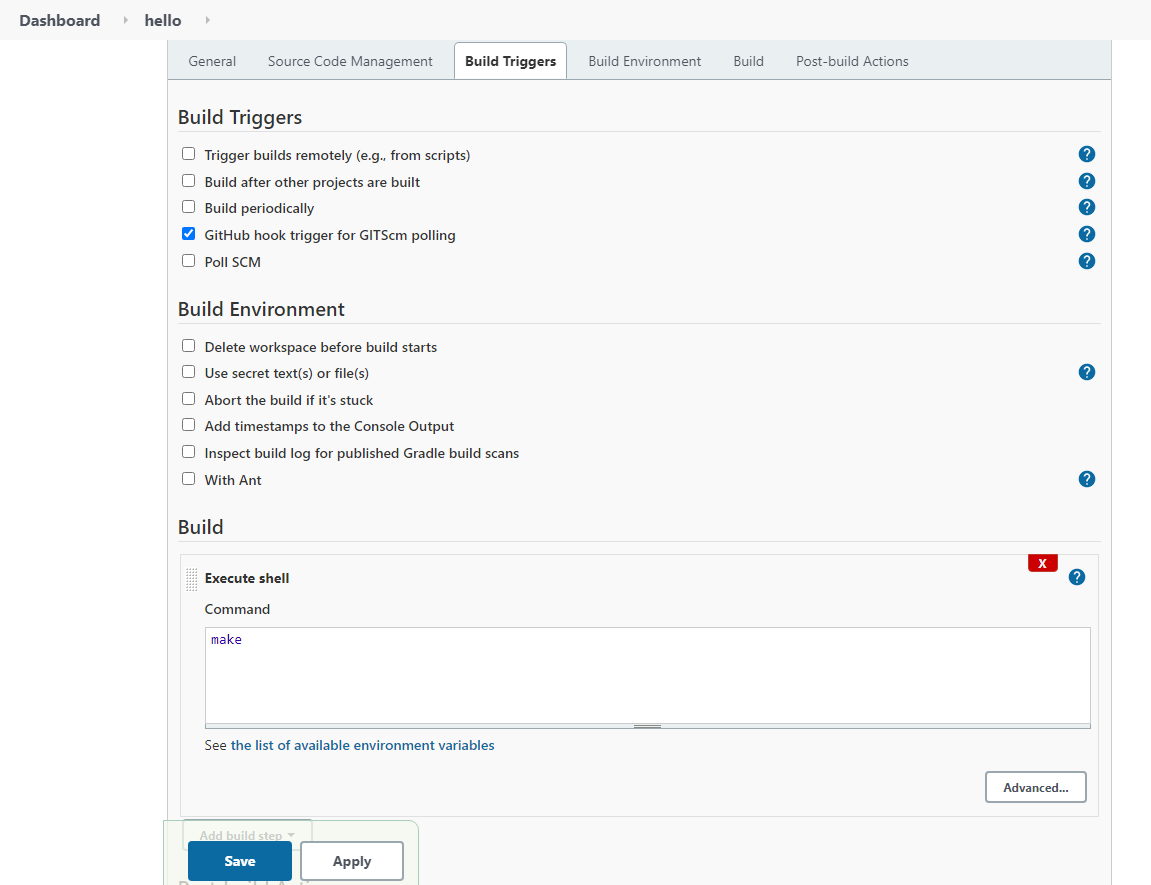
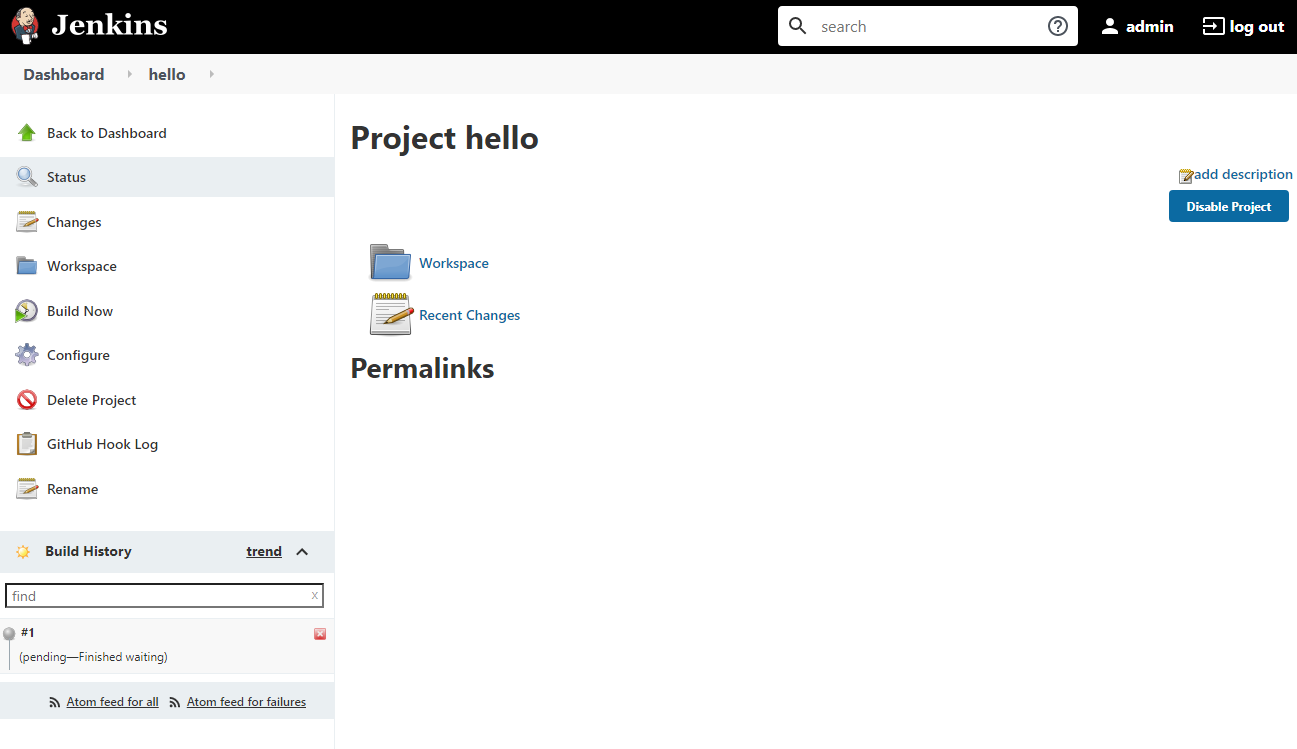
6. Setup Jenkins agents to run on the Kubernetes cluster
- Reminder: If you are launching a new experiment
$ bash /local/repository/launch_network.sh
- Expand NodePort range by editing
/etc/kubernetes/manifests/kube-apiserver.yamland add the following line:
service-node-port-range=30000-50000
sastands forservice account.$ kubectl create namespace jenkins $ kubectl create clusterrolebinding permissive-binding --clusterrole=cluster-admin --user=admin --user=kubelet --group=system:serviceaccounts $ kubectl -n kube-system create sa jenkins $ kubectl create clusterrolebinding jenkins --clusterrole cluster-admin --serviceaccount=jenkins:jenkins $ kubectl create -f /local/repository/jenkins.yaml --namespace jenkins $ kubectl create -f /local/repository/jenkins-service.yaml --namespace jenkinsAfter setup Jenkins (see slides 4), let’s add Kubernetes support
- Go to Manage Jenkins, then Manage Nodes and Clouds, go to the setting of the built-in node and set the number of executors to 0.
- Go to Manage Jenkins, then Manage Plugins
- Type
Kubernetesinto the search box and select the Kubernetes plugin.- Click
Install without Restart.- Scroll to the bottom of the following page and check the
Restart Jenkins after installingbox.- Wait until Jenkins restart and log back in.
- Manage Jenkins, then Manage Nodes and Clouds, then Configure Cloud.
- Select
KubernetesfromAdd a new clouddropbox.

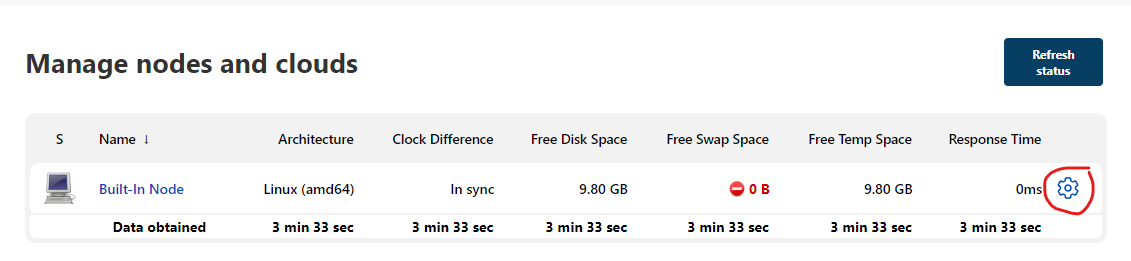


7. Setup Jenkins/Kubernetes: configure Kubernetes Cloud details
- Run
kubectl cluster-infoto get the information about theKubernetes control plane.$ kubectl cluster-info
- Enter the information as shown in the figure below:
Kubernetes URL: use the information fromKubernetes control plane.- Check
Direct Connectionbox.- Click
Test Connectionto confirm successful connection.


8. Setup Jenkins/Kubernetes: configure Pod Templates
- Click
Pod Templates.
- Click
Add Pod Template.- Click
Add Container.- Fill in information about the template for Pod/Container as shown below
- Click
Save.

9. Launch a new pipeline
Create a branch from your
hellorepository and named ithello_kube. Make sure that thishello_kubebranch is copied from the instructor’s hello repo’s hello_kube branch- In
Jenkins, create aNew Itemof typePipelineand name ithello_kube.- Under
Build Triggersand checkGitHub hook trigger for GITScm polling.- Under
PipelineselectPipeline script from SCM.- Once
SCMappears, selectGitand provide theRepository URLfor your hello repo.- Under
Branch to build, change*/masterto*/hello_kube.- Make sure that
Script Path, enterJenkinsfile.
- This is the
Jenkinsfilein thehello_kubebranch.- Click
Apply.
- Click
Save.

10. Where the wild things are
Key Points
Kubernetes Application: CI/CD pipeline - Part II
Overview
Teaching: 0 min
Exercises: 0 minQuestions
Being able to deploy a Jenkins server inside Kubernetes and integrate with GitHub for automated building/testing.
1. Updated Jenkins launch
- Launch an experiment from the
csc468lngoprofile using thekubernetes-jenkins-cdcibranch.- This branch is from kubernetes-jenkins-cdci.
- Once the experiment is fully deployed, and all Startup Finished running, SSH into the head node. You don’t have to do anything else.
- The launching of the overlay network is now fully automated and is integrated into the
kube_manager.shfile.
2. Setup Jenkins
- All normal commands to launch Jenkins have been integrated into
launch_jenkins.sh.$ bash /local/repository/launch_jenkins.sh
- To get the
initialAdminPassword, you can run the following command directly:$ kubectl exec $(kubectl get pods -n jenkins | grep jenkins | awk '{print $1}') -n jenkins -- cat /var/jenkins_home/secrets/initialAdminPassword
kubectl execallows users to run a bash command directly inside the specified pod.$(kubectl get pods -n jenkins | grep jenkins | awk '{print $1}')is a sequence of pipe commands:
$(kubectl get pods -n jenkinsget all pods| grep jenkinsparses the line containing the jenkins pod names| awk '{print $1}')gets the first column, which is the pod ID only.- Configure Jenkins via the web interface as shown in slide 3 and 4 of Kubernetes Application: CI/CD pipeline - Part I.
- Add the following plugins to Jenkins:
- Kubernetes
- SSH Agent
3. Configure Jenkins
In the subsequent slides, we are revisiting the configuration of Jenkins in a more organized manner.
- Configure SSH credentials
- Configure one single executor to support remote SSH execution
- Configure Kubernetes access for deploying Jenkins container-agents.
- Configure pod- and container-templates
4. Configure Jenkins: SSH credentials
- On the CloudLab head node, run
ssh-keygen(do not enter any password when asked).- Run
cat .ssh/id_rsa.pub >> .ssh/authorized_keys- Run
cat ~/.ssh/id_rsaand copy the displayed text, including the starting and ending dashes without any extra spaces.- On Jenkins Dashboard, go to
Manage Jenkins/Manage Credentials.
- Click on
JenkinsunderStores scoped to Jenkins, thenGlobal credentials (unrestricted).- Click on
Add Credentials.- Fill in the boxes as follows:
Kind: SSH Username with private nameScope: Global (Jenkins, nodes, items, all child items, etc)ID: cloudlabUsername: Enter your CloudLab login username here.Private Key: CheckEnter directly, clickAdd, then paster the previously copied private key to this box.- Click
OK.
5. Configure Jenkins: Single executor
- On Jenkins Dashboard, go to
Manage Jenkins/Manage Nodes and Clouds.
- Click on the gear icon for
Built-In Node- Fill in the boxes as follows:
Number of executors: 1Labels: deployUsage: Only build jobs with label expressions matching this node
6. Configure Jenkins: Kubernetes
- On Jenkins Dashboard, go to
Manage Jenkins/Manage Nodes and Clouds/Configure Clouds.- Select
KubernetesfromAdd a new clouddropbox.- Click on
Kubernetes Cloud Details.- Fill in the boxes as follows:
Kubernetes Name: kubernetesKubernetes URL: Information of theKubernetes control planegotten from runningkubectl cluster-infoon the CloudLab head node.- Check
Direction Connectionbox.- Click
Test Connectionto confirm connection.
7. Configure Jenkins: Pod Templates
- Continue on the
Configure Cloudsfrom the previous slide.- Click
Add Pod TemplatethenPod Template details- Fill in the boxes as follows:
Name: agent-templateNamespace: jenkinsUsage: Only build jobs with label expressions matching this node- Do not add container yet
- Click on
Add Volume:
- Select
Host Path Volume- Enter
/var/run/docker.sockfor bothHost pathandMount path.- This is to enable the building and pushing of Docker images.
8. Configure Jenkins: Container Templates
In the scope of
Pod Template
- Click
Add Container- Fill in the boxes as follows:
Container Template Name: golangDocker image: golang- Click
Add Container
Container Template Name: dockerDocker image: docker- Click
Add Environment Variablefor thedockercontainer template
- Prior to this, go to
hub.docker.comand login to your Docker Hub account.
- Go to Account Settings
- Go to
Security.- Click on
New Access Token.- Enter a short description for this token, allow
Access permissionto beRead, Write, Delete, and then clickGenerate.- Store this key some where safe.
- First environment variable:
Key: DOCKER_TOKENValue: the access token copied from before.- Second environment variable:
Key: DOCKER_REGISTRYValue: YOUR_DOCKERHUB_USERNAME/go_server- Third environment variable:
Key: DOCKER_USERValue: YOUR_DOCKERHUB_USERNAME- Click
Applyand thenSave.
9. Setup the app
- Create a branch called
go_appon yourhellorepository (from the hands-on in the Jenkins’ eposide).- The
go_appbranch should have the same contents as https://github.com/CSC468-WCU/hello/tree/go_app- Setup the
webhookfor thego_appto point to the Jenkins server in the previous slide.- The composition of the files in this branch is:
main.go: The Go file that serves as the web server (the application to be deployed).main_test.go: The Go file that serves as the test file (part of the CD process).Jenkinsfile: Setup the pipeline for Jenkins to build, test, and push and deploy (if test is passed) the Go app.
- Edit the
registry(line 4) to change toYOUR_DOCKERHUB_USERNAME/go_server.- Edit the
registry(line 5) to change toYOUR_DOCKERHUB_USERNAME.- Edit the
registry(line 73, 74, 75):
- Change my username
lngoto your CloudLab username.- Be careful of capitalization in your CloudLab username. It has to match exactly.
- Change the IP address to the correct IP address of your head node.
Dockerfile: The Docker image that will package the web server.deployment.ymlandservice.yml: K8 configuration files.
10. Setup the Jenkins pipeline
- Login to the Jenkins server.
- Select
New Item, and create a newPipelinenamedgo_server.
- On
Build Triggerstab, selectGitHub hook trigger for GITScm polling,- On
Pipelinetab, select the followings:
Definition: Pipeline script from SCM (this will open new options)SCM: GitBranch Specifier:go_app- Click
Save
- Click
Build Nowto activate the first build
- Open a new browser tab and visit the IP address of
headat port 32000 to see the running server
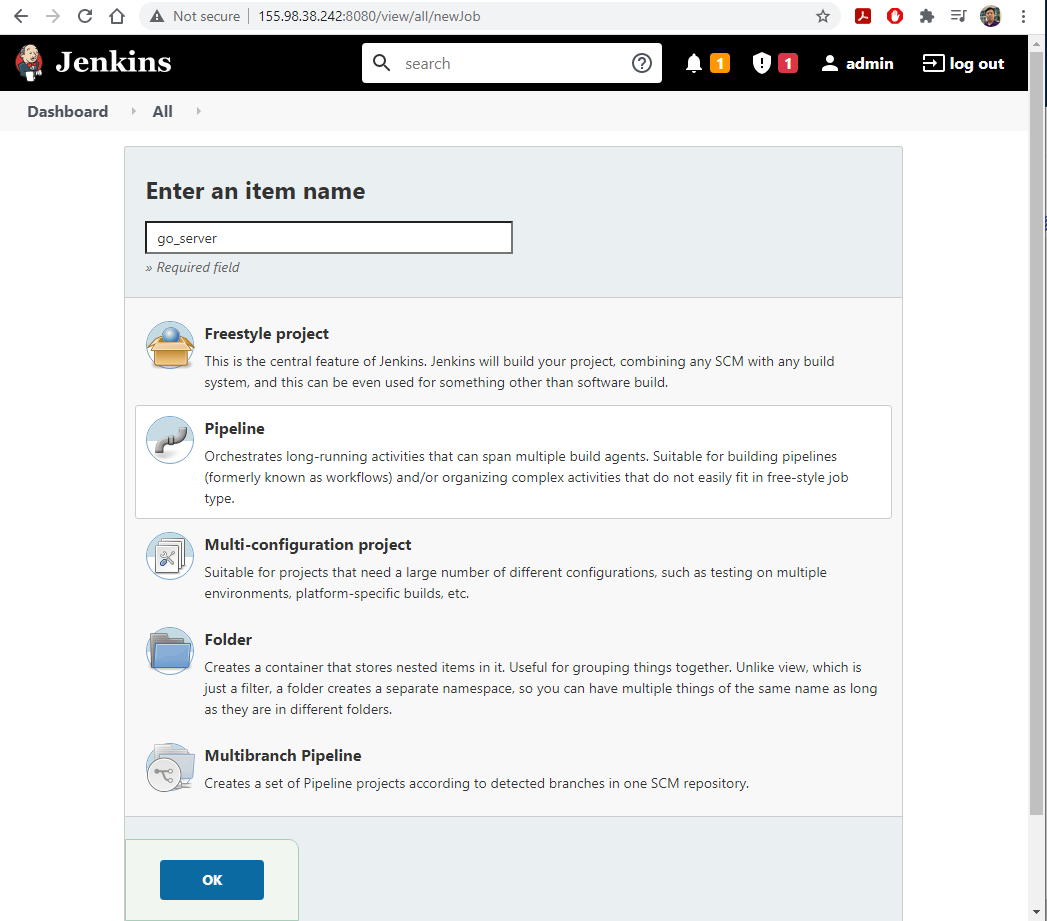
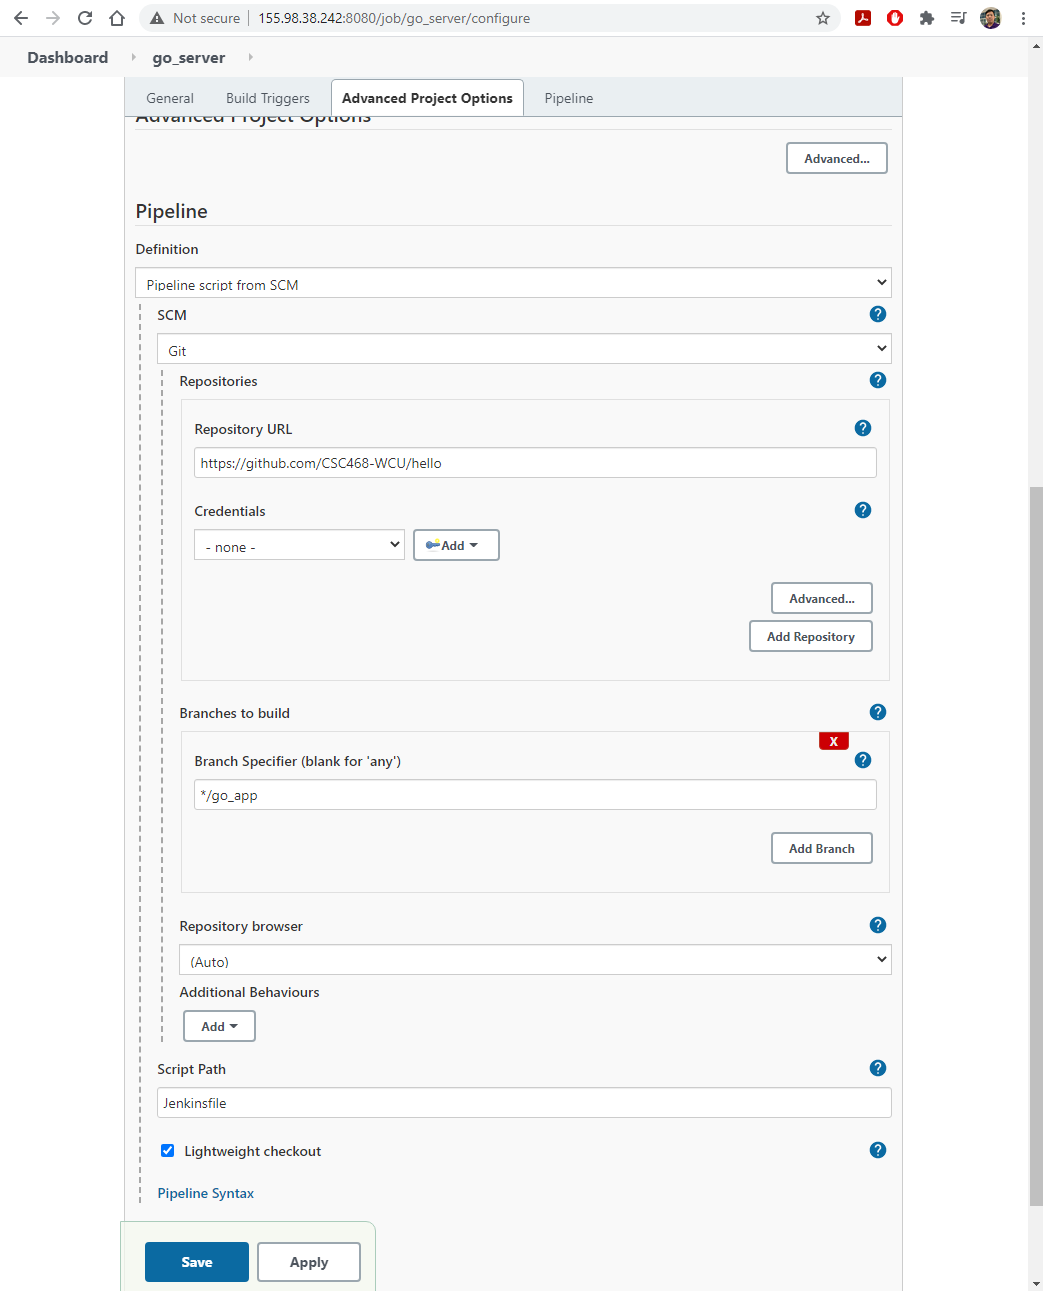
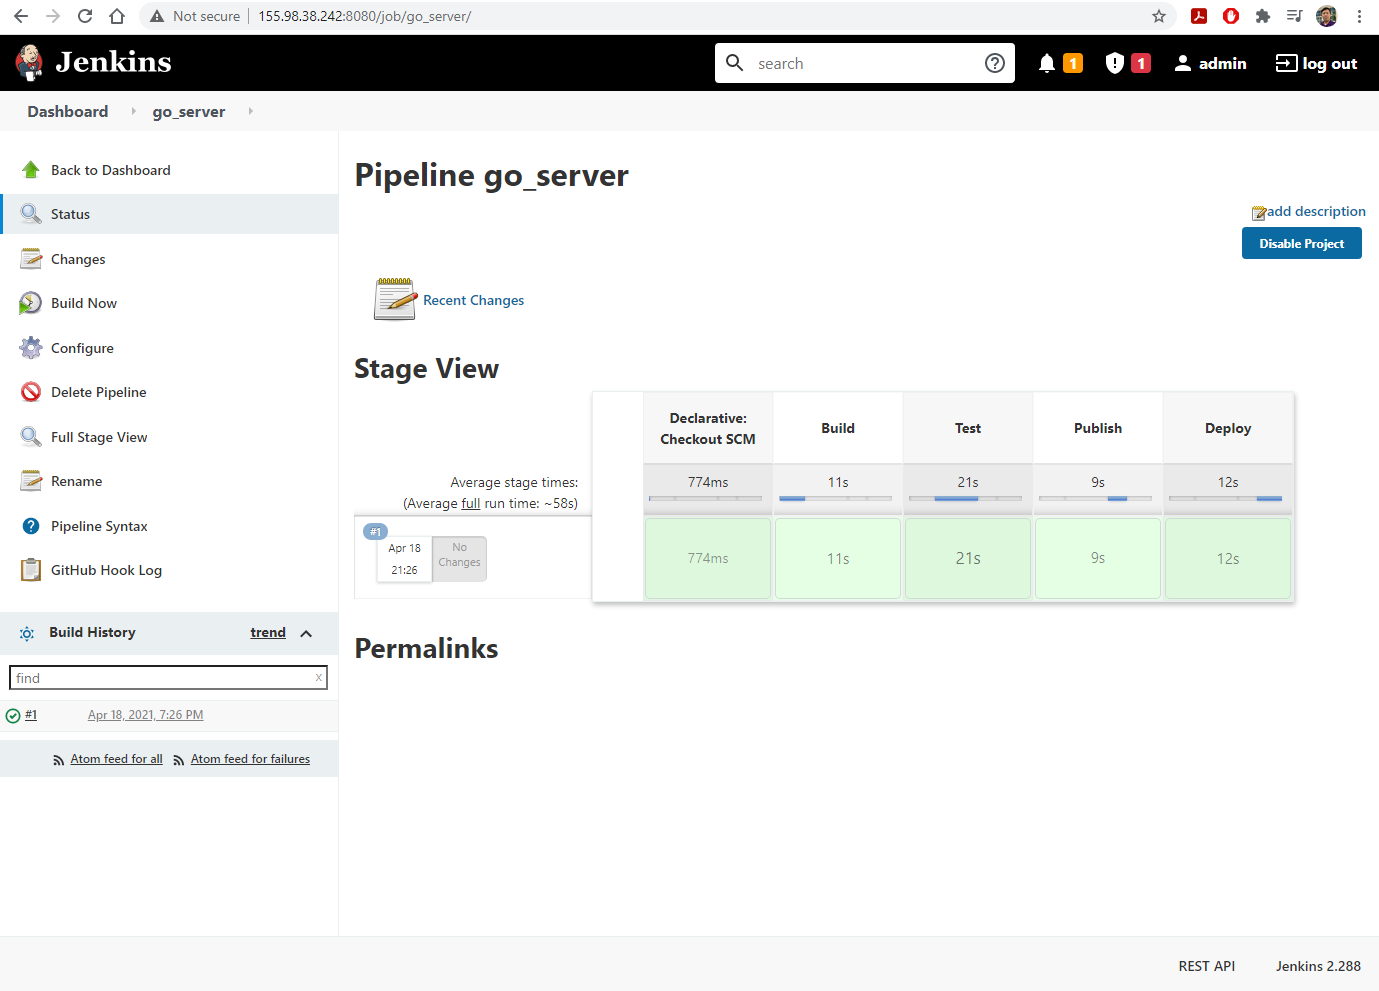
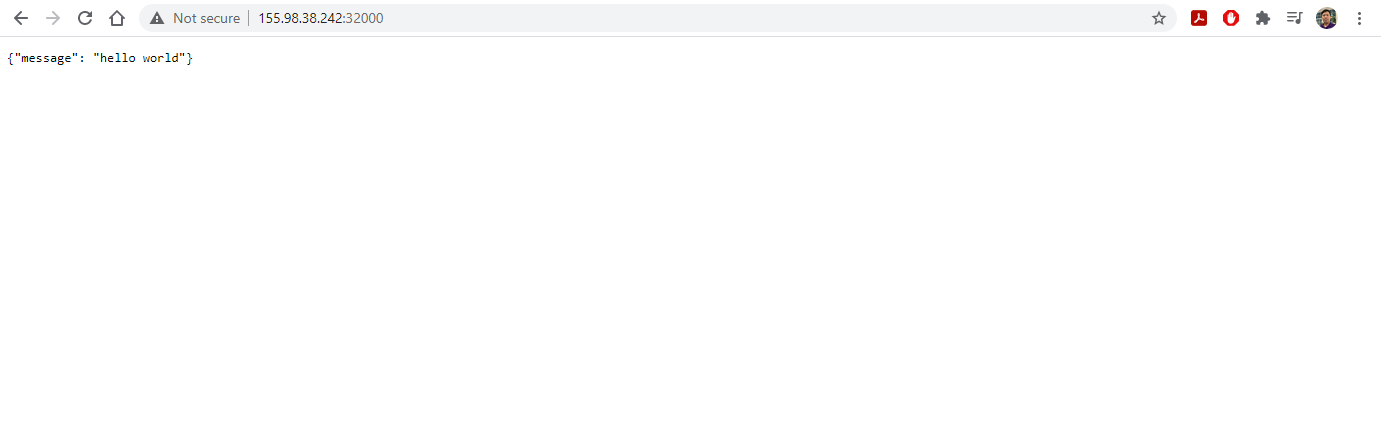
11. CI/CD
- Edit
main.goingo_appto introduce and error.- Observe that the build failed, but the web server is still running.
- Change
main.goand alsomain_test.goso that the build and test can pass.- Observe the webserver updated after the build completes successfully.
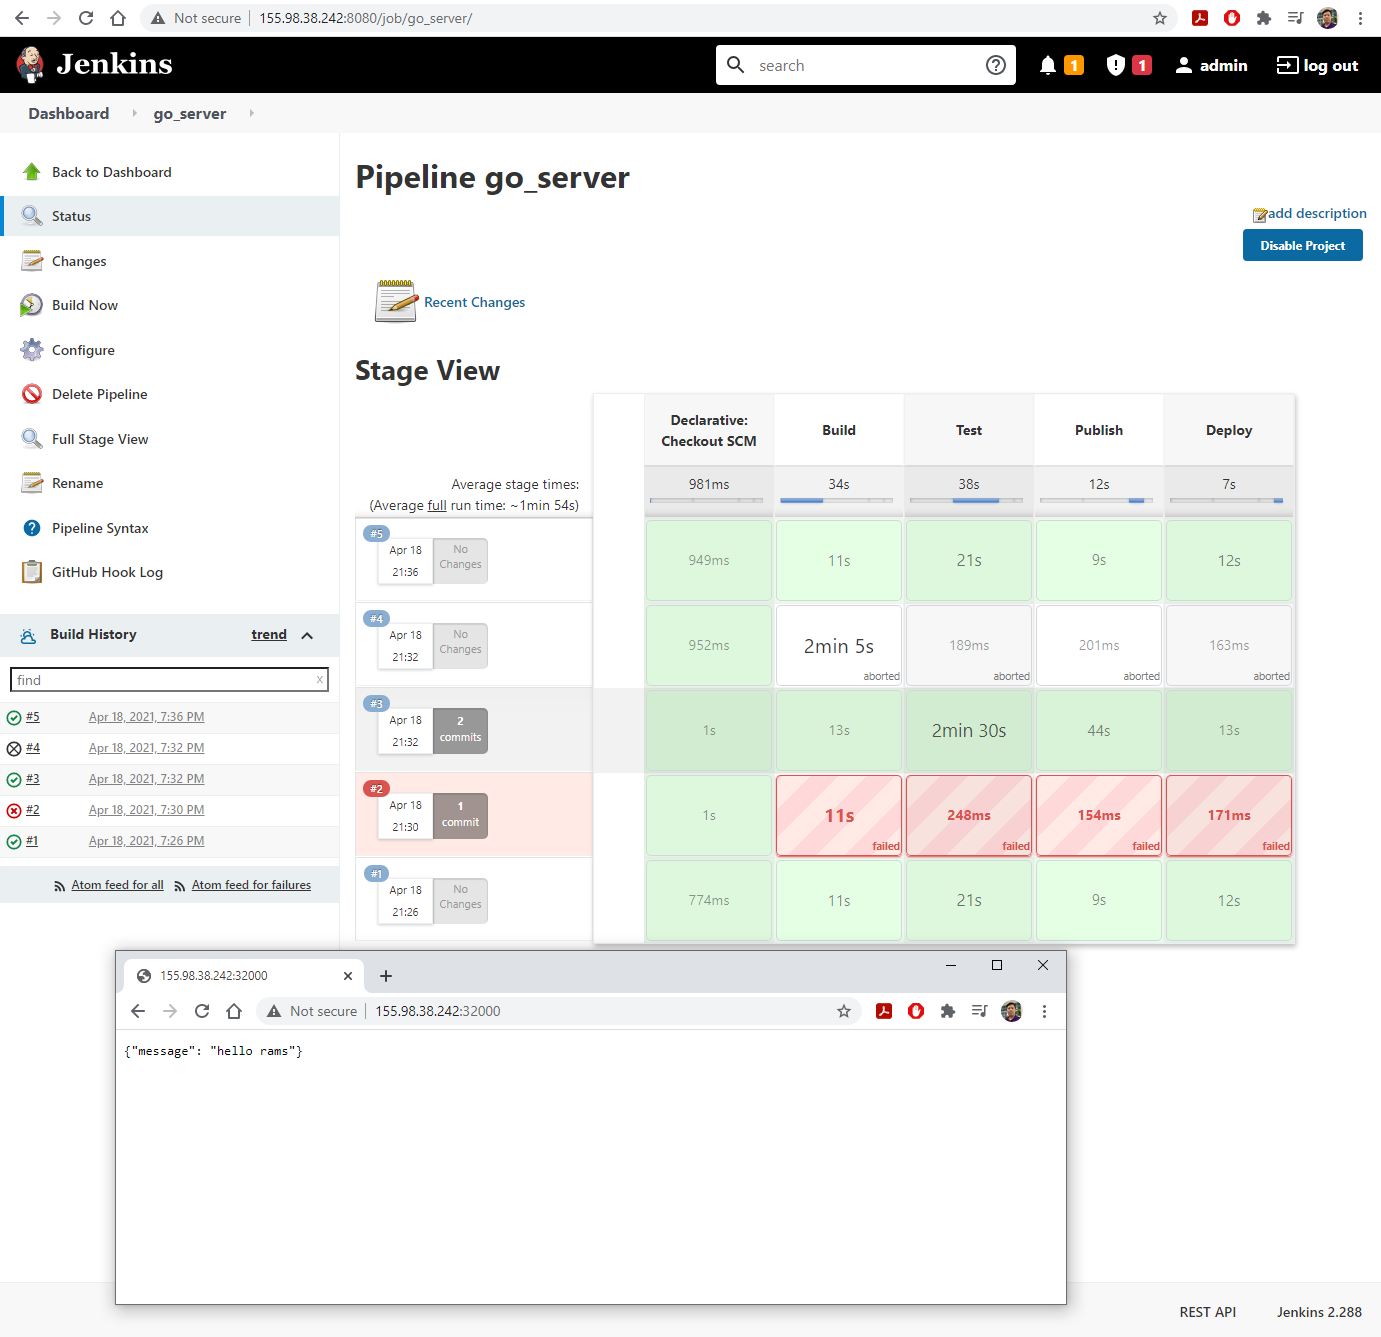
Key Points
Course project (deliverable 2)
Overview
Teaching: 0 min
Exercises: 0 minQuestions
In-class demonstration and presentation
1. Submission requirements:
Each team is to submit the URL to their team’s Github repository. The repository should:
- Contain an updated PDF Technical Report file that provides the relevant information as required by Project Deliverable 2 (based on specific project selection):
- Added chapter 3 describing the current progress/accomplishment/challenges. The chapter’s title should be Intermediate Milestones (20 out of 30 points).
- For the technical report, any file format other than PDF will not be accepted.
- Contain the PowerPoint slide for an in-class presentation (described below).
2. Poster requirements:
Each group should also prepare a 10-minute presentation with the following specific requirements:
- The presentation itself should be a single PowerPoint slide with dimension 24” by 36” that can be turned/printed into a poster.
- Think of this slide as a comprehensive architectural design with detailed notation/description.
- The slide should contain the name of the proposed project, the names of all members, and the URL to the project’s GitHub repository.
- The slide is worth 5 points (5 out of 30 points).
- The slide will be printed out and displayed during the Alumni Weekend. April 17 is the hard-deadline for the 5% bonus toward the midterm for having the poster.
3. Presentation requirements:
Regarding the presentation of the poster, there are two options.
- Each group will present a 10-minute presentation plus a five-minute Q&A session. The presentation dates will be April 18 and 20.
- The presentation is valued at (5 out of 30 points).
- Presentation attendance is mandatory. Anyone not being in class without prior excuse from the instructor will receive a 0 for this portion of the assignment.
- Any group whose members attend the Alumni weekend to hang around and present their posters to the guest alumni for at least 2 hours (could be divided into various time-segment between 9-3) will receive an additional 5% bonus toward the midterm.
2. Submission for deliverable 2
- PDF of PowerPoint/Google Slides presentations.
- If there are live demo, screenshot of each demo step must be added to the end of the presentation (This is good practice for industry as well, because demo is when you have the worst luck!).
3. Rubrics (30 points)
- Each presentation will be evaluated by the faculty and the students in the class.
- Attendance is mandatory.
- Each student will evaluate all other teams’ presentation except for your own team.
- Peer evaluation will be done using Google Form (with time-stamped). Evaluation submitted after the class time is ended will not be counted.
- If a student misses one team’s evaluation, that team’s evaluation for that student will be counted as 0.
- Peer-evaluation is based on the following questions:
- Whether the presentation provides clear and accurate technical descriptions (5 points).
- Whether the team has leveraged a proper cloud computing infrastructures in their work (5 points).
- Whether the team members demonstrate (equal) understandings of the project (5 points)
- Whether the live demo demonstrates adequate preparation and efforts. Does the demo do what the team claims it can do? If not, does the team adequately address the technical cause and potential solution? (5 points)
- Whether the project assessment is adequate/feasible, given what has been presented (5 points)
- Whether the timing of the presentation is appropriate (5 points).
Key Points
Docker Swarm
Overview
Teaching: 0 min
Exercises: 0 minQuestions
How can we deploy containers across nodes?
Objectives
1. Overview: teamwork!
- Deploy your Docker profile (from episode 9) on CloudLab prior to class
- This is a team deployment, only one team member needs to deploy the experiment.
2. Overview of services to be deployed
- We will clone the practice service into head and perform a normal docker compose to observe this service.
$ cd
$ git clone https://github.com/jpetazzo/container.training
$ cd ~/container.training/dockercoins
$ docker-compose up
3. What is this application?
- It is a DockerCoin miner!
- How DockerCoins works:
- generate a few random bytes
- hash these bytes
- increment a counter (to keep track of speed)
- repeat forever!
- It is not a cryptocurrency!
4. Micro-services of DockerCoin
rng= web service generating random byteshasher= web service computing hash of POSTed dataworker= background process callingrngandhasherwebui= web interface to watch progressredis= data store (holds a counter updated by worker)- https://github.com/jpetazzo/container.training/blob/master/dockercoins/docker-compose.yml
5. How DockerCoin works?
workerinvokes web servicerngto generate random bytesworkerinvokes web servicehasherto hash these bytesworkerdoes this in an infinite loop- Every second,
workerupdatesredisto indicate how many loops were donewebuiqueriesredis, and computes and exposes “hashing speed” in our browser
6. Sections of a compose file
- Use
catornanoto viewdocker-compose.yamlfile.versionis mandatory (“2” or later).servicesis mandatory. A service is one or more replicas of the same image running as containers.networksis optional and indicates to which networks containers should be connected. By default, containers will be connected on a private, per-compose-file network.volumesis optional and can define volumes to be used and/or shared by the containers.
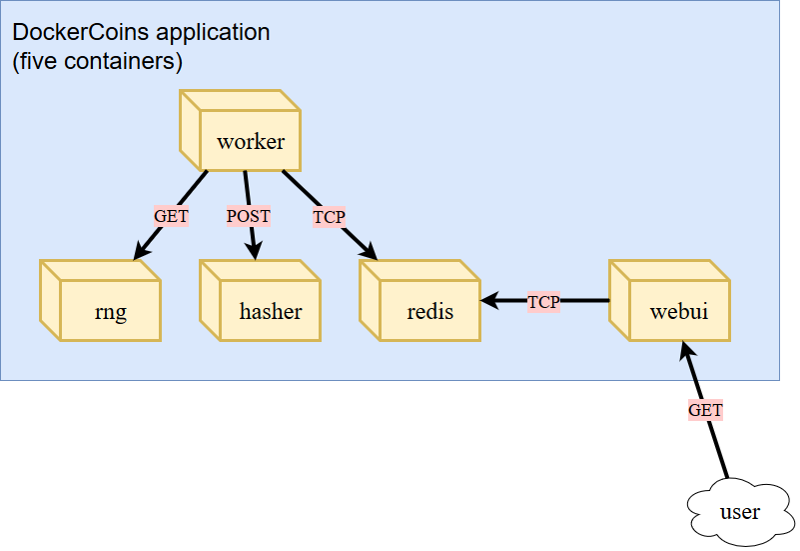
7. How services find one another in container mode?
- We do not hard-code IP addresses in the code
- We do not hard-code FQDN in the code, either
- We just connect to a service name, and container-magic does the rest
- (And by container-magic, we mean “a crafty, dynamic, embedded DNS server”)
- Example: https://github.com/jpetazzo/container.training/blob/master/dockercoins/worker/worker.py
8. Hands-on: check the web services
- Navigate to a browser and use the IP address of your head node and the port 8000 to view the performance of DockerCoin
- On your terminal, use
Ctrl-Cto stop the application.- Restart the application, this time using
-dto run the service in background mode.
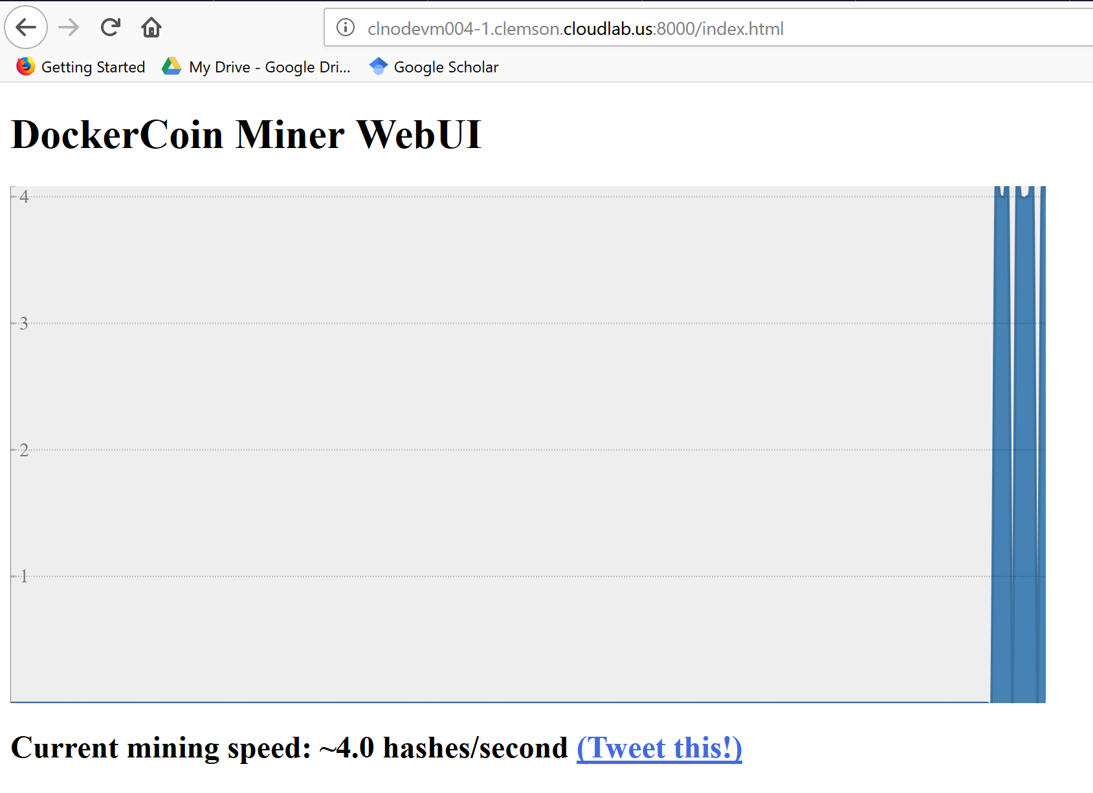
9. Hands-on: Scaling up the application
- Do we have enough resources to scale up?
$ top
- Type
qto quittop.- We observed idle CPU cycles and little to non I/O activities
10. Hands-on: scaling with Docker compose
$ docker-compose up -d --scale worker=2
$ docker-compose ps
- What is the change in the graph?
- What is the change in the CPU usage (using
top)?
- Try scaling up to 10 workers (
--scale worker=10)- What happens to the performance graph? Do we have a 10x scale?
- What happens to our CPU?
- What happens to our I/O
- Check latency of
rng- Check latency of
hasher$ httping -c 3 localhost:8001 $ httping -c 3 localhost:8002
- Which port shows slower ping? Which service is it?
- Docker-compose let us scale on a local physical host.
$ docker-compose down
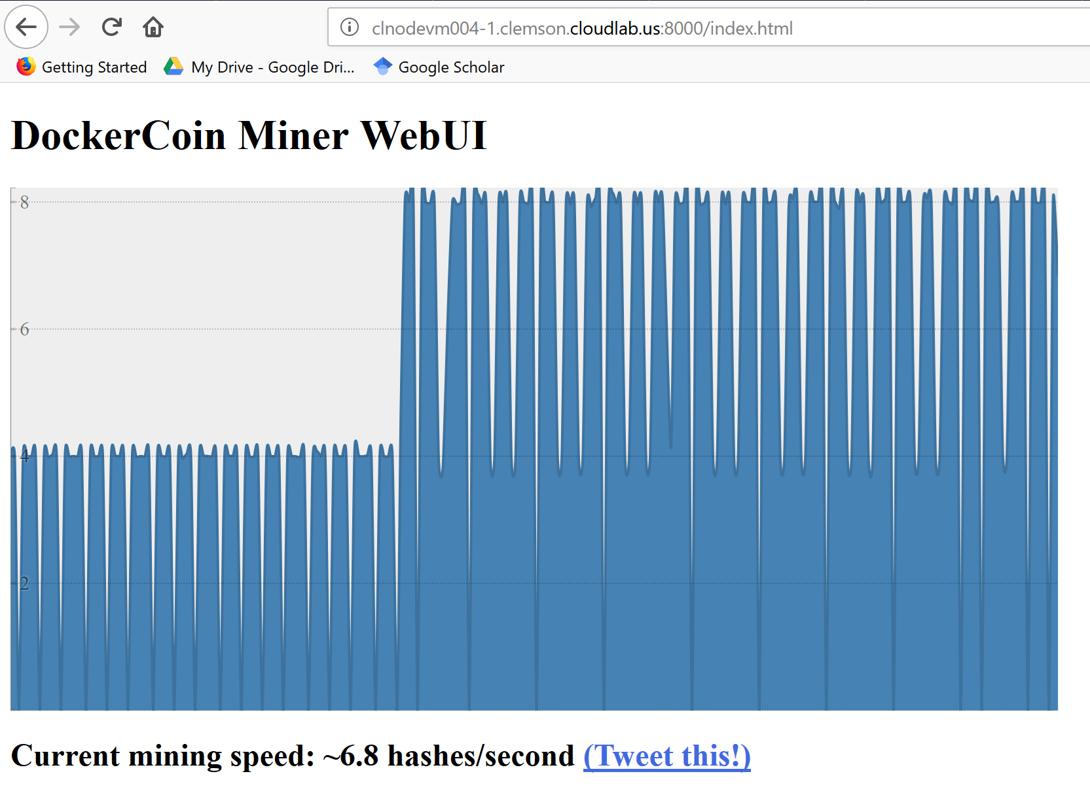

11. SwarmKit
- Open source tool kit to build multi-node systems
- Reusable library.
- Plumbing part of the Docker ecosystem.
- Adopted into Docker as Docker Swarm
12. Features
- Highly-available, distributed store based on Raft consensus algorithm.
- Raft was developed by Ongaro, Diego, and John Ousterhout at Stanford.
- In search of an understandable consensus algorithm. In 2014 USENIX Annual Technical Conference, pp. 305-319. 2014.
- Dynamic reconfiguration of Raft without interrupting cluster operations
- Services managed with declarative API
- Integration with overlay networks and load balancing
- Strong emphasis on security
13. SwarmKit concepts
- A cluster will be at least one node.
- A node can be a manager and a worker.
- A manager actively takes part in the Raft consensus and keeps the Raft log.
- You can talk to a manager using the SwarmKit API.
- One manager is elected as the leader; other manager merely forward requests to it.
- The workers get their instructions from the managers.
- Both workers and managers can run containers.
14. SwarmKit concepts
- The managers expose the SwarmKit API.
- Using the API, you can indicate that you want to run a service.
- A service is specified by its desired state: which image, how many instances…
- The leader uses different subsystems to break down services into tasks: orchestrator, scheduler, allocator, dispatcher.
- A task corresponds to a specific container, assigned to a specific node.
- Nodes know which tasks should be running, and will start or stop containers accordingly.
15. Declarative versus imperative
- Declarative programming is a programming paradigm that expresses the logic of a computation without describing its control flow.
- Imperative programming is a programming paradigm that uses statements that change a program’s state.
- Imperative systems:
- Simpler
- If a task is interrupted, we have to restart from scratch
- Declarative systems:
- If a task is interrupted, we can figure out what’s missing and do only what’s necessary.
- We need to be able to observe the system to find out the difference between what we have and what we want.
16. Hands-on: swarm mode
- By default, SwarmKit features are asleep until you active Swarm mode
- Swarm Mode commands:
docker swarm: enable Swarm mode, join Swarm, adjust Swarm’s parametersdocker node: view nodes, promote/demote managers, manage nodesdocker service: create and manage services.- Run the following on head node:
$ cd
$ docker swarm init --advertise-addr eth1:7777 --listen-addr eth1:7777
- In this profile, CloudLab nodes have two IP addresses:
- Public IP address:
eth0- Private IP address:
eth1
- Read the output and use the provided commands on the worker nodes to have these nodes joining the swarm.

- To view the swarm nodes
$ docker node ls
$ docker-compose down


17. Application on Swarm
- Build images for application,
- Ship these images with a registry,
- Run services using these images.
- Why?
- For
docker-composeup, images are built locally for services.- For a Swarm, images need to be distributed.
- The easiest way is to use a Docker registry.
18. Hands-on: launching a registry inside the Swarm
- On head node:
$ docker service create --name registry --publish 5000:5000 registry
$ docker service ps registry
$ curl 127.0.0.1:5000/v2/_catalog
- Test the registry:
$ docker pull busybox
$ docker tag busybox 127.0.0.1:5000/busybox
$ docker push 127.0.0.1:5000/busybox
$ curl 127.0.0.1:5000/v2/_catalog
- This is a demo registry with no security (without TLS)!
$ /bin/bash
$ cd
$ cd container.training/dockercoins/
$ export REGISTRY=127.0.0.1:5000
$ export TAG=v0.1
$ for SERVICE in hasher rng webui worker; do docker build -t $REGISTRY/$SERVICE:$TAG ./$SERVICE; docker push $REGISTRY/$SERVICE:$TAG; done
$ curl 127.0.0.1:5000/v2/_catalog
- Launching the overlay network and other services
$ docker network create --driver overlay dockercoins
$ docker service create --network dockercoins --name redis redis
$ export REGISTRY=127.0.0.1:5000
$ export TAG=v0.1
$ for SERVICE in hasher rng webui worker; do docker service create --network dockercoins --detach=true --name $SERVICE $REGISTRY/$SERVICE:$TAG; done
$ docker service ls
$ docker service update webui --publish-add 8000:80
$ docker service ls
- Rescale your workers and observe whether there are increases in mining performance.
Key Points
Course project (deliverable 3)
Overview
Teaching: 0 min
Exercises: 0 minQuestions
Final project deliverable (archived, not ready yet)
1. Summary for both project options
- Final project report.
- GitHub repository.
2. Detailed rubrics (30 points)
- (20 points) A technical document:
- Cover page (not included with the minimum page count)
- Project title.
- Members’ names.
- GitHub URL.
- minimum five-pages, 1-inch margin, single-space, font size 11
- Detailed descriptions about the project progress (15 points),
- Comments provided on deliverable 2 should be addressed as appropriate
- Self-assessment about whether the project has met the final deliverable (5 points),
- If for some reasons, the project did not meet the final deliverable, this section should be used to describe the why and how of the issues.
- This document should look professional!
- (10 points) A GitHub repository contains the profile that can be deployed by the instructor on CloudLab for validation purposes. The README file of the repository should provide all necessary instructions on how to get the project deployed.
- The repository should look professional!
- Example Technical Writing Styles:
- https://www.docker.com/taxonomy/term/4955
- http://www.gutenberg.org/files/52091/52091-h/52091-h.htm
Key Points