Content from Introduction to Linux
Last updated on 2024-06-24 | Edit this page
Overview
Questions
- How does Linux come to be?
Objectives
- Explain the historical development of Linux
1. Linux, A Brief History
- First commercial computer by IBM: IBM 701 (1952)
- Require system operators to help run the programs
- Second generation: IBM 704 (1956)
- Incompatible with IBM 701
- No support from IBM
- No textbook/documentation
- IBM 701 system operators
- Trained by IBM for 701
- Encouraged by IBM to organize informal meetings to share expertise
- Concept of time-sharing: Operating System
- Allows computers to become general-purposes (serving multiple users running different programs)
- Enables system operators to transition into the role of system administrators.
- MIT, General Electric (GE), and Bell Labs collaborate to create the
first time-sharing system call Multics
- Multiplexed Information and Computing Service
- Bell Labs left Multics in 1964 (over budget, behind schedule)
- Ken Thompson, Rudd Canaday, Dennis Ritchie continued working on Multics
- Summer 1969
- Ken Thompson’s wife and kids were out of town for a month
- One week was assigned for each key components of UNIX (the operating system, the shell, the editor, and the assembler).
- UNIX
- UNiplexed Information and Computing Service
- An emasculated Multics
- By 1971: as, cal, cat, chdir, chmod, chown, cmp, cp, date, dc, du, ed …
- By 1973: 16 new UNIX installations (components)
- C programming language (Dennis Ritchie)
- Pipe (designed by Doug McIlroy, implemented by Ken Thompson)
- Ritchie, D.M. and Thompson, K., 1973. The UNIX time-sharing system. ACM SIGOPS Operating Systems Review, 7(4), p.27.
- After 6 months, number of UNIX installation tripled.
- Due to AT&T’s antitrust settlement in 1958, UNIX cannot be sold
as a product, but Bell Labs still retains licensing right
- Individual software and licenses must be shipped to others.
- 1974: Berkeley UNIX (BSD - Berkeley Software Distribution - led by Robert Fabrey at University of California at Berkeley)
- 1976: V6 (John Lions at University of New South Wales - Australia)
- 1982: SunOS (Sun Microsystem by Bill Joy - graduate student of Robert Fabrey)
- 1983: AT&T UNIX System V (after court-ordered divestiture of AT&T in 1983)
- Managing general-purpose computing systems requires a different set of skills.
- Serving a wide variety of users and applications.
- Universities were early leaders in fostering system admin groups
- Purdue, Utah, Colorado-Boulder, and SUNY Buffalo were the initial hotbeds
- Evi Nemeth: Mother of system administration
- Graduate student administrative team.
- A system administrator:
Jack of all trades- Rabid jacks of all trades: Hardware, software, system configuration, programming …
- 1989: First edition of UNIX and Linux System Administration Handbook
- Late 1990, UNIX was gaining ground everywhere …
- 1992: AT&T filed copyright lawsuit against BDSI and the Regents of University of California
- 1994: The lawsuit was settled and three files were removed from BSD
code base.
- Impact was lasting
- Everyone moved to Microsoft Windows
- 1984: Andrew Tennenbaum of Vrije Universiteit in Amsterdam developed MINIX as a learning software for his students.
- 1992: Linus Torvalds, an undergraduate at University of Helsinki, Finland, developed his own OS called Linux, with inspirations from both UNIX and MINIX.
- UNIX administration skill sets applies directly to Linux

- Unix and Linux becomes more mainstream, as their TCO for computing servers was significantly lower than that of a Windows server.
- It is not a war, but rather the right combination of Windows and Unix/Linux systems within an organization.
- With its new CEO, Windows has been embracing Linux and open-source:
- Cloud
- IoT (small devices )
2. The course
- We will follow the book, but not following the chapters in the book’s order.
- Rather, we will glean from the perspective of a normal user than eventually learn enough of Linux to become an administrators.
- Operating system: Linux
- Most servers are remote, even when you are in the same data center.
- Remote access via terminal.
- Know your terminal, how to launch them?
- Linux
- Mac
- Mac Terminal
- Windows
- Windows Terminal, or
- Git Bash
- As an admin, you need to know how to launch terminals on any computer.
Content from Linux System Administrators
Last updated on 2024-06-24 | Edit this page
Overview
Questions
- What are the key responsibilities of a Linux system administrator?
- What are the required technical skills of a Linux system administrator?
Objectives
- Understand the capabilities and responsibilities of a Linux system administrator
1. Essential duties of a Linux system aministrator (sysadmin)
- Controlling Access
- Adding Hardware
- Automating Tasks
- Overseeing Backups
- Installing and Upgrading Software
- Monitoring
- Troubleshooting
- Maintaining Local Documentation
- Vigilantly Monitoring Security
- Tuning Performance
- Developing Site Policies
- Working With Vendors
- Fire Fighting
- Create new user accounts
- Remove expired accounts
- Handle all account-related issues
- Access control
- Adding/removing physical components from the system
- Installing/configuring corresponding hardware drivers
- Leverage script programming (scripting) and Linux/Unix system commands to automate repetitive and time-consuming tasks.
- Reduce human errors
- Improve response time
- Indispensable to adminstrating and managing large cluster of computers.
- Example script installing and configuring Docker for all user accounts on CloudLab:
- Computing systems will fail.
- Large computing systems will fail frequently.
- Backup is time consuming, tedious, and highly
critical.
- Should be automated!
- Installing software as needed.
- Upgrading/patching security holes of existing software as needed.
- Juggling multiple versions of same software.
- Manage software to manage installed software.
- Help identifying issues related to the computing systems.
- Collecting and analyzing log files
- Monitoring resource avaiability (CPU and memory utilization, storage availability,)
- SSH to
molly. Refer to the Setup page if you need a refresher on how to do so. - Run the following commands to observe the system.
- The
$is not meant to be typed into the terminal. - It implies that the rest of the command (
htopin this case) is to be typed into a terminal.
- The
$ htop- The sysadmin identifies the issue via monitoring or users’ complaints
- The sysadmin needs to fix the issue.
- Overtime, computing systems will become customized according to the
preferences and styles of their current sysadmins.
- Software vendors
- Deployment methods
- Automation scripts
- It is critical that sysadmins maintain detailed documentations so that you and others can understand/remember how the systems worked (and evolved) for maintenance and upgrade purposes.
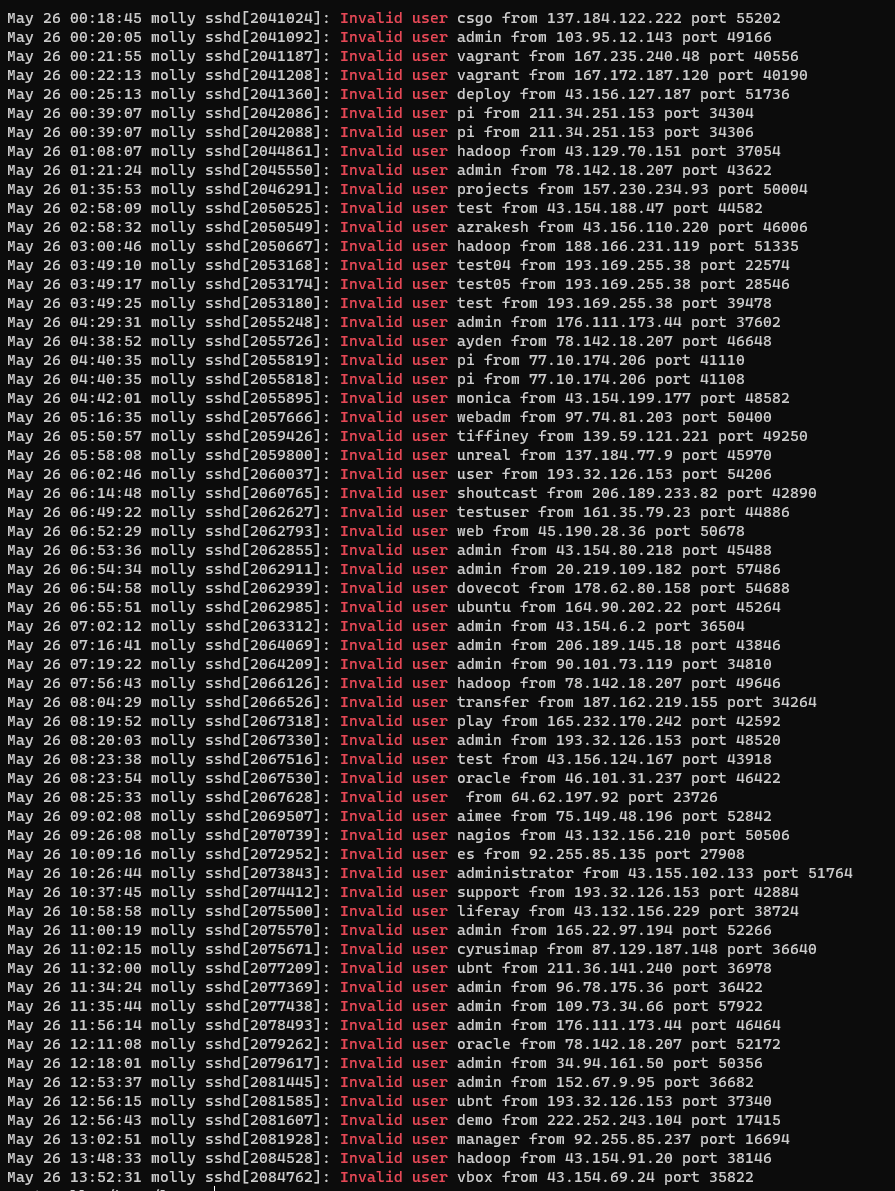
- Attempts within 12 hours on
molly:- This is only the most naive type of hacking attempts, there are others.
- Exercise:
- Visit https://www.iplocation.net
- Find out where are these IP addresses located.
- Based on system monitors, sysadmins can, and should, configure system components (operating system configurations, software-specific configuration) in order to improve users’ application performance.
- In many cases, sysadmins need to work with users to ensure that users apply application-specific run-time configuration to ensure optimal performance.
- The main responsibility of sysadmins are to deploy and maintain complex computing systems that support a diverse set of applications and users.
- This includes developing appropriate documents regarding:
- Acceptable use of computer systems
- Management and retention of data
- Privacy and security of networks and systems
- Adherence to regulation (local and governmental)
- Anything specifics that you want (hope) the users to follow …
- Be the liaison between vendors and the institutions (businesses).
- Hardware vendors
- Software vendors
- Cloud providers
- On-the-fly troubleshooting of critical issues
- Most of the time user-related
- Critical patching of security issues (outside of normal maintenance schedule)
- Highly comfortable with keyboard (say goodbye to the mouse)
- Know your environment (laptop)
- Text editors: nano or vim
- Scripting: bash (or Python or Ruby)
- DevOps
- Site-reliability engineers
- Security operations (SecOps) engineers
- Network administrators
- Database administrators
- Network operations center (NOC) engineers
- Data center technicians
- System architects
Content from Introduction to the Linux Shell
Last updated on 2024-06-24 | Edit this page
Overview
Questions
- What is a shell
- How does a shell differ from traditional GUI likes Windows Desktop
Objectives
- Understand the Linux shell
- Be able to carry out basic commands inside the Linux shell
Prior to this lesson, you need to launch an experiment on CloudLab.
- Traditional computers: Graphical User Interface (GUI)
- Included in modern Linux distributions (distros)
- Remote Linux cluster of computers: Command-Line Interface (CLI)
- Great for automation
- Familiarity with CLI and shell scripting is essential
- Linux CLI: The Shell
- Is a program where users can type commands
- Tasks that are often managed by a mouse click are now carried out by these commands and their respective options (flags)
- Shell scripting:
- Sequence of commands can be combined into a
scriptto automate the workflow.
- Sequence of commands can be combined into a
- This is an example comparing the contents of a directory between a
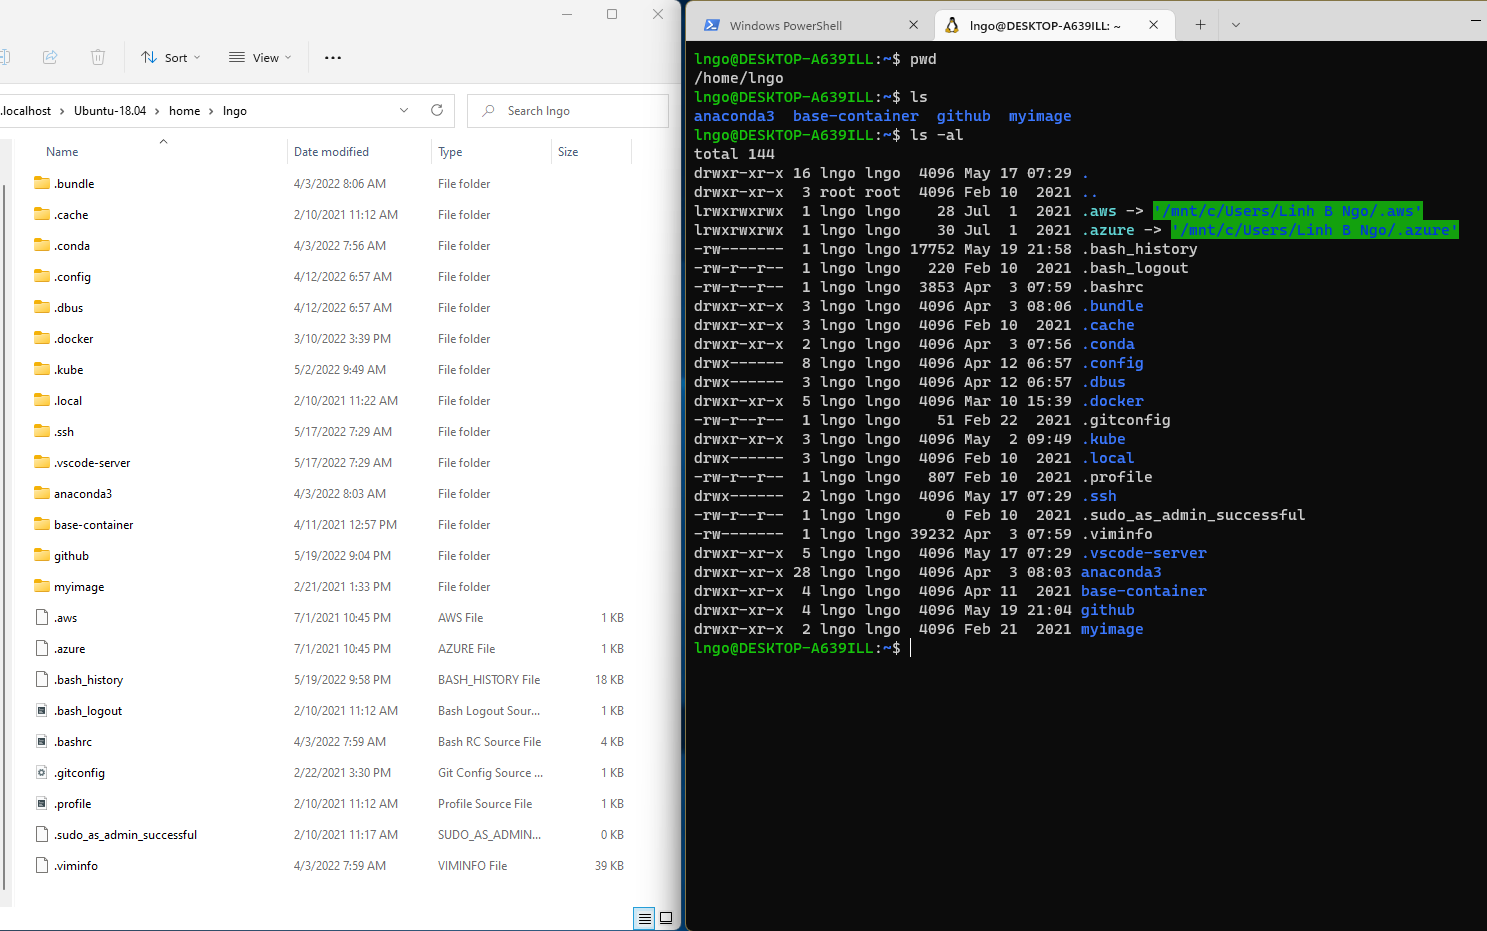
GUI view (left) and a CLI view (right).
- Both display contents of a home directory on a Windows Kernel Subsystem for Linux
- File System: an Operating System component responsible for managing files and directories.
- Perspective:
- On a GUI, you click to move from one place to another, so you are outside the file system space looking in.
- On a CLI, you need to explicitly provide direction (path) for the command to know with which file/directory it is supposed to interact. The perspective is more inside the file system space.
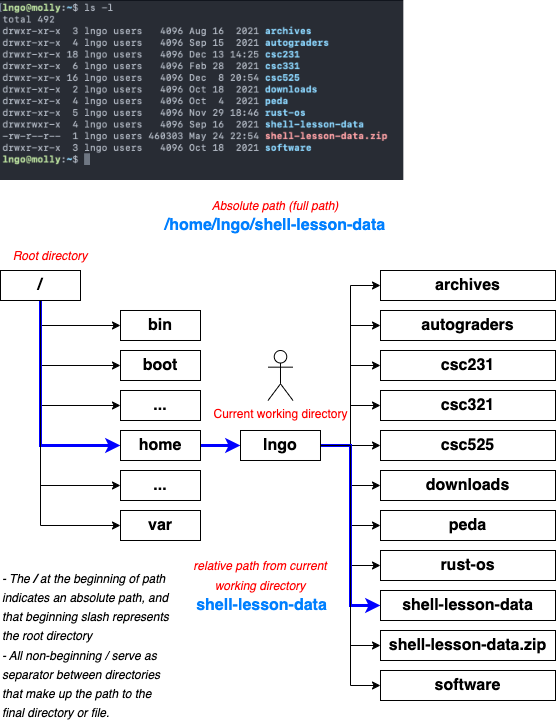
- Key commands:
-
pwd: path of working (current) directory -
ls: listing -
cd: change directory
-
-
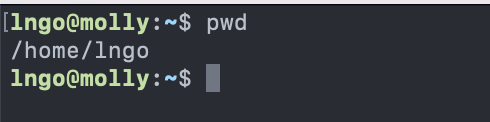
pwdreturns the absolute path to the current working directory (i.e.: where you are when you are in the terminal).
-
lsreturns the list of current files and directories in the target directory.

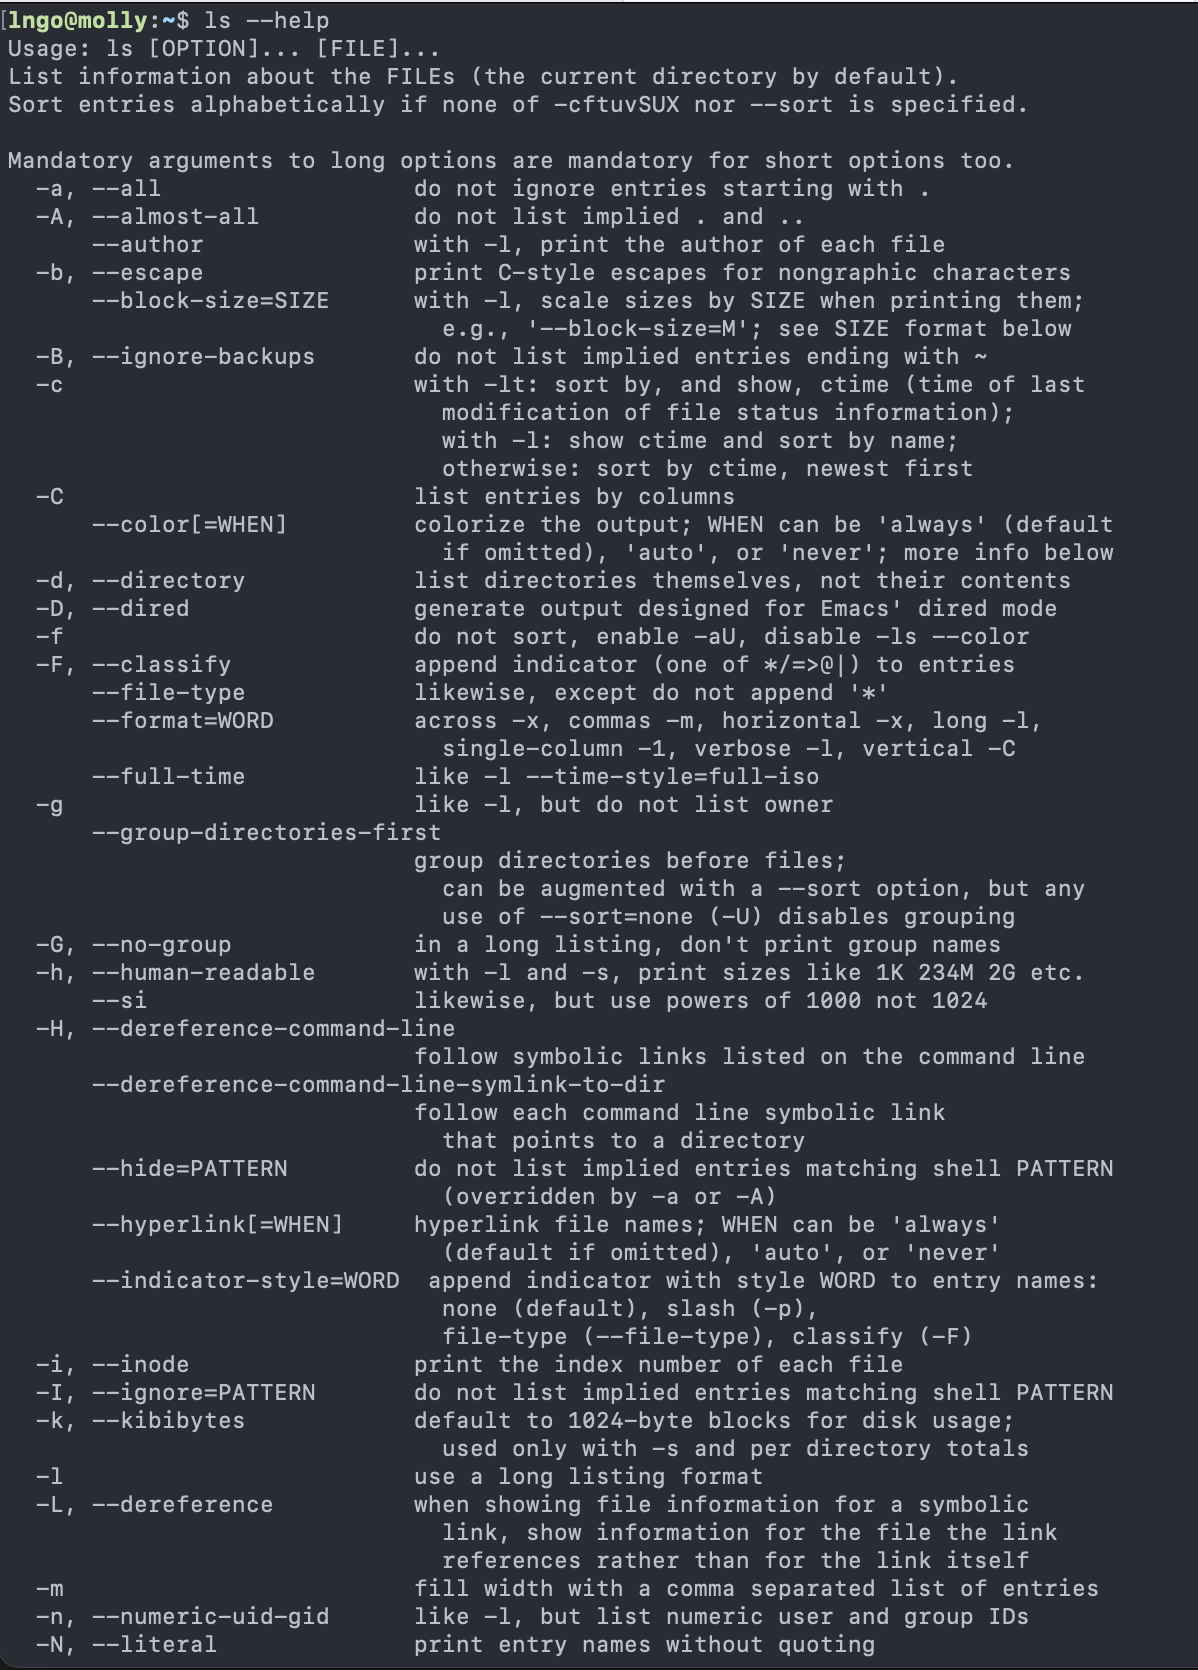
- There are many options available for different commands. To view the
documentation, run the followings:
- As a sys admin, you have to become very good at reading documentation!
- Detailed manual can be viewed using the following command:
- Use the
Spacekey to move down page by page - How do you quit?
- Use the
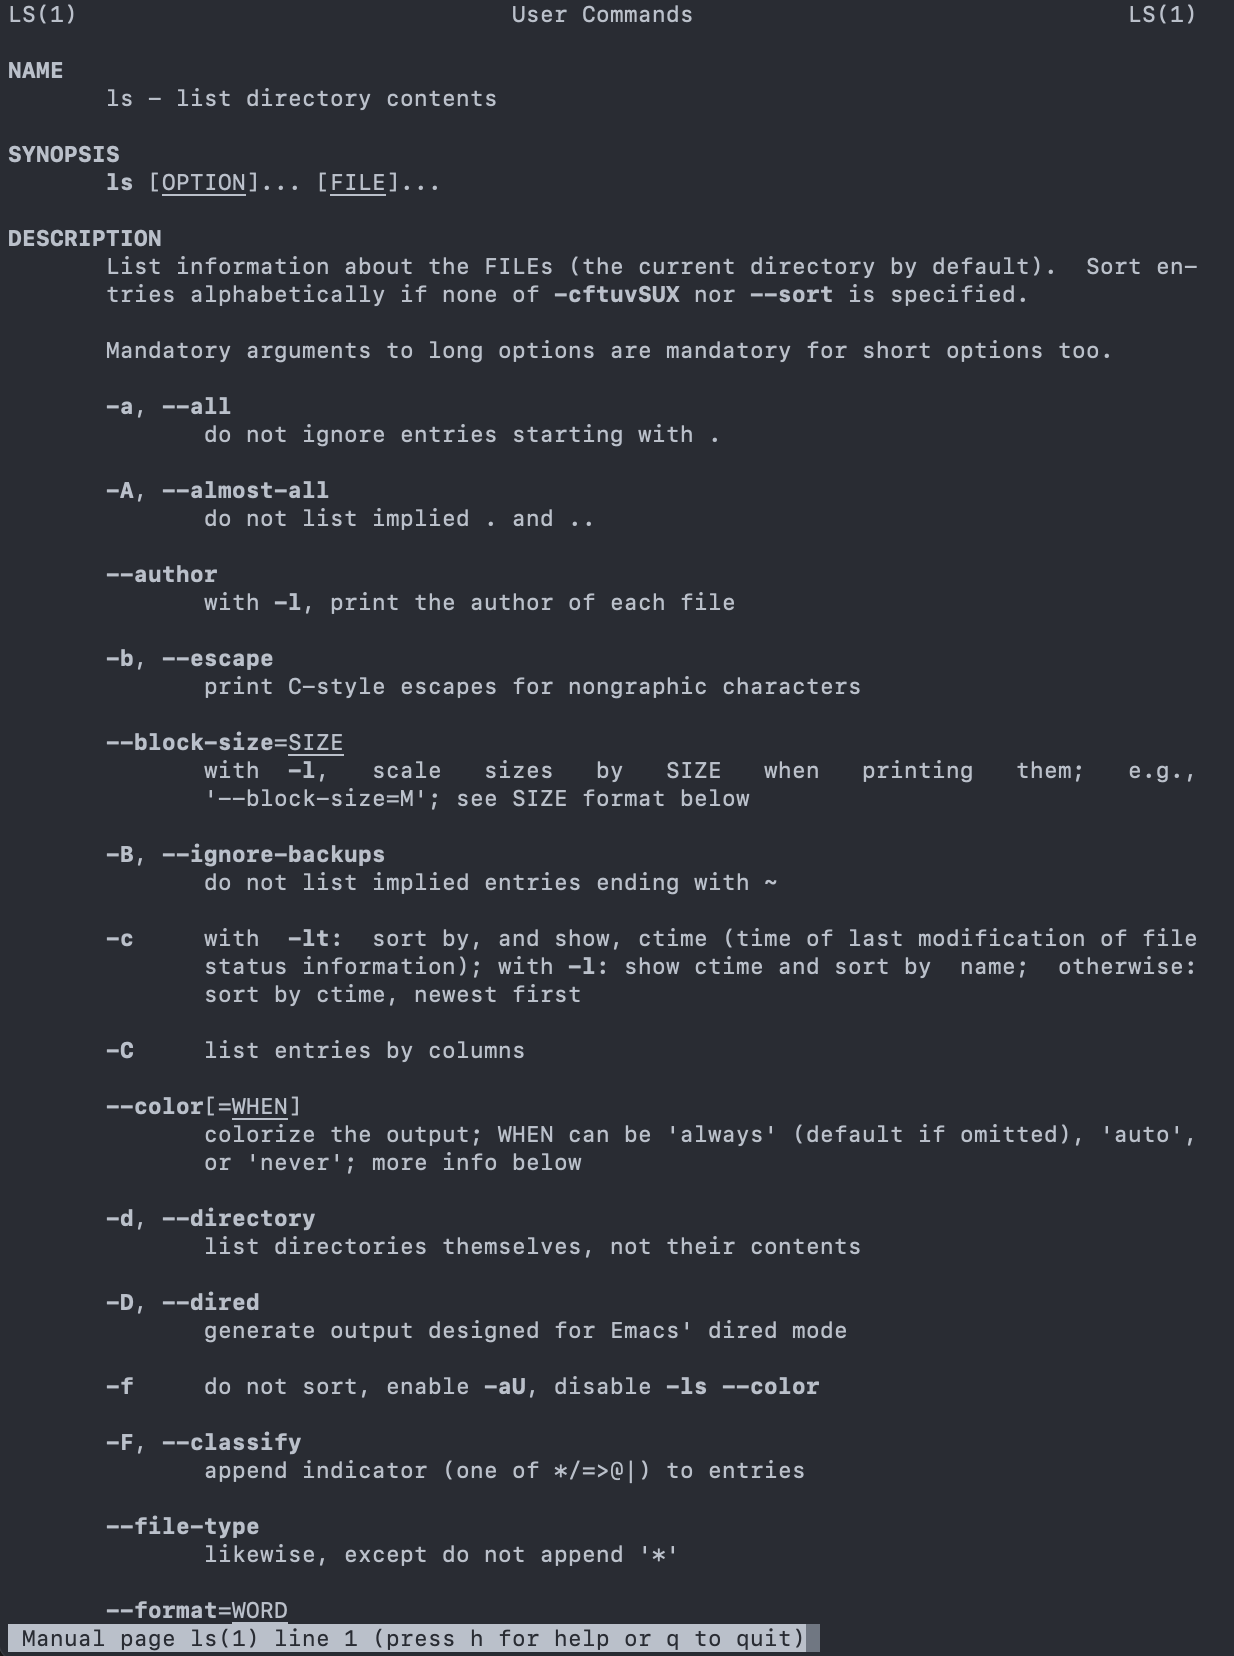
Challenge: exploring more flags
- You can also use two options at the same time. What does the command
lsdo when used with the-loption? What about if you use both the-land the-hoption? - Some of its output is about properties that we do not cover in this lesson (such as file permissions and ownership), but the rest should be useful nevertheless.
- The
-loption makeslsuse a long listing format, showing not only the file/directory names but also additional information, such as the file size and the time of its last modification. - If you use both the
-hoption and the-loption, this makes the file size human readable, i.e. displaying something like 5.3K instead of 5369.
Challenge: Listing in reverse chronological order
- By default, ls lists the contents of a directory in alphabetical
order by name. The command ls
-tlists items by time of last change instead of alphabetically. The command ls-rlists the contents of a directory in reverse order. - Which file is displayed last when you combine the
-tand-roptions? Hint: You may need to use the -l option to see the last changed dates.
The most recently changed file is listed last when using
-rt. This can be very useful for finding your most recent
edits or checking to see if a new output file was written.
- Run
lsby itself will list the contents of the current directory.
-
cdallows users to change the current directory (outcome ofpwd) to the target directory.- Run
man cdorcd --helpto read the documentation forcd. - The generate syntax for
cdiscd DESTINATIONwithDESTINATIONcan either be absolute or relative paths or special paths.
- Run
- Change to root directory and view contents of root:
- Special paths:
-
~: home direcrory -
.: current directory -
..: a directory that is one level above the current directory
-
- Change to your home directory using either the special paths or
/home/YOURUSERNAME(YOURUSERNAME: your username onmolly)- Check the content of your home directory to confirm that you have
the
shell-lesson-datadirectory. - Change into
shell-lesson-datadirectory and view the contents of this directory
- Check the content of your home directory to confirm that you have
the


- No:
pwdis not the name of a directory. - Yes:
lswithout directory argument lists files and directories in the current directory. - Yes: uses the absolute path explicitly.

-
lsis the command, with an option-Fand an argument/. -
Option:
- either start with a single dash (
-) or two dashes (--), - change the behavior of a command.
- can be referred to as either
switchesorflags.
- either start with a single dash (
- Arguments tell the command what to operate on (e.g. files and directories).
- Sometimes
optionsandargumentsare referred to as parameters.- The shell is in fact just a process/function and these
optionsandargumentsare being passed as parameters to the shell’s function that is responsible for executing the command.
- The shell is in fact just a process/function and these
- A command can be called with more than one option and more than one argument, but a command doesn’t always require an argument or an option.
- Each part is separated by spaces: if you omit the space between
lsand-Fthe shell will look for a command calledls-F, which doesn’t exist. - Capitalization can be important.
-
ls -swill display the size of files and directories alongside the names -
ls -Swill sort the files and directories by size
-
- Create a directory called
thesis, and check for its existence.- Also check that there is nothing inside the newly created directory.
-p allows the creation of all directories on the
specified path, regardless whether any directory on that path
exists.
-
Important for directory and file names in Linux!!!
- Do not use spaces/special characters in file and directory names.
- Use
-,_, and.for annotation, but do not begin the names with them.
- Linux terminal environment is text-only, hence its editors are text
only as well.
nanovim-
emacs.
- Fun read: One does not simply exist vim
- We are using nano (lowest learning curve).
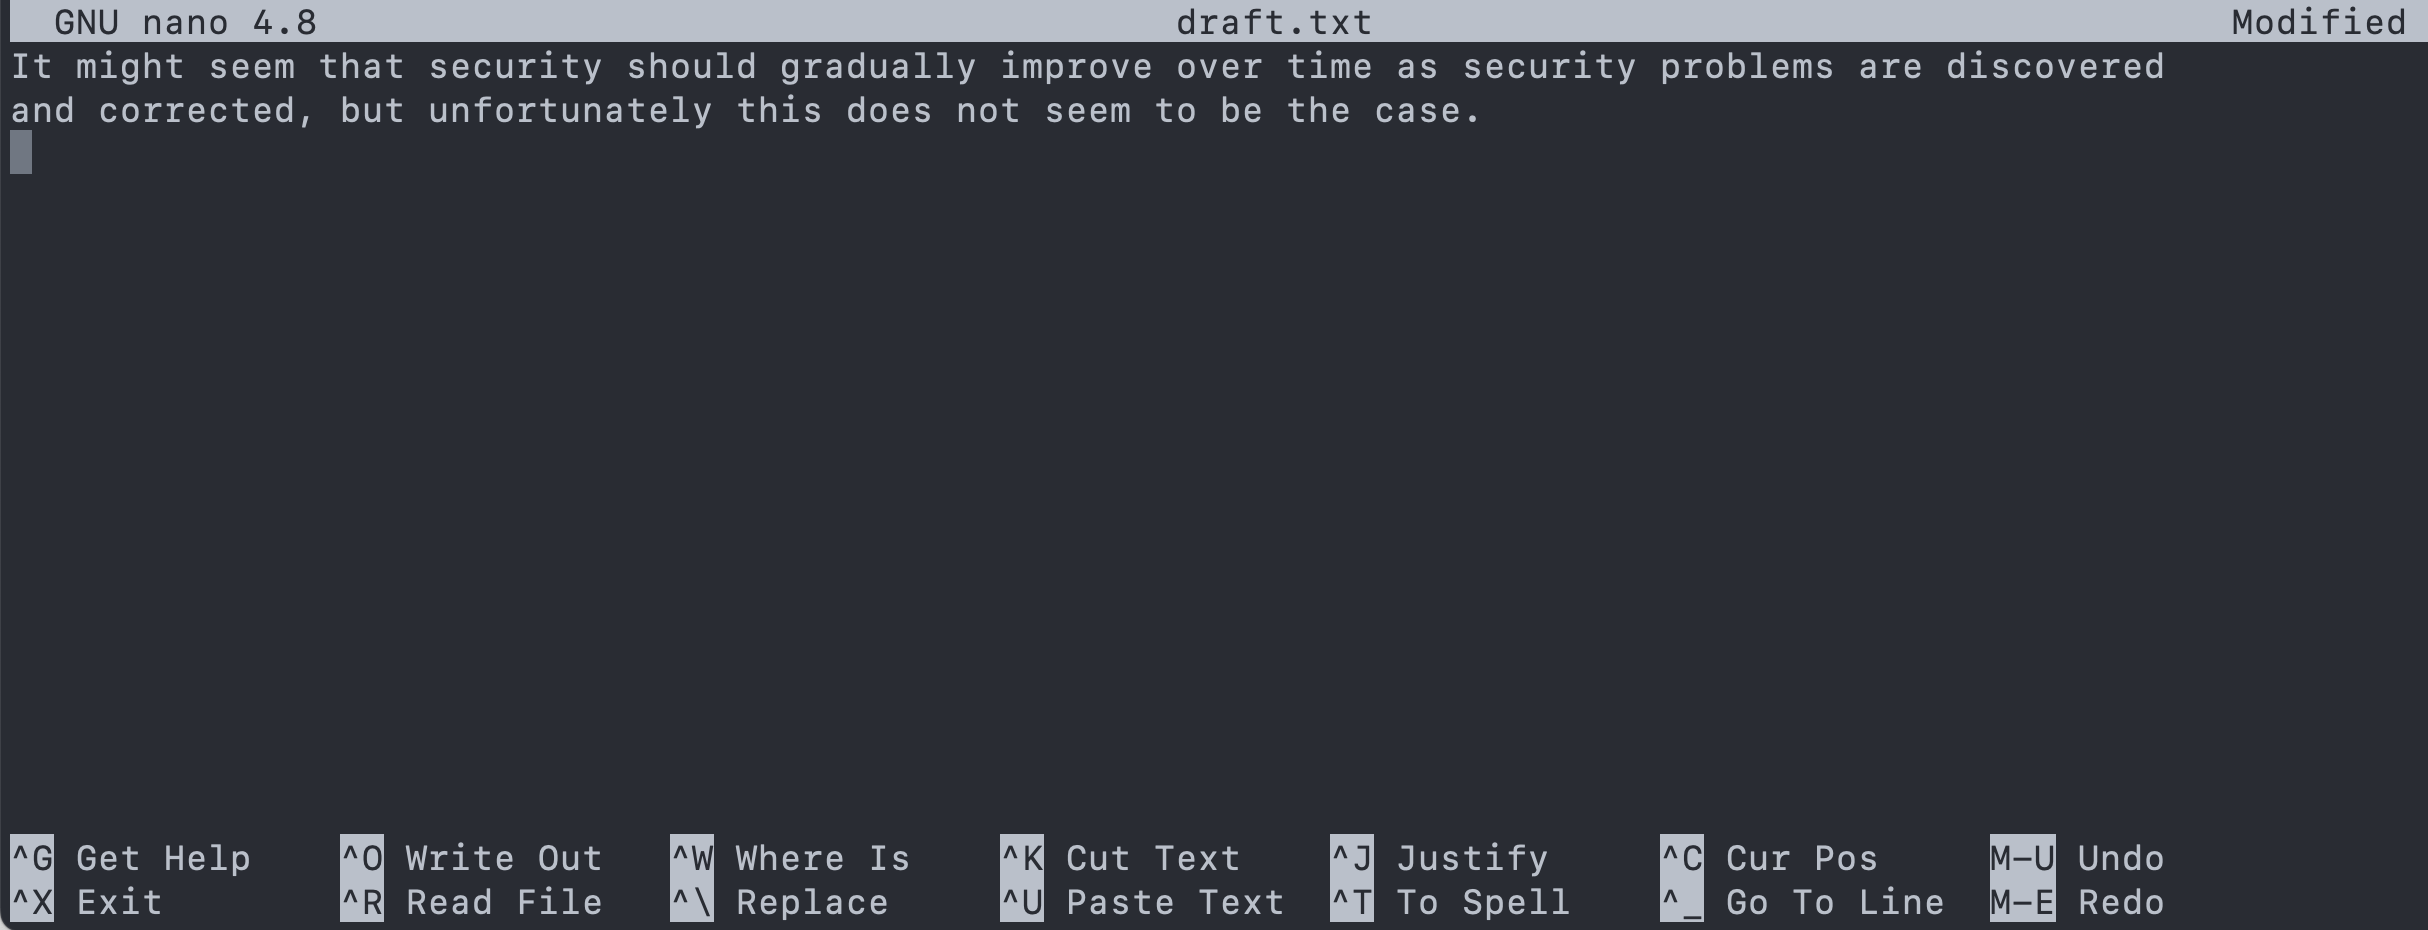
- Create a file named
draft.txtinsidethesis.- Type in the contents shown in the screenshot.
- To save the text, you need to press
Ctrl+Okeys:- Press and hold
Ctrlthen pressO. - You will be asked whether to keep the same file name or to edit the
name. Press
Enterto confirm.
- Press and hold
- To quit nano, press
Ctrl+X.- If you have not saved the text before, nano will ask if you want to
save the file first and confirm the name with
YorN.
- If you have not saved the text before, nano will ask if you want to
save the file first and confirm the name with
-
mvis short for move. It will move a file/directory from one location to another.
BASH
cd ~/shell-lesson-data/exercise-data/writing
ls thesis
mv thesis/draft.txt thesis/quotes.txt
ls thesis
mv thesis/quotes.txt .
ls thesis
ls Challenge: Moving files to a new folder
- After running the following commands, Jamie realizes that she put
the files
sucrose.datandmaltose.datinto the wrong folder. The files should have been placed in therawfolder.
BASH
ls -F
analyzed/ raw/
ls -F analyzed
fructose.dat glucose.dat maltose.dat sucrose.dat
cd analyzed- Fill in the blanks to move these files to the
rawfolder:
-
cpstands for copy. It copies a file or directory to a new location, possibly with a new name.
BASH
cp quotes.txt thesis/quotations.txt
ls quotes.txt thesis/quotations.txt
cp -r thesis thesis_backup
ls thesis thesis_backupChallenge: Renaming files
- Suppose that you created a plain-text file in your current directory
to contain a list of the statistical tests you will need to do to
analyze your data, and named it:
statstics.txt - After creating and saving this file you realize you misspelled the filename! You want to correct the mistake, which of the following commands could you use to do so?
- cp statstics.txt statistics.txt
- mv statstics.txt statistics.txt
- mv statstics.txt .
- cp statstics.txt .
- No. While this would create a file with the correct name, the incorrectly named file still exists in the directory and would need to be deleted.
- Yes, this would work to rename the file.
- No, the period(.) indicates where to move the file, but does not provide a new file name; identical file names cannot be created.
- No, the period(.) indicates where to copy the file, but does not provide a new file name; identical file names cannot be created.
- No,
proteins-saved.datis located at/home/rammy/ - Yes
-
proteins.datis located at/home/rammy/data/recombined - No,
proteins-saved.datis located at/home/rammy/
- Returning to the
shell-lesson-data/exercise-data/writingdirectory, let’s tidy up this directory by removing the quotes.txt file we created. - The command we’ll use for this is
rm(short for ‘remove’):
-
*is a wildcard, which matches zero or more characters.- Inside
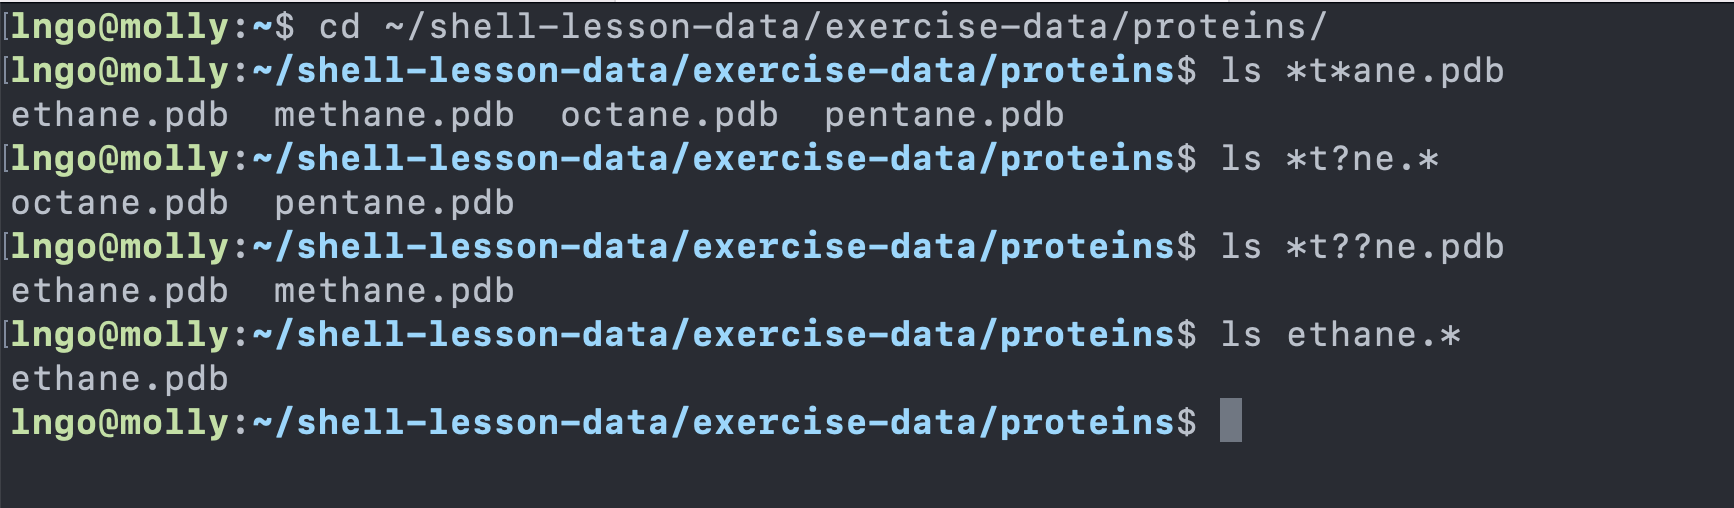
shell-lesson-data/exercise-data/proteinsdirectory:-
*.pdbmatchesethane.pdb,propane.pdb, and every file that ends with ‘.pdb’. -
p*.pdbonly matchespentane.pdbandpropane.pdb, because the ‘p’ at the front only matches filenames that begin with the letter ‘p’.
-
- Inside
-
?is also a wildcard, but it matches exactly one character. So-
?ethane.pdbwould matchmethane.pdb -
*ethane.pdbmatches bothethane.pdb, andmethane.pdb.
-
- Wildcards can be used in combination with each other
-
???ane.pdbmatches three characters followed byane.pdb. -
cubane.pdb,ethane.pdb,octane.pdb.
-
- When the shell sees a wildcard, it expands the wildcard to create a list of matching filenames before running the command that was asked for. It is the shell, not the other programs, that deals with expanding wildcards.
- Change into
shell-lesson-data/exercise-data/proteinsand try the following commands
Challenge: more on wildcards
Sam has a directory containing calibration data, datasets, and descriptions of the datasets:
BASH
.
├── 2015-10-23-calibration.txt
├── 2015-10-23-dataset1.txt
├── 2015-10-23-dataset2.txt
├── 2015-10-23-dataset_overview.txt
├── 2015-10-26-calibration.txt
├── 2015-10-26-dataset1.txt
├── 2015-10-26-dataset2.txt
├── 2015-10-26-dataset_overview.txt
├── 2015-11-23-calibration.txt
├── 2015-11-23-dataset1.txt
├── 2015-11-23-dataset2.txt
├── 2015-11-23-dataset_overview.txt
├── backup
│ ├── calibration
│ └── datasets
└── send_to_bob
├── all_datasets_created_on_a_23rd
└── all_november_filesBefore heading off to another field trip, Sam wants to back up her data and send datasets created the 23rd of any month to Bob. Sam uses the following commands to get the job done:
BASH
cp *dataset* backup/datasets
cp ____calibration____ backup/calibration
cp 2015-____-____ send_to_bob/all_november_files/
cp ____ send_to_bob/all_datasets_created_on_a_23rd/Help Sam by filling in the blanks.
The resulting directory structure should look like this ~bash .
├── 2015-10-23-calibration.txt ├── 2015-10-23-dataset1.txt ├──
2015-10-23-dataset2.txt ├── 2015-10-23-dataset_overview.txt ├──
2015-10-26-calibration.txt ├── 2015-10-26-dataset1.txt ├──
2015-10-26-dataset2.txt ├── 2015-10-26-dataset_overview.txt ├──
2015-11-23-calibration.txt ├── 2015-11-23-dataset1.txt ├──
2015-11-23-dataset2.txt ├── 2015-11-23-dataset_overview.txt ├── backup │
├── calibration │ │ ├── 2015-10-23-calibration.txt │ │ ├──
2015-10-26-calibration.txt │ │ └── 2015-11-23-calibration.txt │ └──
datasets │ ├── 2015-10-23-dataset1.txt │ ├── 2015-10-23-dataset2.txt │
├── 2015-10-23-dataset_overview.txt │ ├── 2015-10-26-dataset1.txt │ ├──
2015-10-26-dataset2.txt │ ├── 2015-10-26-dataset_overview.txt │ ├──
2015-11-23-dataset1.txt │ ├── 2015-11-23-dataset2.txt │ └──
2015-11-23-dataset_overview.txt └── send_to_bob ├──
all_datasets_created_on_a_23rd │ ├── 2015-10-23-dataset1.txt │ ├──
2015-10-23-dataset2.txt │ ├── 2015-10-23-dataset_overview.txt │ ├──
2015-11-23-dataset1.txt │ ├── 2015-11-23-dataset2.txt │ └──
2015-11-23-dataset_overview.txt └── all_november_files ├──
2015-11-23-calibration.txt ├── 2015-11-23-dataset1.txt ├──
2015-11-23-dataset2.txt └── 2015-11-23-dataset_overview.txt~
Content from Access Control
Last updated on 2024-06-24 | Edit this page
Overview
Questions
- Who has the ability to carry out privileged tasks in a Linux system?
Objectives
- Understand the scopes of administrative controls inside Linux
- Undersand common access control models
- Access control decisions depend on which user is attempting to perform and operation on that user’s membership in a UNIX group.
- Objects have owners. Owners have broad (but not necessarily unrestricted) control over their objects.
- You own the object you create.
- The special user account
rootcan act as the owner of any object. Onlyrootcan perform certain sensitive administrative operation.
- The omnipotent administrative user (superuser)
- Can perform all restrictive operations:
- Creating device files
- Setting the system clock
- Raising resource usage limits and process priorities
- Setting the system’s hostname
- Configuring network interfaces
- Opening privileged network ports (those below 1024)
- Shutting down the system
4. Rootly powers
-
sudo: Running the commands as another user. If there is no username provided, the user is going to beroot. - For security purposes, the password of the
rootaccount should always be very complicated and not be given out lightly. - Administrative teams are often granted
sudopower, meaning that they can execute commandsin the name ofother accounts, includingroot.

- How does it help with security aspects, since technically everyone have rootly power anyway with sudo?
-
setuid- Grant privilege to the task (the program), not the user
- Possible by leveraging a process’ user ID:
- real user ID (ruid)
- effective user ID (euid)
- saved user ID (suid)
- Why direct log in of root account is a bad idea.
- Root logins leave no record of what operations where performed as root.
- We also don’t know who logged in as root.
- By default, most systems allow root login to be disabled on
terminals, through the windows systems, and across the network.
- Passwordless root account is another solution.
- If root is accessible, password must be really good.
- Root access presents a potential single point of failure.
- The
setuidalternative is difficult to manage due to potential capability leaks from complex software suites. - Minimal control over network security.
- Group management cannot be done by users (more work for administrators).
- Access control rules are embedded in individual codes, cannot be easily rewritten.
- Little to no support for auditing and logging.
- PAM: Pluggable Authentication Modules
- Wrapper for various method-specific authentication libraries
- SSO (Single Sign-On)
- Kerberos: netowrk cryptographic authentication
- Authentication rather than access control
- Uses trusted third party to perform authentication for an entire network.
- Filesystem access control lists )ACL)
- Set permissions for multiple users and groups at once.
- Linux capabilities
- man capabilities
- Privileges traditionally associated with superuser are divided into units, known as capabilities, which can be independently enabled and disabled.
- Capabilities are a per-thread attribute.
- This is in use extenively for higher-level systems like
AppArmororDocker.
- Linux namespaces
- Processes can be separated into hierarchical partitions
(
namespaces) from which they see only a subset of the system’s files, network ports, and processes. - Preemptive access control.
- Foundation for software containerization
- Docker
- Processes can be separated into hierarchical partitions
(
- Linux’s standard access control model is considered
discretionary access control(DAC)- Owners of access-controlled entities to set the permissions on them.
- Bad example: users expose their home directories.
- Mandatory access control (MAC)
- Administrators write access control policies that override or supplement DAC.
- Enabling technology for new security models.
- Principle of least privilege
- Role-based access control (RBAC)
- Added layer of indirection to access control calculations
- Permissions are granted to intermediate constructs
(
roles), androlesare assigned tousers. -
rolescan have hierarchical relationships (easier to administer)
- SELinux: Security-Enhanced Linux
- MAC model
- Created by NSA
- Difficult to administer and troubleshoot
Content from Process Control
Last updated on 2024-06-24 | Edit this page
Overview
Questions
- What is a process?
- How can we monitor running processes?
Objectives
- Undertand how to observe and monitor running processes.
- Represents a running program
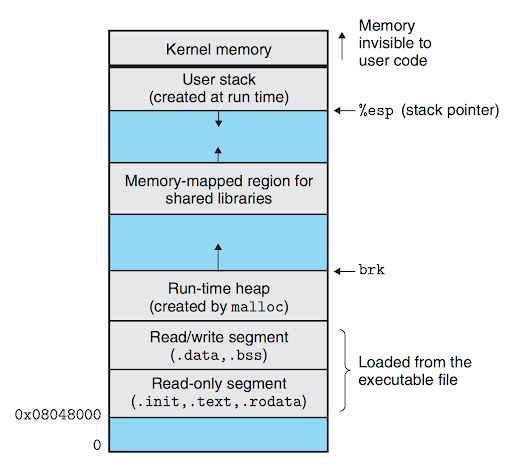
- An address space
- A set of data structures within the kernel
- Address space map
- Current status of the process
- Execution priority of the process
- Information about resources
- Information about files and open ports
- Signal mask
- Owner
- …
- PID: process ID number
- PPID: parent PID - how is a process spawn?
- UID: user identifier of the person who created the process
- EUID: effective user identifier - what resources the process has access to at any given moment
- GID: group identifier of the person who created the process
- EGID: effective group identifier
- When system boot, the first process is created (
initorsystemd) with process ID of 1 - All other processes are created through
fork-
fork()creates a copy of the parent process. - In the copy (child),
fork()returns 0. - In the original (parent),
fork()returns the new PID of the child process.
-
- Process-level interrupt requests
- Approximately thirty signals
- Are sent as means of communication
- Are sent by terminal driver to kill/interrupt/suspend processes using Ctrl-C or Ctrl-Z
- Are sent by kill to terminal processes
- Are sent by kernel when faults happen (e.g., divided by 0)
- Are sent by kernel to notify the process of interesting events (I/O data is available, child process is dead …)
- Signal description
- HUP
- INT
- QUIT
- KILL
- BUS
- SEGV
- TERM
- STOP
- TSTP
- CONT
- WINCH
- USR1
- USR2
-
ps: Snapshot of current processes - ssh to your CloudLab experiment and run:
-
USER,PID,%CPU,%MEM -
VSZ: Virtual size of the process -
RSS: Resident set size (number of pages) -
TTY: control terminal ID -
STAT: current process status (Process State Codes from manual) -
TIME: CPU time process consumed -
COMMAND: command and arguments.
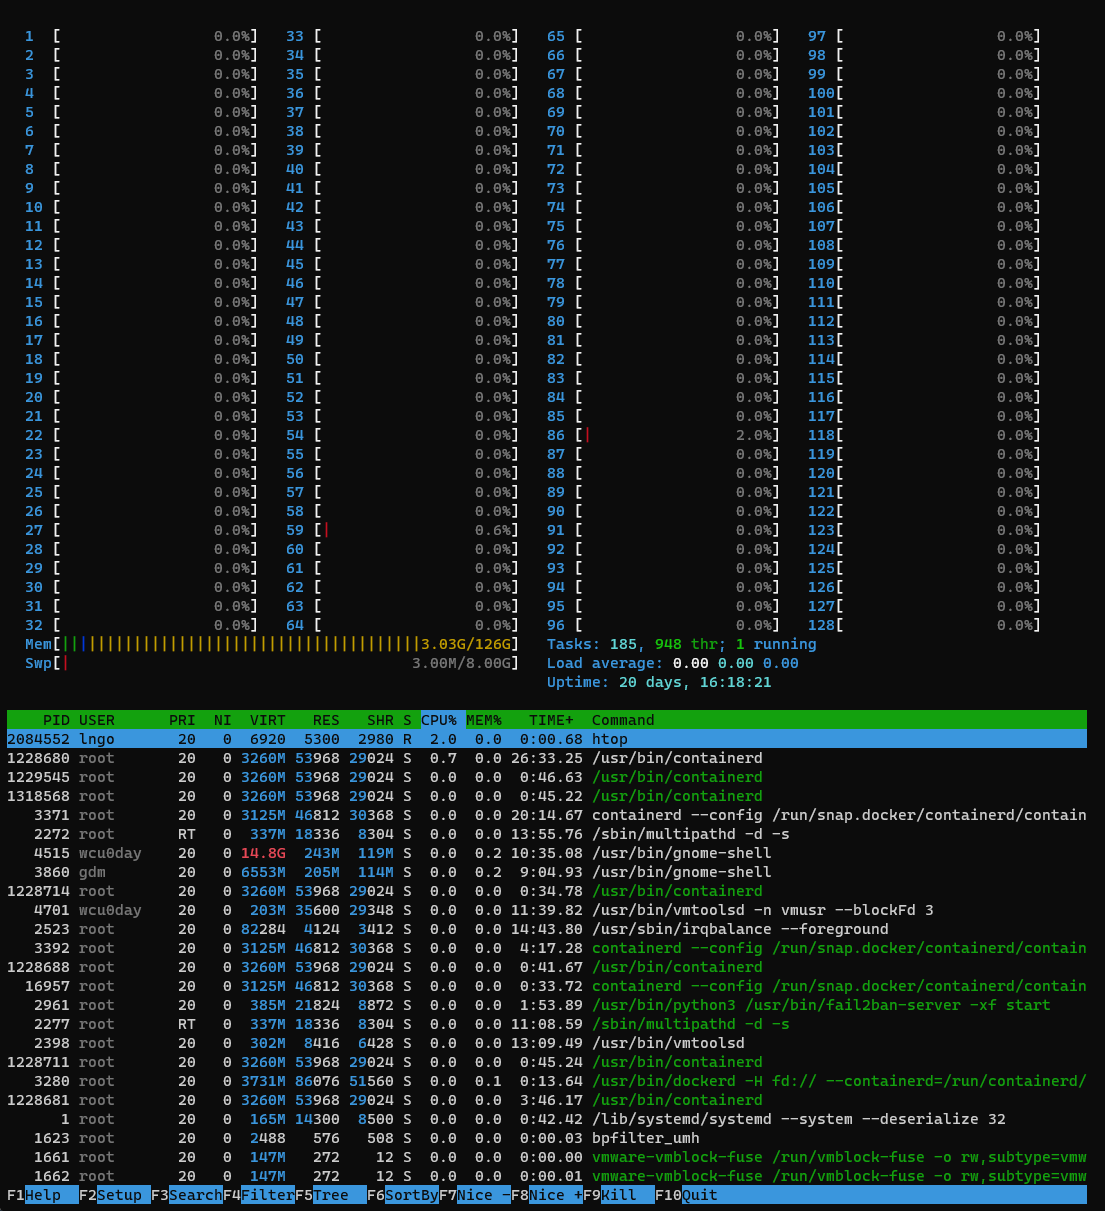
tophtop
- Spend 10-15 minutes to read and learn how to use tmux
- This is to be done on CloudLab
-
strace: check what a process is doing- Create a tmux session with two horitonzal panel.
- Run
topin the first screen - In the second screen
- Identify the process ID of top
- Run
straceon this process ID:
- System slows down!
- Use
psandtop(htop) to identify those that soak up CPU and memory - Check filesystem disk usage:
df -h - Check directory usage:
du -h
- The
crondaemon allows the execution of commands on a predetermined schedule. - Run the followings
crontab -e- Select an editor (recommend nano)
- Type
* * * * * echo $(/bin/date) >> /users/<your_username>/cron.loginto the file - Save and quit nano (we did this before)
- Wait for a few minutes, then check the content of cron.log
- Common usage:
- Sending mail
- Cleaning up a file system
- Rotating a log file
- Running batch jobs
- Backing up and mirroring
- A legacy!!!
Content from The Filesystem
Last updated on 2024-06-24 | Edit this page
- Processes
- Audio devices
- Kernel data structures and tuning parameters
- Inter-process communication channels
- A namespace
- An API
- Securiy models
- An implementation
- Single unified hierarchy start at root:
/ - Absolute path: path name starts from root
- Relative path: path name starts from current directory: . or subdirectory name
- The root file system is composed of smaller trunks (smaller filesystems)
- Smaller file systems are attached to the tree with the mount
command, which …
- Maps a directory within the existing filesystem tree, called the mount point, to the root of the newly attached filesystem.
- Instead of rebooting, perhaps unmounting/remounting of offending device drivers.
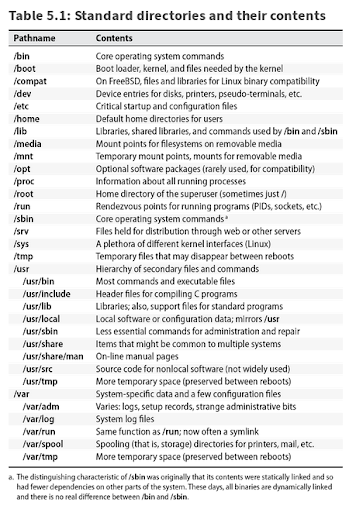
- Character/block device file: standard communication interface provided by device drivers.
- Local domain sockets: connections between processes that allow them to communicate hygienically.
- Named pipes allow communication between two processes running on the same host.
- Symbolic links: point to a file by name
- Hard links: create an illusion that a file exists in more than one place at the same time.
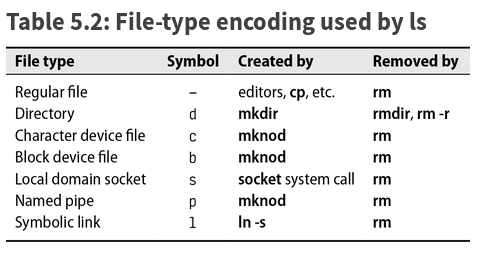
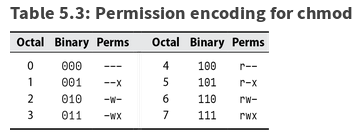
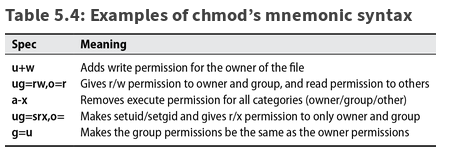
- Traditionally 12 bits for each file: the file’s mode (plus 4 more bits : file’s type)
- 9 permission bits - read, write, execute for owner, group, others
- setuid & setgid bits (4000 , 2000)
- setgid on directory - newly created file has group ownership of the directory (not group ownership of a user creating it)
- sticky bit (1000)
- on regular files ignored (original meaning: keep program text on swap device)
- on directories - only the owner of the file and the owner of that directory may remove the file from that directory
- supported for ext2, ext3, ext4, reiserfs, XFS, JFS:
mount -o [no]acl - allows rwx to be set independently for any user.group combination:
getfacl,setfacl( plus man acl) - NFSv4 - superset of POSIX ACLs plus all permission bits and most semantics from Windows
Content from User Management
Last updated on 2024-06-24 | Edit this page
- Nothing more than a number (user ID - UID)
- Everything else revolves around this number
- System maps UID to additional set of information based on an API.
- login names: ≤ 32 chars, case sensitive and (in some cases) even special chars (☹, …)
- encrypted password ( or *) - do NOT leave empty
- DES, MD5(\(1\)..), Blowfish(\(2y\)), SHA-256 (\(5\)), SHA-512 (\(6\)),
- check
/etc/login.defsor (was)/etc/default/passwdplusPAMand on RHEL/CentoSauthconfig.
- UID (32-bit integer)
- 0 for root by default
- do not recycle them (or as late as possible) - ? why
- should be unique in the whole organization ( else NFS problems, ..)
- GID
- GECOS (finger’s interpretation)
-
homedir -
loginshell
- Contains the names of UNIX groups and list of each group’s members
- useradd
- userdel
- usermod
- pwconv
- pwunconv
- groupadd
- groupmod
- groupdel
Content from Software Installation and Configuration
Last updated on 2024-06-24 | Edit this page
- Instantiate an experiment from the CloudLab profile created last week
- SSH into the experiment once it is ready.
- Two approaches:
- From package management system
- From source
- Hands-on:
- Install nginx from package management system
- Install another version of nginx into
/opt/nginx/VERSION
- The purpose of this document is to create a LAMP (Linux/Apache/MySQL/Php) installation on your experiment.
- With this in place, we’ll also install two common LAMP applications:
-
phpMyAdmin: a web app for managing MySQL databases -
Drupal: a content management system.
-
- More passwords:
- The
MySQLinstallation needs an administrative (root) password to get started. This is an important one, but we will make it so that you, with machine root access, do not have to remember it. -
phpMyAdminhas its own administrative database/user/password; fortunately you do not need to remember this password. -
Drupalalso has its own administrative database/user/password which you don’t have to remember. Drupal also requires a site administrator login/password, which you do have to remember.
- The
- Open mysql
- Run the following commands inside MySQL
ALTER USER 'root'@'localhost' IDENTIFIED WITH mysql_native_password BY 'password';
exit- Setup MySQL using
mysql_secure_installation: first, run the following command
- Answer the questions on the prompt as follows:
Securing the MySQL server deployment.
Enter password for user root:
VALIDATE PASSWORD COMPONENT can be used to test passwords
and improve security. It checks the strength of password
and allows the users to set only those passwords which are
secure enough. Would you like to setup VALIDATE PASSWORD component?
Press y|Y for Yes, any other key for No: n
Using existing password for root.
Change the password for root ? ((Press y|Y for Yes, any other key for No) : n
... skipping.
By default, a MySQL installation has an anonymous user,
allowing anyone to log into MySQL without having to have
a user account created for them. This is intended only for
testing, and to make the installation go a bit smoother.
You should remove them before moving into a production
environment.
Remove anonymous users? (Press y|Y for Yes, any other key for No) : n
... skipping.
Normally, root should only be allowed to connect from
'localhost'. This ensures that someone cannot guess at
the root password from the network.
Disallow root login remotely? (Press y|Y for Yes, any other key for No) : n
... skipping.
By default, MySQL comes with a database named 'test' that
anyone can access. This is also intended only for testing,
and should be removed before moving into a production
environment.
Remove test database and access to it? (Press y|Y for Yes, any other key for No) : n
... skipping.
Reloading the privilege tables will ensure that all changes
made so far will take effect immediately.
Reload privilege tables now? (Press y|Y for Yes, any other key for No) : Y
Success.
All done!- Run the following command and provide the password to test the MySQL
server:
mysql -u root -p- To quit MySQL, type
\q
- Create a file named
.my.cnf(runsudo nano /root/.my.cnf)directly inside/rootwith the following content:
[client]
user=root
password="MYSQL_ROOT_PASS"- Test the effectiveness of this passwordless setup
sudo su
mysql
\q
exit
sudo -H mysql
\q- Run the following commands
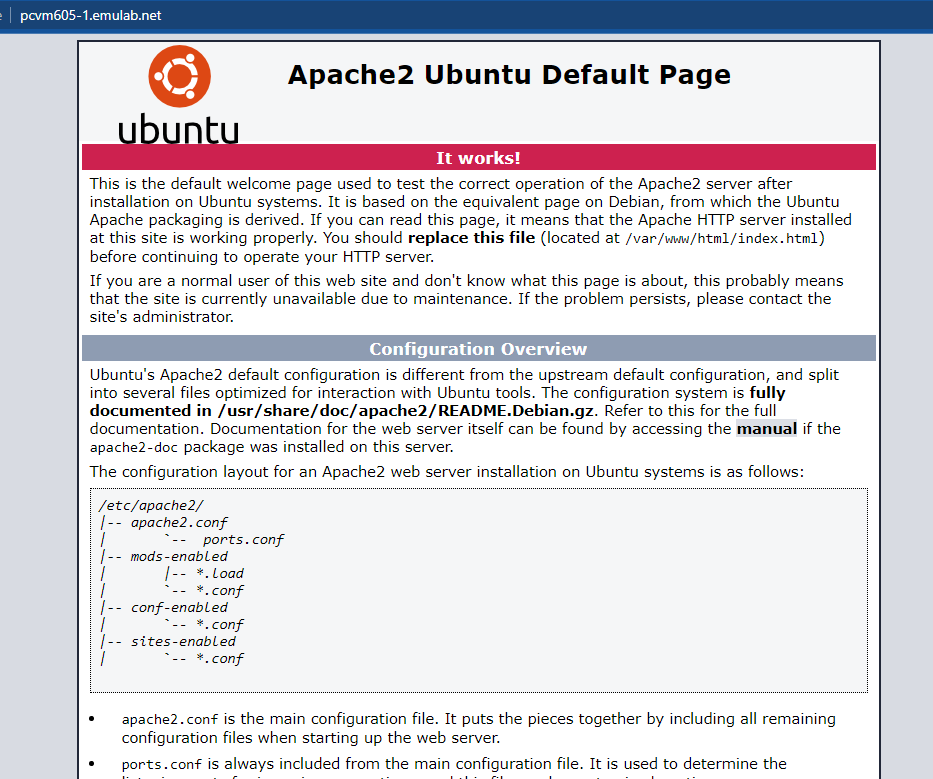
$ sudo apt install -y apache2 php libapache2-mod-php php-cli php-mysql php-cgi php-curl php-json php-apcu php-gd php-xml php-mbstring- Test the installation once it is completed by open a web browser and go to your CloudLab experiment’s host name (the same one that you SSH to)
- The Apache service is one which needs to be
resetoften because of configuration changes. Control the Apache server is done as a SysV service which is based on thesystemctlcommand:
or, more simply:
where COMMAND can be: status, start,
stop, restart, reload.
- If something goes wrong, the first place to look is usually this log
file:
/var/log/apache2/error_log - This error log file is readable by you, a system admin, without
invoking
sudo. Often a useful thing to do is tofollow the tailof this file as messages are generated with using thetail -fcommand:
- If you make a configuration change, you can test its effectiveness by running this prior to attempting to reset the service.
- Apache understands user sites as the automatic association of a
special directory owned by you (by default,
~/public_html) to the URLhttp://hostname/~LOGIN
- User directories are not enabled by default. To enable the Apache userdir module by:
$ sudo a2enmod userdir
$ sudo systemctl reload apache2- The first command simply creates a symbolic link. Check it yourself:
$ ll /etc/apache2/mods-enabled/userdir.*- Visit
http://hostname/~LOGIN- Does it work?
- Why?
- Run
$ sudo nano /etc/apache2/mods-available/userdir.conf- Make the appropriate changes or additions
- Save and reload
- Try visiting the site again
- To enable PHP, edit the file
/etc/apache2/mods-enabled/php7.4.conf - Comment out the last five lines as per the instructions in the comments
- Restart apache2
- Create a file named
hello.phpin yourpublic_htmldirectory with the following contents:
<?php
echo "Hello from PHP";
?>- Refresh your home page and view this file.
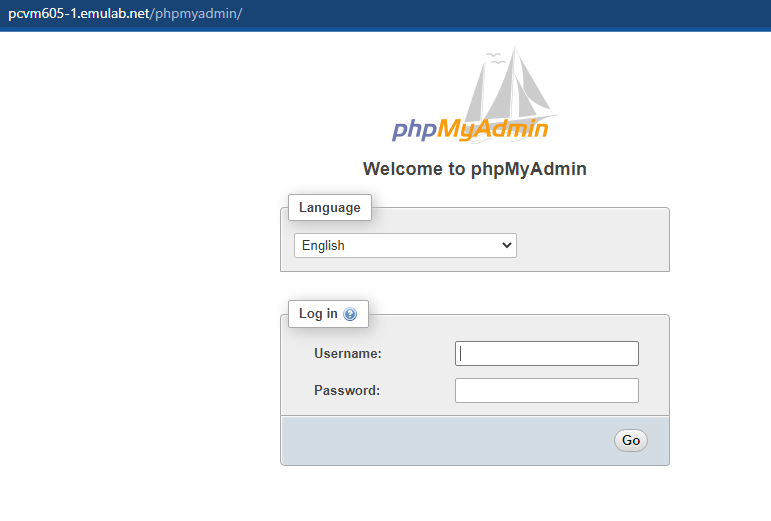
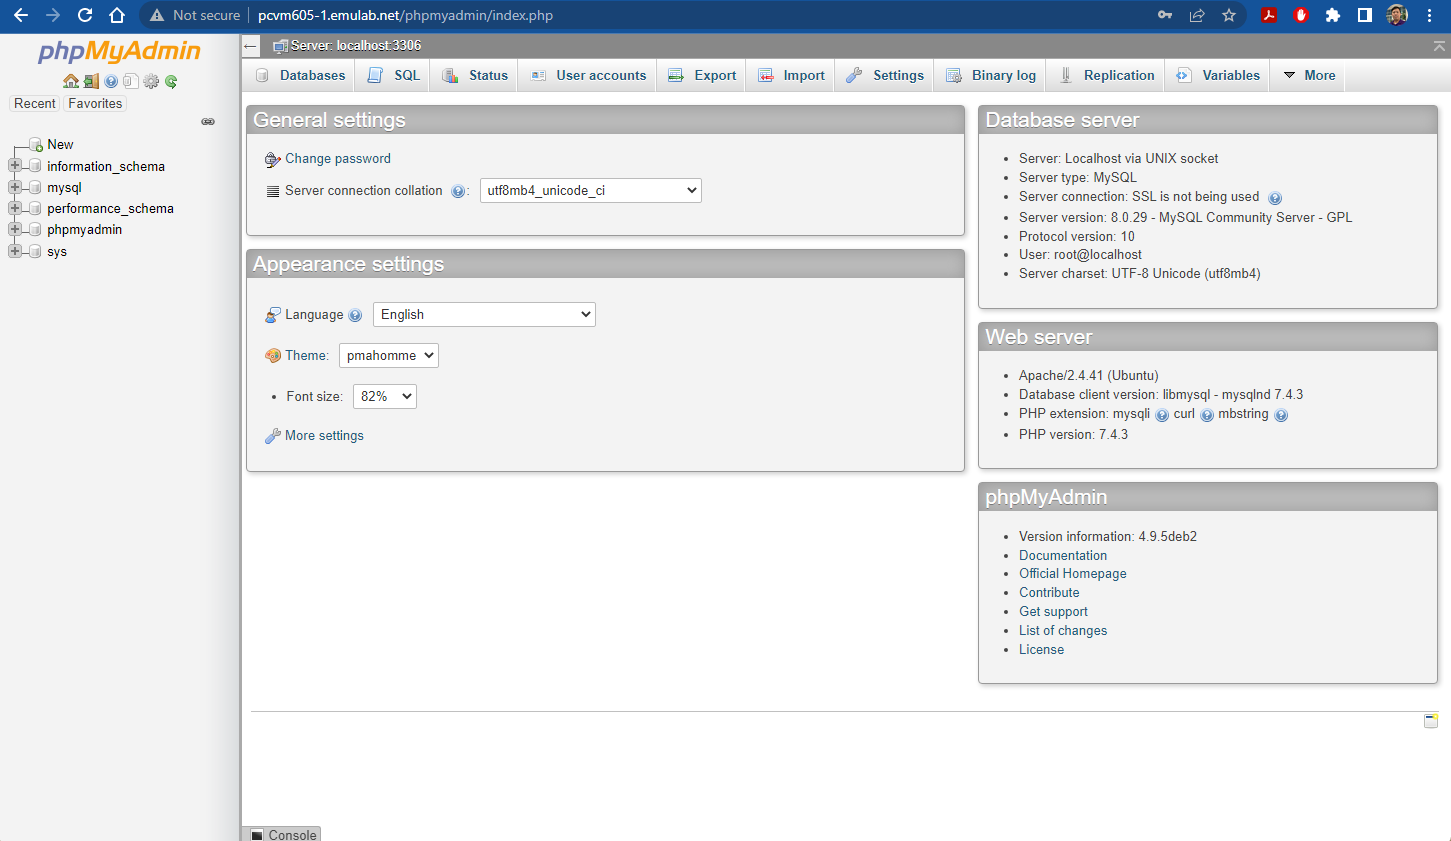
- Run the following command to install
phpmyadmin
sudo apt-get install -y phpmyadmin- Press the
Spacebutton to checkapache2, thenTabto move toOkand pressEnter.
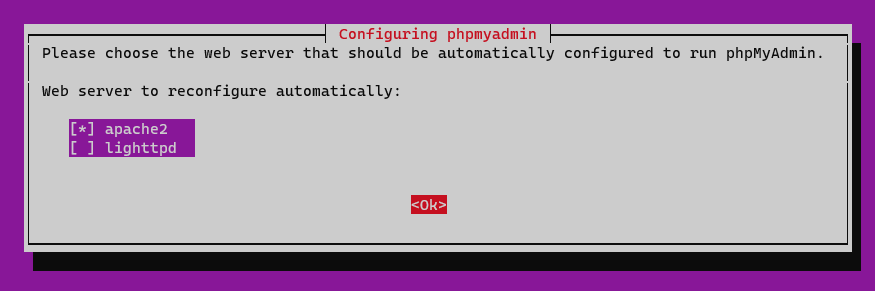
- Accept default
Yesanswer onConfiguring database for phpadmin with dbconfig-common. - Select and enter a password for
phpmyadmin.- Press the
Tabkey to go toOk, then pressEnter
- Press the
- Re-enter the above password for confirmation, then
TabtoOkandEnter. - Provide the password of account
rootfor MySQL (from the MySQL installation).- Press the
Tabkey to go toOk, then pressEnter
- Press the
- Run the following commands
- Find your machine simple hostname
- Going forward,
MACHINEwill refer to the outcome of this command.
- Going forward,
- Find your machine full hostname
- Going forward,
HOSTNAMEwill refer to the outcome of this command.
- Going forward,
- Think of a password for your drupal database.
- Going forward,
DRUPAL_DB_PASSwill refer to this value.
- Going forward,
BASH
mysql
mysql> create database drupal;
mysql> create user drupal@localhost identified by "DRUPAL_DB_PASS";
mysql> grant all on drupal.* to drupal@localhost;
mysql> quit;- Install drupal
BASH
tar xzf drupal-9.4.2.tar.gz
mv drupal-9.4.2 /var/www/html/$(hostname -f | awk -F\. '{print $1}')_drupalVisit
http://HOSTNAME/MACHINE_drupalto start the browser-based configuration process for Drupal.On first windows, select language
Englishand clickSave and Continue.Next, select
Standardthen clickSave and Continue.We need to address two errors and one warnings.
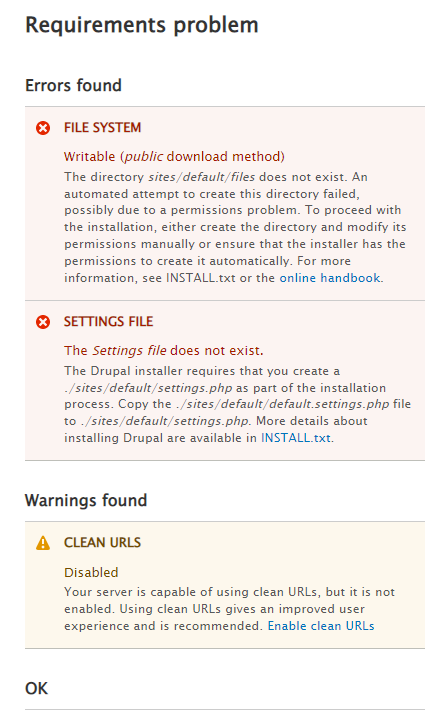

- Confirm that you are still inside the drupal directory.
- Edit
/etc/apache2/conf-available/drupal.confand add<Directory /var/www/html/MACHINE_drupal>as first line and</Directory>as last line.
- Scroll to bottom of page, click
try againto confirm that the warning error message is gone and the configuration has moved on to the next step.
- Provide the authentication for the
drupalusername and database table as created earlier. - Wait for the installation to complete.
- For configuration:
-
Site name: MACHINE -
Site email address: your email address. - Other options can be selected as you see fit.
-
- Challenge: Create a first page via Drupal and display the content.
- Ansible is one of the more well-known configuration management tools at the disposal of sys admins.
- This is to help facilitate the automatic installation and configuration of various software.
- Tasks:
- Install Ansible on CloudLab experiment
- Follow instructions at Digital Ocean to setup and create a LAMP stack using Ansible playbooks.
- Integrate everything into the CloudLab experiment so that all is automated!
Content from Bash Scripting
Last updated on 2024-06-24 | Edit this page
Based on previous materials by Dr. Robert Kline
- Just like the script for a movie that tells the actors what they should say and do, a script for a computer tells the computer what is should do or say.
- A bash script is a plain text file which contains a series of commands.
- Anything you can run normally on the command line can be put into a script and it will do exactly the same thing. Similarly, anything you can put into a script can also be run normally on the command and it will do exactly the same thing.
- In your CloudLab experiment, run the following:
BASH
wget --no-check-certificate https://cs.wcupa.edu/lngo/assets/src/bash_basics.zip
unzip bash_basics.zip
cd bash_basics
ls- These scripts will be used to illustrate concepts in the remainder of this slide deck.
- There is far too much content in the Bash language to be covered in any single document like this one, a tutorial, or even an introductory textbook. Inevitably, if you need to write programs in Bash, you will have to consult the online manual: https://linux.die.net/man/1/bash
- Bash script files can be named as you like. Unlike Windows systems,
the extension is not an essential feature which determines the usage.
The
.shextension is merely a convention which can assist editor recognition. All scripts can be executed explicitly using the bash executable:
- Create a file named
hello.shwith the following content:
- Execute the file using the following command:
- The file itself must be executable by you.
- If you are the owner of the script you can add that permission with statements like:
or
The file must either be locatable by its path prefix or have its containing directory in the PATH variable. A full path to the script might be:
/usr/local/bin/SOME-SCRIPT.shIf the script is in the shell’s current directory, this is also a full path:
./SOME-SCRIPT.shThe file must identify itself as self-executing.
If the first two characters are
#!, this indicates that the file is a text-based script file, and that the remaining portion of the first line provides the program to run the script. Thus, a Bash script begins with this first line:#!/bin/bashEdit and add
#!/bin/bashto the first line ofhello.sh
- The Bash language has three main functions:
- execute commands interactively
- extend the set of commands via scripts
- build up, via sourcing, the user environment with variables, aliases, functions
- In particular, Bash, per se, is not a general purpose programming
script language like, say, Perl, Python or TCL.
- Its main orientation is towards executing the standard UNIX command set and Bash scripts rely heavily on the standard UNIX commands.
- When a shell is run interactively the lines of a bash program a re created one-by-one.
- Shell code usually is considers the script to be interactive if the prompt variable, PS1 is defined, since all statements receive this prompt before entry.
- In interactive execution, Bash will source each statement, which is a form of execution in which all variable settings are retained.
- Interactive execution also permits many user-friendly control
features not necessary in script execution such as:
- line repeat control with up and down arrows
- line editing and extension features
- tab-based command and filename completion
The program
scalars.shillustrates basic principles of Bash variables and values. In particular, the only scalar data type is a string. Values are created in several ways:within uninterpolated quotes: ’ ’
within interpolated quotes: ” ”
the output of a command within shell evaluated back quotes \(`\_`\) or within
$( )a bareword which is not a Bash reserved word and contains no special operator characters
- The most basic operation on strings is concatenation, which, in Bash, is simply juxtaposition. In general, whitespace sequences are collapsed into a single blank; whitespace sequences at the ends of strings are truncated (i.e., trimmed).
- Variables are defined using the assign operator
=in a very strict sort of way. - Once a variable,
v, is defined, its value is automatically used with the expression$v. - A double-quoted variable’s value, like
"$y", can behave differently from$ywhen the value has internal whitespace. If there is any doubt, it is recommended to always use double quotes. - A newline is interpreted as a statement terminator. A semicolon
(
;) can also be used as a statement terminator if you want two or more statements on the same line. - View, then execute scalars.h
- Observe the corresponding outcomes versus the codes
- Type something and hit Enter to exit this script.
- Although echo is the most common output statement, Bash also supports the C-style printf statement, e.g.,
- There is an equivalent to sprintf (printf to a variable) in the form of
- For most situations, echo is more common. It is easy to use and, for
the most part does what you want in a simple manner. One
-
problem spot is printing control characters like
\tfor tab. - The bash syntax for this control character has the cumbersome form: $’
-
problem spot is printing control characters like
- For example, these two statements generate the same output:
- As you can imagine the
printfversion is more memorable. On feature available to echo which is not available to printf is colorization. When used with the-eflag, echo interprets certain special convoluted escape sequences as indication to change the color of the output. For example this prints “HELLO” in bold red followed by “THERE” in (normal) black
- The output need not be separated like this, we are simply making it easier to see
- Bash, just as other languages, does support additional structured data types in the form of lists and maps (associative lists).
- It also provides a way of assigning a type to a variable through a the declare statement. View and execute the following script for observation
- One of the primary purpose of the bash language is to extend the set
of commands. For this reason Bash provides simple access to the
command-line parameters. Bash uses the variables
$1,$2, etc. The expression$0is the command name itself. They should be double-quoted. Use these test-runs:
- The bash if-else syntax is unusual compared to other languages. The format looks like this:
The “…” sections represent boolean “tests”. The chained
elif and the else parts are optional. The
“then” syntax is often written on the same line as the if portion like
this: if ...; then
- What is happening is that the ping operation with the options used is a single ping which can either succeed or fail within 2 seconds with these two possible outcomes:
- it succeeds with exit status is 0, the test is true and the if part is executed.
- it fails with non-zero exit status, the test is false and the else part is executed.
- The notion of true and false in these bash tests can be
counter-intuitive: an exit status of 0 means true, non-zero means false.
The
$?construct used inecho status=$?is a Bash special variable which gives the exit status of a previous command (and so it has to come before the second echo statement).
- The
&&and||operators are much the same sense as other languages using short-circuit execution. - In Bash they are often used to express the chaining of operations
based on success or failure. A good example is:
c++ myprog.cc && a.out, in which we only run the compiled program if the compilation succeeds.
- What is considered as boolean expression in an if test uses this syntax:
- The only value regarded as false is the empty string. Bash does not recognize any numerical types per se, only strings used in a numerical context. An undefined value is, in every way, equivalent to the empty string in Bash.
- You have to be careful about using an undefined variable in a script
since it may be an exported variable and, thereby, implicitly defined.
You can always explicitly undefined a variable
xbyunset x. - You can verify the values of false by viewing and running this
sample script:
falsetest.sh
- An example usage is this line in
pingtest.sh:
- In this example host is the first parameter; if undefined, give a “usage” message.
- A number of common Bash constructions use the unary “–” prefix file
test operators, e.g.,
-
-eNAME: NAME exists as a file (of some type) -
-fNAME: NAME exists as a regular file -
-dNAME: NAME exists as a directory
-
- An example of this appears in the
~/.bashrcstartup script:
- The
ifoperator (and other tests) can be used with boolean expressions using appropriate syntax. - The test expressions are normally within single brackets [ .. ].
- There is a single space after
[and before].
- There is a single space after
- Within these we have these operator usages:
-
=,!=: lexicographic comparison -
-eq,-ne,-lt,-le,-gt,-ge: numerical comparison
-
- However both double brackets
[[ .. ]]and double parentheses(( .. ))can serve as delimiters. - The operators
<and>normally represent file redirection, but can be used for lexicographic comparison, within[[ .. ]]and numerical comparison within(( .. )). - You can view and observe some examples from:
test-values.sh
- The way Bash deals with strings has certain unexpected consequences.
Consider the program
errors.sh:
- When executed, the 3 out of 4 test lines are flagged as errors:
- line 4:
[a: command not found - line 5:
[: missing]’` - line 7:
[: a: unary operator expected
- line 4:
- The first two mistakes were caused by having the expression
$xtouch a bracket. - The last was caused by the missing quotes around the
$yexpression in which case it interpreted the inserted expression"a b"as the operatorawith argumentb.
- Bash uses primitive globbing patterns for various matching operations.
- The most common is the usage of
*which matches any sequence of characters. - Less common is
?which matches any single character and even less common are character sets, such as[A-Z]and[^0-9]. - These type of expressions stand in contrast to more powerful regular expression pattern generators which, in Bash, are only available through auxiliary commands.
- Glob patterns are simple, familiar patterns such as those used
commonly in file listing:
-
ls *.html# all HTML files (not starting with “.”) -
ls .??*# all dot files except “.” and “..” -
ls test[0-3]# “test0”, “test1”, “test2”, “test3”
-
- The Bash
casestatement distinguishes itself from anif/elseconstructions primarily by its ability to test its cases by matching the argument against glob patterns. The syntax is like this:
BASH
case "$file" in
*.txt) # treat "$file" like a text file
;;
*.gif) # treat it like a GIF file
;;
*) # catch-all
;;
esac - Unlike C++ or Java syntax, the break exits an enclosing loop, not exit the particular case.
Bash has both for and while loops. However, the type of control for these is typically not numerical. The most common looping structure in Bash is the for/in structure like this: for x in … do statements involving $x done
Loops The “…” is a list of things generated in a number of ways. The x is the loop variable which iterates through each item in the list. For example, try running this program in the current directory: $ more fileinfo.sh $ ./fileinfo.sh In this case the things iterated are the files in the current directory. Loops One can use numerical-like looping with the double-parentheses like those in for numerical comparison: for ((i=1; i<=10; ++i)); do echo $i done
- The while loop also has an advantage in its ability to read live input. For example, this simple program reads and echos input lines:
- In a programmatic setting, it is often useful to process lines generated from the output of some command.
- Say we want to process all words starting with
myin the system dictionary (/usr/share/dict/words) by removing - the initialmypart. - The following two scripts represent two possible ways of doing so:
- The command
grep ^my /usr/share/dict/wordsis used to generate the target information. - The two respective approaches to processing this are:
- input redirection into the
while ... doneloop using the manufactured “input device”< (grep ^my /usr/share/dict/words) - piping (i.e.,
|) the command into the “while … done” loop.
- input redirection into the
- It turns out that only the former method works as we want it to. The
problem with the latter method is that the
countvariable is being manipulated in a subshell created by the pipe operation and so its value cannot be used upon exiting the while loop.- In contrast, the former method with the odd syntax “<(..)” turns out to be more useful.
- Command-line arguments commonly consist of option arguments
beginning with a “-”. Consider, for example, the follow
unzipcommand which extractsFILE.zipinto/usr/local,- doing so with no output (-q) and
- overriding existing files (-o).
- The FILE.zip portion is the argument and others are options.
- Some options, like -d, take an argument themselves.
- The unzip command takes many more options (mostly prior to the argument).
- The options can be “compressed” under certain circumstances. For example, this is an equivalent call:
- The bash built-in operation
getoptsis meant to assist in extracting these options from the command line. - Consider the program getopts-test.sh:
- Running this command
yields the output:
- The while loop
while getoptsruns through the arguments looking for-n,-o,-q,-soptions.- OPTIND gives the position of the option (1-based).
- When a non-option argument is encountered the while loop terminates with flag set to ?. We can keep on going by shifting everything out and resetting OPTIND back to 1.
- The second part of the option search uses:
while getopts "d:" flag- The “d:” syntax indicates that the d option also takes an argument. In this case, the $OPTARG expression captures that value.
- A useful style of option sensing is to set
option flagvariables as shown inoptflags.sh. Try the followings:
- What is happening is that the variables
opt_a,opt_b, andopt_care being created through deferred evaluation using the Bash eval function. - The actual
$flag, say “b”, subtitutes into the evaluated expression eval “opt_\(flag=1" thus defining `opt_b` and setting it. We can later test for the presence of the "b" flag by: `if [ "\)opt_b” ]; then …`
- Functions offer an improvement of aliases. They must be defined before being used. In practice, they are often grouped into Bash files which are sourced within the script which uses them.
- Functions are supposed to emulate the way commands work. They do not return values in the usual way; any value sent back by the return statement must be an integer which acts like the exit code of an executable.
- The Bash language relies heavily on the UNIX-like environment in which it resides in order to create utility scripts. This environment includes many standard UNIX string processing operations such as these:
-
sed: (stream editor) for regular-expression substitution -
grep: can be used to perform match testing with -c (count) option; the -e option uses regular expression instead of glob patterns -
awk: captures the fields of a line (separated by whitespace) and does operations on these fields; -
tr: translate from one list of characters to another; often used to convert case of a string -
sed,grep,awk, andtrare used in Bash via standard I/O. All above operations act on text files when given file name as a parameter, or act from standard input with no arguments. - A common bash expression which uses an external OPERATION to compute
some internal value looks something like this:
result="$(echo "input string" | OPERATION)" - The pipe operator “|” is crucial for passing the input string to OPERATION via echo. The following program illustrates some of these external operations.
Content from More Linux Bash Scriptings
Last updated on 2024-06-24 | Edit this page
Overview
Questions
- How can sys admin setup complex workflows in Linux?
Objectives
- Understand pipe and filter tools
- It is possible to combine multiple Linux commands into one
- Settings:
- Data files have
.pdbextension.
- Data files have
- Question:
- Which of these files contains the fewest lines?
- SSH into your CloudLab experiment.
- Run the following commands to prepare the environment.
BASH
clear
cd
pwd
wget --no-check-certificate https://www.cs.wcupa.edu/lngo/data/shell-lesson-data.zip

unzip shell-lesson-data.zip
cd ~/shell-lesson-data/exercise-data/proteins
ls -l *.pdb
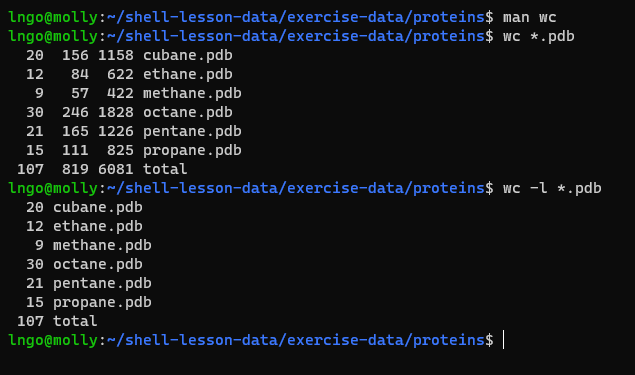
- To get counts of characters, words, and lines in a file, we use
wc.
- We can use the
>to redirect output to a file-
>redirects output and creates a new file. -
>>appends output to a file (if the file already exists, else creates a new file)
-
BASH
ls

wc -l *.pdb > lengths.txt

ls

cat lengths.txt

wc -l *.pdb >> lengths.txt

cat lengths.txt

wc -l *.pdb > lengths.txt

cat lengths.txt
- We can sort the contents of
lengths.txtusingsort
- The
-noption specifies a numerical rather than an alphanumerical sort.
- Let’s look at
lengths.txt:
sort -n lengths.txt

sort -n lengths.txt > sorted-lengths.txt

cat sorted-lengths.txt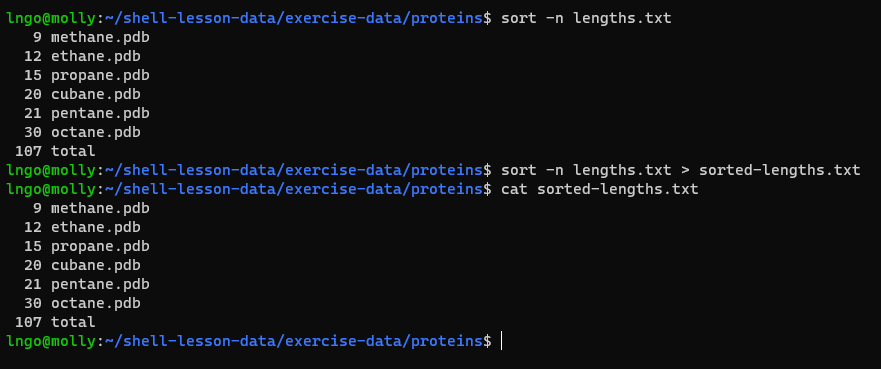
- We can use the
headcommand to get the first line
head -n 1 sorted-lengths.txt
- We used intermediate files to store output. We can use a pipe
(
|) to combine them together.
sort -n lengths.txt | head -n 1- We can combine multiple commands
wc -l *.pdb | sort -n | head -n 1
- Option 4 is the solution. The pipe character
|is used to connect the output from one command to the input of another.>is used to redirect standard output to a file. Try it in theshell-lesson-data/exercise-data/proteinsdirectory!
Challenge: pipe reading comprehension
- A file called animals.csv (in the
shell-lesson-data/exercise-data/animal-countsfolder) contains the following data:
BASH
cat ~/shell-lesson-data/exercise-data/animal-counts/animals.csv

2012-11-05,deer,5

2012-11-05,rabbit,22

2012-11-05,raccoon,7

2012-11-06,rabbit,19

2012-11-06,deer,2

2012-11-06,fox,4

2012-11-07,rabbit,16

2012-11-07,bear,1- What text passes through each of the pipes and the final redirect in
the pipeline below? Note, the
sort -rcommand sorts in reverse order.
Challenge: pipe construction
- For the file
animals.csvfrom the previous exercise, consider the following command:

- The
uniqcommand filters out adjacent matching lines in a file. How could you extend this pipeline (using uniq and another command) to find out what animals the file contains (without any duplicates in their names)?
Challenge: which pipe?
- The file
animals.csvcontains 8 lines of data formatted as follows::
The uniq command has a -c option which
gives a count of the number of times a line occurs in its input.
Assuming your current directory is
shell-lesson-data/exercise-data/animal-counts, what command
would you use to produce a table that shows the total count of each type
of animal in the file?
sort animals.csv | uniq -csort -t, -k2,2 animals.csv | uniq -ccut -d, -f 2 animals.csv | uniq -ccut -d, -f 2 animals.csv | sort | uniq -ccut -d, -f 2 animals.csv | sort | uniq -c | wc -l
Option 4. is the correct answer.
- Nelle has run her samples through the assay machines and created 17
files in the
north-pacific-gyredirectory described earlier. Let’s check the integrity of this data:
- How do we check for data integrity? Imagine if you have thousands of files?
- This is possible by looking at metadata (line counts, word counts, etc)
- There are also files containing
Zin their names,
- It is important to be careful when using wildcards if we don’t want to include these strange files in our calculations.
Suppose we have several hundred genome data files named
basilisk.dat, minotaur.dat, and
unicorn.dat. For this example, we’ll use the
exercise-data/creatures directory which only has three
example files, but the principles can be applied to many many more files
at once.
The structure of these files is the same:
- The common name, classification, and updated date are presented on the first three lines
- The DNA sequences on the following lines.
Let’s look at the files:
BASH
cd ~/shell-lesson-data/exercise-data/creatures/

head -n 5 basilisk.dat minotaur.dat unicorn.dat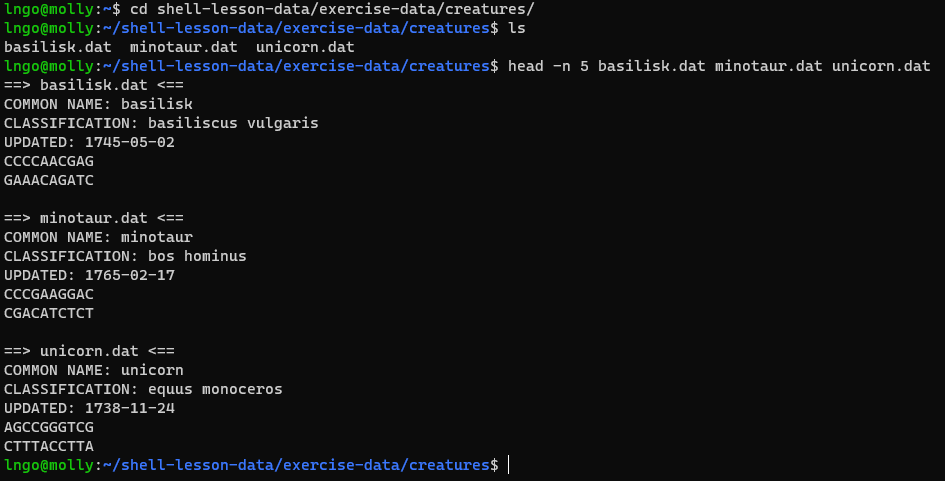
- We would like to print out the classification for each species, which is given on the second line of each file.
- For each file, we would need to execute the command
head -n 2and pipe this totail -n 1. - We’ll use a loop to solve this problem, but first let’s look at the general form of a loop:
for thing in list_of_things

do

    operation_using $thing    # Indentation within the loop is not required, but aids legibility

done
and we can apply this to our example like this:
BASH
for filename in basilisk.dat minotaur.dat unicorn.dat

> do

>   head -n 2 $filename | tail -n 1

> done
- When the shell sees the keyword
for, it knows to repeat a command (or group of commands) once for each item in a list. - Inside the loop, we call for the variable’s value by putting
$in front of it. The$tells the shell interpreter to treat the variable as a variable name and substitute its value in its place, rather than treat it as text or an external command. - In this example, the list is three filenames:
basilisk.dat,minotaur.dat, andunicorn.dat. Each time the loop iterates, it will assign a file name to the variablefilenameand run theheadcommand.- The first time through the loop,
$filenameisbasilisk.dat. The interpreter runs the commandheadonbasilisk.datand pipes the first two lines to thetailcommand, which then prints the second line ofbasilisk.dat. - For the second iteration,
$filenamebecomesminotaur.dat. This time, the shell runsheadonminotaur.datand pipes the first two lines to thetailcommand, which then prints the second line ofminotaur.dat. - For the third iteration,
$filenamebecomesunicorn.dat, so the shell runs theheadcommand on that file, andtailon the output of that. - Since the list was only three items, the shell exits the
forloop.
- The first time through the loop,
- Here we see
>being used as a shell prompt, whereas>is also used to redirect output. - Similarly,
$is used as a shell prompt, but, as we saw earlier, it is also used to ask the shell to get the value of a variable. - If the shell prints
>or$then it expects you to type something, and the symbol is a prompt. - If you type
>or$yourself, it is an instruction from you that the shell should redirect output or get the value of a variable. - When using variables it is also possible to put the names into curly
braces to clearly delimit the variable name:
-
$filenameis equivalent to${filename}, but is different from${file}name. You may find this notation in other people’s programs.
-
Challenge: variables in loops
- This exercise refers to the
shell-lesson-data/exercise-data/proteinsdirectory. - Run the following commands, observe the outputs, and answer the questions:
- What is the output of the following code?
- Now, what is the output of the following code?
- Why do these two loops give different outputs?
- The first code block gives the same output on each iteration through
the loop.
- Bash expands the wildcard
*.pdbwithin the loop body (as well as before the loop starts) to match all files ending in.pdband then lists them usingls.
- Bash expands the wildcard
- The second code block lists a different file on each loop iteration.
The value of the
datafilevariable is evaluated using$datafile, and then listed usingls.
Challenge: limiting sets of files
:class: note - What would be the output of running the following loop
in the shell-lesson-data/exercise-data/proteins
directory?
- No files are listed.
- All files are listed.
- Only
cubane.pdb,octane.pdbandpentane.pdbare listed. - Only
cubane.pdbis listed.
- How would the output differ from using this command instead?
- The same files would be listed.
- All the files are listed this time.
- No files are listed this time.
- The files
cubane.pdbandoctane.pdbwill be listed. - Only the file
octane.pdbwill be listed.
- 4 is the correct answer.
*matches zero or more characters, so any file name starting with the letter c, followed by zero or more other characters will be matched. - 8 is the correct answer.
*matches zero or more characters, so a file name with zero or more characters before a letter c and zero or more characters after the letter c will be matched.
Challenge: saving to a file in a Loop
:class: note - In the
shell-lesson-data/exercise-data/proteins directory, what is
the effect of this loop?
BASH
cd ~/shell-lesson-data/exercise-data/proteins/

for alkanes in *.pdb

> do

>   echo $alkanes

>   cat $alkanes > alkanes.pdb

> done- Prints
cubane.pdb,ethane.pdb,methane.pdb,octane.pdb,pentane.pdbandpropane.pdb, and the text frompropane.pdbwill be saved to a file calledalkanes.pdb. - Prints
cubane.pdb,ethane.pdb, andmethane.pdb, and the text from all three files would be concatenated and saved to a file calledalkanes.pdb. - Prints
cubane.pdb,ethane.pdb,methane.pdb,octane.pdb, andpentane.pdb, and the text frompropane.pdbwill be saved to a file calledalkanes.pdb. - None of the above.
- Also in the
shell-lesson-data/exercise-data/proteinsdirectory, what would be the output of the following loop?
BASH
cd ~/shell-lesson-data/exercise-data/proteins/

for datafile in *.pdb

> do

>   cat $datafile >> all.pdb

> done- All of the text from
cubane.pdb,ethane.pdb,methane.pdb,octane.pdb, andpentane.pdbwould be concatenated and saved to a file calledall.pdb. - The text from
ethane.pdbwill be saved to a file calledall.pdb. - All of the text from
cubane.pdb,ethane.pdb,methane.pdb,octane.pdb,pentane.pdbandpropane.pdbwould be concatenated and saved to a file calledall.pdb. - All of the text from
cubane.pdb,ethane.pdb,methane.pdb,octane.pdb,pentane.pdbandpropane.pdbwould be printed to the screen and saved to a file calledall.pdb.
- The text from each file in turn gets written to the
alkanes.pdbfile. However, the file gets overwritten on each loop iteration, so the final content ofalkanes.pdbis the text from thepropane.pdbfile.
- The text from each file in turn gets written to the
- 7 is the correct answer.
>>appends to a file, rather than overwriting it with the redirected output from a command. Given the output from thecatcommand has been redirected, nothing is printed to the screen.
- Run the following loop
- The shell starts by expanding
*.datto create the list of files it will process. - The loop body then executes two commands for each
of those files.
- The first command,
echo, prints its command-line arguments to standard output. In this case, since the shell expands$filenameto be the name of a file,echo $filenameprints the name of the file. - Finally, the
headandtailcombination selects lines 81-100 from whatever file is being processed (assuming the file has at least 100 lines).
- The first command,
- The shell starts by expanding
BASH
cd ~/shell-lesson-data/exercise-data/creatures

for filename in *.dat

> do

>   echo $filename

>   head -n 100 $filename | tail -n 20

> done- We would like to modify each of the files in
shell-lesson-data/exercise-data/creatures, but also save a version of the original files, naming the copiesoriginal-basilisk.datandoriginal-unicorn.dat. - We can’t use:
because that would expand to:
This wouldn’t back up our files, instead we get an error:
- This problem arises when
cpreceives more than two inputs. When this happens, it expects the last input to be a directory where it can copy all the files it was passed. Since there is no directory namedoriginal-*.datin thecreaturesdirectory we get an error. - Instead, we can use a loop:
- Since the
cpcommand does not normally produce any output, it’s hard to check that the loop is doing the correct thing. However, we learned earlier how to print strings usingecho, and we can modify the loop to useechoto print our commands without actually executing them. As such we can check what commands would be run in the unmodified loop.
The following diagram shows what happens when the modified loop is
executed, and demonstrates how the judicious use of echo is
a good debugging technique.
Nelle is now ready to process her data files using
goostats.sh — a shell script written by her supervisor.
This calculates some statistics from a protein sample file, and takes
two arguments:
- an input file (containing the raw data)
- an output file (to store the calculated statistics)
Since she’s still learning how to use the shell, she decides to build up the required commands in stages. Her first step is to make sure that she can select the right input files — remember, these are ones whose names end in ‘A’ or ‘B’, rather than ‘Z’. Starting from her home directory, Nelle types:
BASH
cd ~/shell-lesson-data/north-pacific-gyre

for datafile in NENE*A.txt NENE*B.txt

> do

>     echo $datafile

> done
Her next step is to decide what to call the files that the
goostats.sh analysis program will create. Prefixing each
input file’s name with ‘stats’ seems simple, so she modifies her loop to
do that:
She hasn’t actually run goostats.sh yet, but now she’s
sure she can select the right files and generate the right output
filenames.
Typing in commands over and over again is becoming tedious, though, and Nelle is worried about making mistakes, so instead of re-entering her loop, she presses ↑. In response, the shell redisplays the whole loop on one line (using semi-colons to separate the pieces):
Using the left arrow key, Nelle backs up and changes the command
echo to bash goostats.sh:
When she presses Enter, the shell runs the modified command. However, nothing appears to happen — there is no output. After a moment, Nelle realizes that since her script doesn’t print anything to the screen any longer, she has no idea whether it is running, much less how quickly. She kills the running command by typing Ctrl+C, uses ↑ to repeat the command, and edits it to read:
BASH
for datafile in NENE*A.txt NENE*B.txt; do echo $datafile;

bash goostats.sh $datafile stats-$datafile; done
When she runs her program now, it produces one line of output every
five seconds or so 1518 times 5 seconds, divided by 60, tells her that
her script will take about two hours to run. As a final check, she opens
another terminal window, goes into north-pacific-gyre, and
uses cat stats-NENE01729B.txt to examine one of the output
files. It looks good, so she decides to get some coffee and catch up on
her reading.
Another way to repeat previous work is to use the
history command to get a list of the last few hundred
commands that have been executed, and then to use !123
(where ‘123’ is replaced by the command number) to repeat one of those
commands. For example, if Nelle types this:
BASH
history | tail -n 5

   456  ls -l NENE0*.txt

   457  rm stats-NENE01729B.txt.txt

   458  bash goostats.sh NENE01729B.txt stats-NENE01729B.txt

   459  ls -l NENE0*.txt

   460  history
then she can re-run goostats.sh on
NENE01729B.txt simply by typing !458.
Challenge: doing a dry run
- A loop is a way to do many things at once — or to make many mistakes
at once if it does the wrong thing. One way to check what a loop
would do is to
echothe commands it would run instead of actually running them. - Suppose we want to preview the commands the following loop will execute without actually running those commands:
- What is the difference between the two loops below, and which one would we want to run?
- The second version is the one we want to run. This prints to screen
everything enclosed in the quote marks, expanding the loop variable name
because we have prefixed it with a dollar sign. It also does
not modify nor create the file
all.pdb, as the>>is treated literally as part of a string rather than as a redirection instruction. - The first version appends the output from the command
echo cat $datafileto the file,all.pdb. This file will just contain the list;cat cubane.pdb,cat ethane.pdb,cat methane.pdbetc. - Try both versions for yourself to see the output! Be sure to change
to the proper directory and open
all.pdbfile to view its contents.
- We have a nested loop, i.e. contained within another loop, so for each species in the outer loop, the inner loop (the nested loop) iterates over the list of temperatures, and creates a new directory for each combination.
- Try running the code for yourself to see which directories are created!
- Let’s start by going back to
~/shell-lesson-data/exercise-data/proteins$and creating a new file,middle.shwhich will become our shell script:
- Add the following line to
middle.shand save:head -n 15 octane.pdb | tail -n 5
- Once we have saved the file, we can ask the shell to execute the
commands it contains. Our shell is called
bash, so we run the following command:
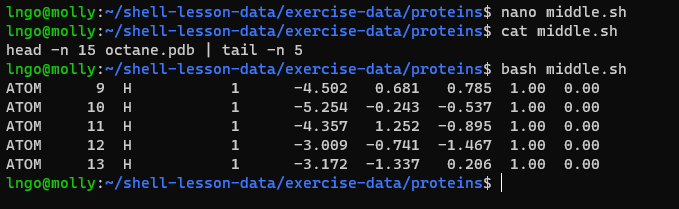
- What if we want to select lines from an arbitrary file? We could
edit
middle.sheach time to change the filename, but that would probably take longer than typing the command out again in the shell and executing it with a new file name. Instead, let’s editmiddle.shand make it more versatile:- Edit
middle.shand replace the textoctane.pdbwith the special variable called$1.- Wrap
$1inside double quotes:"$1".
- Wrap
-
$1means ‘the first filename (or other argument) on the command line’.
- Edit
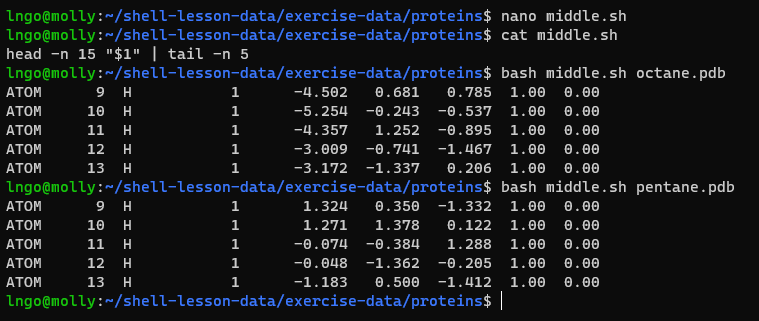
- Currently, we need to edit
middle.sheach time we want to adjust the range of lines that is returned. Let’s fix that by configuring our script to instead use three command-line arguments. - After the first command-line argument (
$1), each additional argument that we provide will be accessible via the special variables$1,$2,$3, which refer to the first, second, third command-line arguments, respectively. - Edit
middle.shand replace15with"$2"and5with"$3"
- By changing the arguments to our command we can change our script’s behaviour:
- This works, but it may take the next person who reads
middle.sha moment to figure out what it does. We can improve our script by adding some comments at the top:- A comment starts with a
#character and runs to the end of the line. - Add the following comments to
middle.shat the top:# Select lines from the middle of a file.#Usage: bash middle.sh filename end_line num_lines
- A comment starts with a
- What if we want to process many files in a single pipeline? For
example, if we want to sort our
.pdbfiles by length, we would type the following command becausewc -llists the number of lines in the files andsort -nsorts things numerically.
- We could put this in a file, but then it would only ever sort a list
of
.pdbfiles in the current directory. If we want to be able to get a sorted list of other kinds of files, we need a way to get all those names into the script. - We can’t use
$1,$2, and so on because we don’t know how many files there are. - Instead, we use the special variable
$@, which means, ‘All of the command-line arguments to the shell script’. - We also should put
$@inside double-quotes to handle the case of arguments containing spaces ("$@"is special syntax and is equivalent to"$1""$2"…). - Create a file called
sorted.shinsideshell-lesson-data/exercise-data/proteinswith the following contents:
BASH
# Sort files by their length.

# Usage: bash sorted.sh one_or_more_filenames

wc -l "$@" | sort -n- Observe the following commands:
BASH
cd ~/shell-lesson-data/exercise-data/proteins

nano sorted.sh

cat sorted.sh

bash sorted.sh *.pdb ../creatures/*.dat- To turn your script into an
executable file(run withoutbashcommand), the following line must be at the top of your script:
- and your script file must have executable permission:
Challenge: list unique species
:class: note
- Leah has several hundred data files, each of which is formatted like this:
BASH
2013-11-05,deer,5

2013-11-05,rabbit,22

2013-11-05,raccoon,7

2013-11-06,rabbit,19

2013-11-06,deer,2

2013-11-06,fox,1

2013-11-07,rabbit,18

2013-11-07,bear,1- An example of this type of file is given in
shell-lesson-data/exercise-data/animal-counts/animals.csv. - We can use the command
cut -d , -f 2 animals.txt | sort | uniqto produce the unique species inanimals.txt. - In order to avoid having to type out this series of commands every time, a scientist may choose to write a shell script instead.
- Write a shell script called
species.shthat takes any number of filenames as command-line arguments, and uses a variation of the above command to print a list of the unique species appearing in each of those files separately.
BASH
#!/bin/bash

# Script to find unique species in csv files where species is the second data field

# This script accepts any number of file names as command line arguments

# Loop over all files

for file in $@

do

  echo "Unique species in $file:"

  # Extract species names

  cut -d , -f 2 $file | sort | uniq

done- Suppose we have just run a series of commands that did something useful — for example, that created a graph we’d like to use in a paper. We’d like to be able to re-create the graph later if we need to, so we want to save the commands in a file.
- Instead of typing them in again (and potentially getting them wrong) we can do this:
The file redo-figure-3.sh now could
contains:
BASH
297 bash goostats.sh NENE01729B.txt stats-NENE01729B.txt

298 bash goodiff.sh stats-NENE01729B.txt /data/validated/01729.txt > 01729-differences.txt

299 cut -d ',' -f 2-3 01729-differences.txt > 01729-time-series.txt

300 ygraph --format scatter --color bw --borders none 01729-time-series.txt figure-3.png

301 history | tail -n 5 > redo-figure-3.sh- After a moment’s work in an editor to remove the serial numbers on
the commands, and to remove the final line where we called the
historycommand, we have a completely accurate record of how we created that figure. - In practice, most people develop shell scripts by running commands at the shell prompt a few times to make sure they’re doing the right thing, then saving them in a file for re-use.
- This style of work allows people to recycle what they discover about
their data and their workflow with one call to
historyand a bit of editing to clean up the output and save it as a shell script.
Nelle’s supervisor insisted that all her analytics must be reproducible. The easiest way to capture all the steps is in a script.
First we return to Nelle’s project directory:
- then creates a file using
nano…
- …which contains the following:
BASH
#!/bin/bash

# Calculate stats for data files.

for datafile in "$@"

do

    echo $datafile

    bash goostats.sh $datafile stats-$datafile

done- … saves this in a file called
do-stats.shand set executable mode so that she can now re-do the first stage of her analysis by typing:
- She can also do the following so that the output is just the number of files processed rather than the names of the files that were processed.
- One thing to note about Nelle’s script is that it lets the person running it decide what files to process. She could have written it as:
BASH
#!/bin/bash

# Calculate stats for Site A and Site B data files.

for datafile in NENE*A.txt NENE*B.txt

do

    echo $datafile

    bash goostats.sh $datafile stats-$datafile

done- The advantage is that this always selects the right files:
- she doesn’t have to remember to exclude the ‘Z’ files.
- The disadvantage is that it always selects just those files — she can’t run it on all files (including the ‘Z’ files), or on the ‘G’ or ‘H’ files her colleagues in Antarctica are producing, without editing the script.
- She could modify her script to check for command-line arguments, and
use
NENE*A.txt NENE*B.txtif none were provided. Of course, this introduces another tradeoff between flexibility and complexity.
Challenge: variables in shell scripts
:class: note
- In the
proteinsdirectory, imagine you have a shell script calledscript.shcontaining the following commands:
While you are in the proteins directory, you type the
following command:
Which of the following outputs would you expect to see?
- All of the lines between the first and the last lines of each file
ending in
.pdbin theproteinsdirectory - The first and the last line of each file ending in
.pdbin theproteinsdirectory - The first and the last line of each file in the
proteinsdirectory - An error because of the quotes around
*.pdb
- The correct answer is 2.
- The special variables $1, $2 and $3 represent the command line arguments given to the script, such that the commands run are:
BASH
head -n 1 cubane.pdb ethane.pdb octane.pdb pentane.pdb propane.pdb

tail -n 1 cubane.pdb ethane.pdb octane.pdb pentane.pdb propane.pdb- The shell does not expand
'*.pdb'because it is enclosed by quote marks. - As such, the first argument to the script is
'*.pdb'which gets expanded within the script byheadandtail.
Challenge: find the longest file with a given extension
:class: note
- Write a shell script called
longest.shthat takes the name of a directory and a filename extension as its arguments, and prints out the name of the file with the most lines in that directory with that extension. For example:
would print the name of the .pdb file in
shell-lesson-data/data/pdb that has the most lines.
Feel free to test your script on another directory e.g. ~bash
bash longest.sh shell-lesson-data/writing/data txt~
BASH
#!/bin/bash

# Shell script which takes two arguments:

#    1. a directory name

#    2. a file extension

# and prints the name of the file in that directory

# with the most lines which matches the file extension.

wc -l $1/*.$2 | sort -n | tail -n 2 | head -n 1- The first part of the pipeline,
wc -l $1/*.$2 | sort -n, counts the lines in each file and sorts them numerically (largest last). When there’s more than one file,wcalso outputs a final summary line, giving the total number of lines across all files. We usetail -n 2 | head -n 1to throw away this last line. - With
wc -l $1/*.$2 | sort -n | tail -n 1we’ll see the final summary line: we can build our pipeline up in pieces to be sure we understand the output.
Challenge: script reading comprehension
:class: note
- For this question, consider the
shell-lesson-data/exercise-data/proteinsdirectory once again. This contains a number of.pdbfiles in addition to any other files you may have created. - Explain what each of the following three scripts would do when run
as
bash script1.sh *.pdb,bash script2.sh *.pdb, andbash script3.sh *.pdbrespectively.
In each case, the shell expands the wildcard in *.pdb
before passing the resulting list of file names as arguments to the
script. - Script 1 would print out a list of all files containing a dot
in their name. The arguments passed to the script are not actually used
anywhere in the script. - Script 2 would print the contents of the first
3 files with a .pdb file extension. $1,
$2, and $3 refer to the first, second, and
third argument respectively. - Script 3 would print all the arguments to
the script (i.e. all the .pdb files), followed by
.pdb. $@ refers to all the arguments
given to a shell script.
Challenge: debugging scripts
:class: note
- Suppose you have saved the following script in a file called
do-errors.shin Nelle’snorth-pacific-gyre/scriptsdirectory:
BASH
# Calculate stats for data files.

for datafile in "$@"

do

  echo $datfile

  bash goostats.sh $datafile stats-$datafile

done- When you run it from the
north-pacific-gyredirectory, the output is blank.
- To figure out why, re-run the script using the
-xoption:
- What is the output showing you?
- Which line is responsible for the error?
- The
-xoption causesbashto run in debug mode. - This prints out each command as it is run, which will help you to locate errors.
- In this example, we can see that
echoisn’t printing anything. We have made a typo in the loop variable name, and the variabledatfiledoesn’t exist, hence returning an empty string.
Content from Networked File System
Last updated on 2024-06-24 | Edit this page

Sandberg, R., Goldberg, D., Kleiman, S., Walsh, D., & Lyon, B. (1985, June). Design and implementation of the Sun network filesystem. In Proceedings of the Summer USENIX conference (pp. 119-130)
- Machine and operating system independence
- Crash recovery
- Transparent access
- UNIX semantics maintained on client
- Reasonable performance (target 80% as fast as local disk)
- NFS protocol
- Server side implementation
- Client side implementation
- Remote Procedure Call (RPC) mechanism
- Simplify the definition, organization, and implementation of remote services.
- Stateless protocol
- Parameters to each procedure call contain all the information necessary to complete the call.
- The server does not keep track of past requests. This makes crash recovery easy.
- Transport independent (works with both TCP and UDP).
- Key procedure parameter: a file handler (
fh)
- Commit modified data to stable storage before returning RPC calls
- Write to disk
- New parameter, generation number, for inode and file system id.
- Allow
mountto attach remote file system - New Unix kernel interface for all file system types: Virtual
FileSystem (VFS)
- Allows system calls to be unified
- VFS will automatically determine/interact with the correct file system types, including networked file systems.
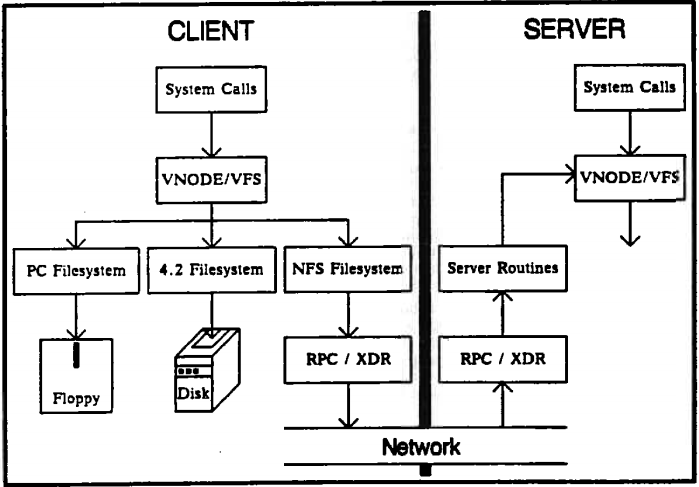
- Modify CloudLab’s experimental profile with the following
requirements
- Two nodes
- One node setup as Ansible master (public IP)
- One node setup as Ansible host (public IP)
- On Ansible host, automate the setup of Ansible stack
- Keyoutcome:
- By the time everything is setup, a webserver is available on the Ansible host.
- Which means we are doing two things:
- Manual setup (for testing purpose)
- Convert setup commands to bash scripts …
- Relevant documents:
- Setup NSF
- Non-interactive passwordless SSH keygen
- Install and configure Ansibe
- Install and setup lamp on Ubuntu to setup and create a LAMP stack using Ansible playbooks.
Content from SSO: Single Sign On
Last updated on 2024-06-24 | Edit this page
- A centralized directory store that contains user identity and authorization information.
- A tool for managing user information in the directory.
- A mechanism for authenticating user identities. It could be the LDAP store itself, or a Kerberos ticket-based authentication system.
- Centralized-identity-and-authentication-aware versions of the C
library routines that look up user attributes. This is often configured
through the name service switch file,
/etc/nsswitch.conf.
- Assumptions:
- Data objects are relatively small.
- The database will be widely replicated and cached.
- The information is attribute-based.
- Data are read often but written infrequently.
- Searching is a common operation.
- Common usage: A central repository for login names, passwords, and other account attributes.
- Property lists (entries).
- Each entry consists of a set of named attributes along with those attributes’ values.
- Every attribute can have multiple values.
Callout
Example attributes
BASH
dn: uid=ghopper,ou=People,dc=navy,dc=mil

objectClass: top

objectClass: person

objectClass: organizationalPerson

objectClass: posixAccount

objectClass: shadowAccount

uid: ghopper

cn: Grace Hopper

userPassword: {crypt}$1$pZaGA2RL$MPDJoc0afuhHY6k8HQFp0

loginShell: /bin/bash

uidNumber: 1202

gidNumber: 1202

homeDirectory: /home/ghopper| Attribute | Stand for | What it is |
|---|---|---|
| o | Organization | Identifies a site’s top-level entry (not used at sites that model their hierarchy on DNS) |
| ou | Organizational Unit | A logical subdivision, e.g. “marketing” |
| cn | Common name | The most natural name to represent the entry |
| dc | Domain component | Used at sites that model their hierarchy on DNS |
| objectClass | Object class | Schema to which this entry’s attributes conform |
5. Hands-on: update your webserver profile
- Create a new branch from
webserverand callwebserver-ldap.
c - Update profile.py to match the following content
- Update and instantiate an experiment from this new branch.
- Create a new branch from
webserverand callwebserver-ldap.

- Update
profile.pyto match the following content
- Update and instantiate an experiment from this new branch.
- Connect into the
ldapnode and run the following commands
bash

clear

sudo apt update

sudo apt install -y slapd ldap-utils- Provide a (simple) password for LDAP server
- Press the
Tabkey to go toOk, then pressEnter. - Retype the password, then
Tab,Ok, andEnteragain.
- Press the
- Setup OpenLDAP server
sudo dpkg-reconfigure slapd- Refuse to omit OpenLDAP server configuration
- Keep the default
No(or make sure that you stay onNo), then pressEnter.
- Keep the default
- Enter
wcupa.eduas default DNS domain name- Press the
Tabkey to go toOk, then pressEnter.
- Press the
- Enter
wcupa.eduas the name of the organization to use in the base DN- Press the
Tabkey to go toOk, then pressEnter.
- Press the
- Enter the password (previously created) for your LDAP directory
- Press the
Tabkey to go toOk, then pressEnter.
- Press the
- Enter the password again for your LDAP directory
- Press the
Tabkey to go toOk, then pressEnter.
- Press the
- Select
Yesto remove the database whenslapdis purged.- Press the
Tabkey to go toYes, then pressEnter.
- Press the
- Select
Yesto move old database- Press the
Tabkey to go toYes, then pressEnter.
- Press the
- Enable firewall rules
sudo ufw allow ldap- Create a file named
basedn.ldifwith the following contents
- Run the following command to populate LDAP.
- Enter the password for LDAP previously created, then press Enter.
ldapadd -x -D cn=admin,dc=wcupa,dc=edu -W -f basedn.ldif

Enter LDAP Password:

adding new entry "ou=People,dc=wcupa,dc=edu"


adding new entry "ou=Groups,dc=wcupa,dc=edu"


adding new entry "cn=CSC,ou=Groups,dc=wcupa,dc=edu"- Run the following command to generate a password hash
- The password is
rammy
- The password is
slappasswd

New password:

Re-enter new password:

{SSHA}N8Rfc9lvnKb8A3oUOxUOBlDen4v8FYL/- Create a file named
users.ldifusing the following content- Replace the hash in
userPasswordfield with the password hash you just created.
- Replace the hash in
- Populate LDAP with user info
ldapadd -x -D cn=admin,dc=wcupa,dc=edu -W -f users.ldif

Enter LDAP Password:

adding new entry "uid=student,ou=People,dc=wcupa,dc=edu"- Test LDAP
ldapsearch -x -LLL -b dc=wcupa,dc=edu 'uid=student' cn gidNumber

dn: uid=student,ou=People,dc=wcupa,dc=edu

cn: student

gidNumber: 5000- Connect to
webservernode and run the following commands
bash

clear

sudo apt update

sudo apt-get update

sudo apt install -y libnss-ldap libpam-ldap ldap-utils- Configure
ldap-auth-config- Based on the
profile.py,ldapwill have192.168.1.3as a predefined IP address. - You can test by run
cat /etc/hostsonldap. - Enter
ldap://192.168.1.3as LDAP server Uniform Resource Identifier.- PAY ATTENTION TO ALL CHARACTERS
- Distinguished name of the search base:
dc=wcupa,dc=edu - LDAP version to use:
3 - Make local root Database admin:
Yes - Does the LDAP database require login?
No - LDAP account for root:
cn=admin,dc=wcupa,dc=edu - LDAP root account password: Use the password you created earlier
- Based on the
- Enable LDAP profile for NSS
- Run
sudo nano /etc/nsswitch.conf - Change the configurations of
passwdandgroupto:compat systemd ldap - Save and quit
- Run
- Enable LDAP profile PAM
- Run
sudo nano /etc/pam.d/common-password- Find the line with the phrase
use_authtokand delete that phrase
- Find the line with the phrase
- Run
- Run
sudo nano /etc/pam.d/common-session- Add the following line to the end:
session optional pam_mkhomedir.so skel=/etc/skel umask=077
- Add the following line to the end:
- Test that now you can authenticate user
studentonwebservervia LDAP
getent passwd student

student:x:10000:5000:Golden Ram:/home/student:/bin/dash

lngo@webserver:~$ su student

Password:

$
Content from Practice Scenarios
Last updated on 2024-06-24 | Edit this page
- Launch the
webserver-ldapexperiment on CloudLab. We will assume that there are three connected nodes:webserverobserver-
ldap.
- The
webservershould have an apache server ready (setup_apache.sh). - The
ldapshould have an ldap server ready. There should be one user account (student/rammy) created.
- Enable the
public_htmldirectory and create anindex.htmlpage in that directory that displaysHello Worldwhen access. - Secure this location by requiring viewer to authenticate via the
ldap server with the
student/rammylogin/password.
- Add the following users to the LDAP server
- Make sure to change the password hash (password remains
rammy) - Confirm that the users were added correctly by view the page from
scenario 1 using users
merinoanddorper.
- Make sure to change the password hash (password remains
- Set up the NFS server on
ldap.- Create a directory called
nfs/homeand make it available via NFS for bothwebserverandobserver.
- Create a directory called
- Setup NFS clients on
webserverandobserver.- Create
nfs/homeand mount/nfs/homefromldap
- Create
- Using
su(do not usesudo), confirm that you can switch users, and that their home directories are shared acrossldap,webserver, andobserver.
- Review https://github.com/CSC586-WCU/csc586cloud/tree/webserver for correction against previous class’ errors.
- Instantiate the
webserverprofile. - Setup the Ansible
controlnode to be an LDAP node. - Configure the apache server on the Ansible
hostnode (previously installed via Ansible lamp stack) to be authenticated with the LDAP server on thecontrolnode.- You can use the template
users.ldiffile from the lecture.
- You can use the template
Content from Introduction to Docker Containers
Last updated on 2024-06-24 | Edit this page
- Go to your GitHub project repository (on the first day), create a
new branch called
dockerfrom themain branch, and modify to add the following components from this link:- The
docker_configdirectory and its content (daemon.json). - The
install_docker.shfile. - The
profile.pyfile.
- The
- Check and make sure all the contents are correctly copied!
- Go to CloudLab, open your profile, switch to
Editmode and clickUpdate. The newdockerbranch should show up.
- Instantiate an experiment from this branch.
-
Only login after the Startup column becomes
Finished and type the following command:
sudo docker info | grep "Docker Root Dir" - Confirm that you have something similar to the screenshot below

- SSH into your CloudLab experiment.
- Check version of Docker:
$ docker version
- Docker is client-server application.
- Docker daemon (Engine): receives and processes incoming Docker API request and requires root privilege.
- Docker Hub registry: collection of public images (https://hub.docker.com/).
- Docker client : Talks to the Docker daemon via the docker API and the registry API.
- Docker
containersare instantiated from Dockerimages. - You can check availability of local
imagesandcontainers.
$ docker image ls

$ docker container ls
- We can issue the following to start a service that will echo
hello worldto the screen. - This requires a Linux container to run the
echocommand.
$ docker run alpine echo hello world-
docker: invoke the container engine. -
run: subcommand to run a container. -
alpine: name of the image based on which a container will be launched. -
echo hello world: the command to be executed in the container environment.
$ docker image ls

$ docker container ls

$ docker container ls --all

$ docker run alpine echo hello world

$ docker container ls --all
- We can launch a container and get into the shell of the container.
$ docker run -it ubuntu bash
- You are now in a new prompt: a shell inside the container
-
-it: combination of-iand-t.-
-itells Docker to connect to the container’s stdin for interactive mode -
-ttells Docker that we want a pseudo-terminal
-
- The following commands are done inside the container.
- Let’s attempt to run
figlet
# figlet hello- There will be an error.
- The current container does not have the
figletprogram yet.
- The following commands are done inside the container.
# apt-get update

# apt-get install -y figlet

# figlet hello
- Type
exitto shutdown the container and back to your normal terminal. - Repeat the process of launching an interactive container from start
and try running
figletagain. - Is the program still there?
- You should have already exited out of the container shell and back to the CloudLab environment.
- Run the following command
- Press
Ctrl-Cto stop after a few time stamps.
$ docker run jpetazzo/clock- Run the following command
$ docker run -d jpetazzo/clock

$ docker ps- Use the first four characters of your container ID to view the log of the running Docker container
- Use
--tail Nto only look at the tail of the log.
$ docker container ls

$ docker logs --tail 5 YOUR_CONTAINER_ID- Find out how to kill a running container by using
docker kill. {: .challenge}
- Image = files + metadata
- The files form the root filesystem of the container
- The metadata describes things such as:
- The author of the image
- The command to execute in container when starting it
- Environment variables to be set
- …
- Images are made of layers, conceptually stacked on top of each other.
- Each layer can add, change, and remove files and/or metadata.
- Images can share layers to optimize disk usage, transfer times, and memory use.
- CentOS base layer
- Packages and configuration files added by our local IT
- JRE
- Tomcat
- Our application’s dependencies
- Our application code and assets
- Our application configuration
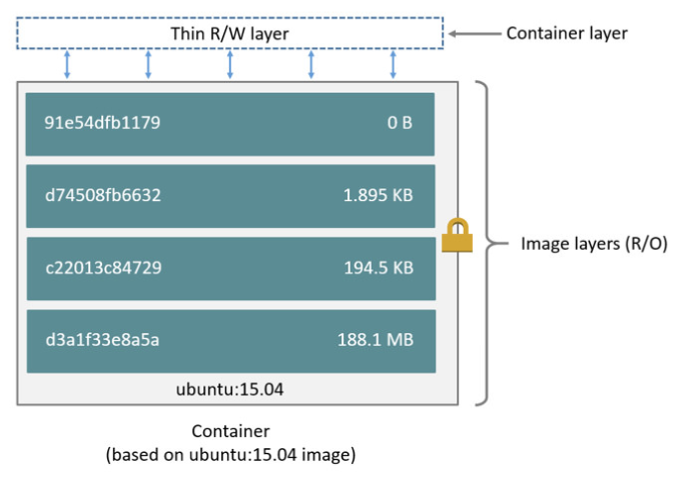
- An image is a read-only filesystem.
- A container is an encapsulated set of processes running in a read-write copy of that filesystem.
- To optimize container boot time, copy-on-write is used instead of regular copy.
-
docker runstarts a container from a given image.
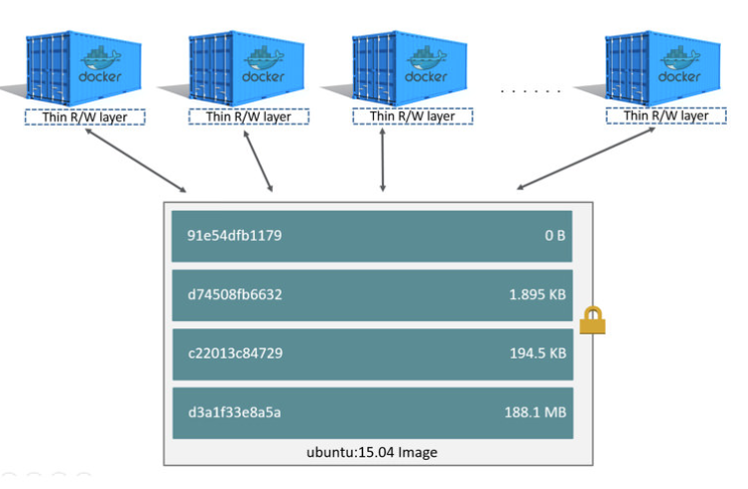
- Object-oriented analogy
- Images are conceptually similar to classes
- Layers are conceptually similar to inheritance
- Containers are conceptually similar to instances
- It is read-only, we don’t.
- We create a new container from the image
- We make changes to the container.
- When we are satisfied with the changes, we transform them into a new layer.
- A new image is created by stacking the new layer on top of the old image.
- Official images (ubuntu, busybox, …)
- Root namespace.
- Small, distro images to be used as bases for the building process.
- Ready-to-use components and services (redis, postgresl …)
- User (and organizations) images:
<registry_name>/<image_name>:[version]- jpetazzo/clock:latest
- linhbngo/csc331:latest
- Self-hosted images
- Images hosted by third party registry
URL/<image_name>
- If this is a new experiment, go ahead and run the following commands to get some images loaded.
$ docker run hello-world

$ docker run alpine echo This is alpine

$ docker run ubuntu echo This is ubuntu

$ docker image ls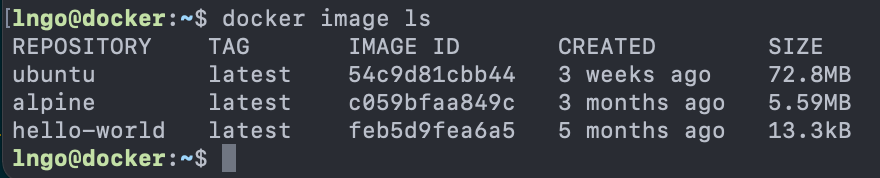
- We can search for available images in the public Docker Hub
$ docker search mysql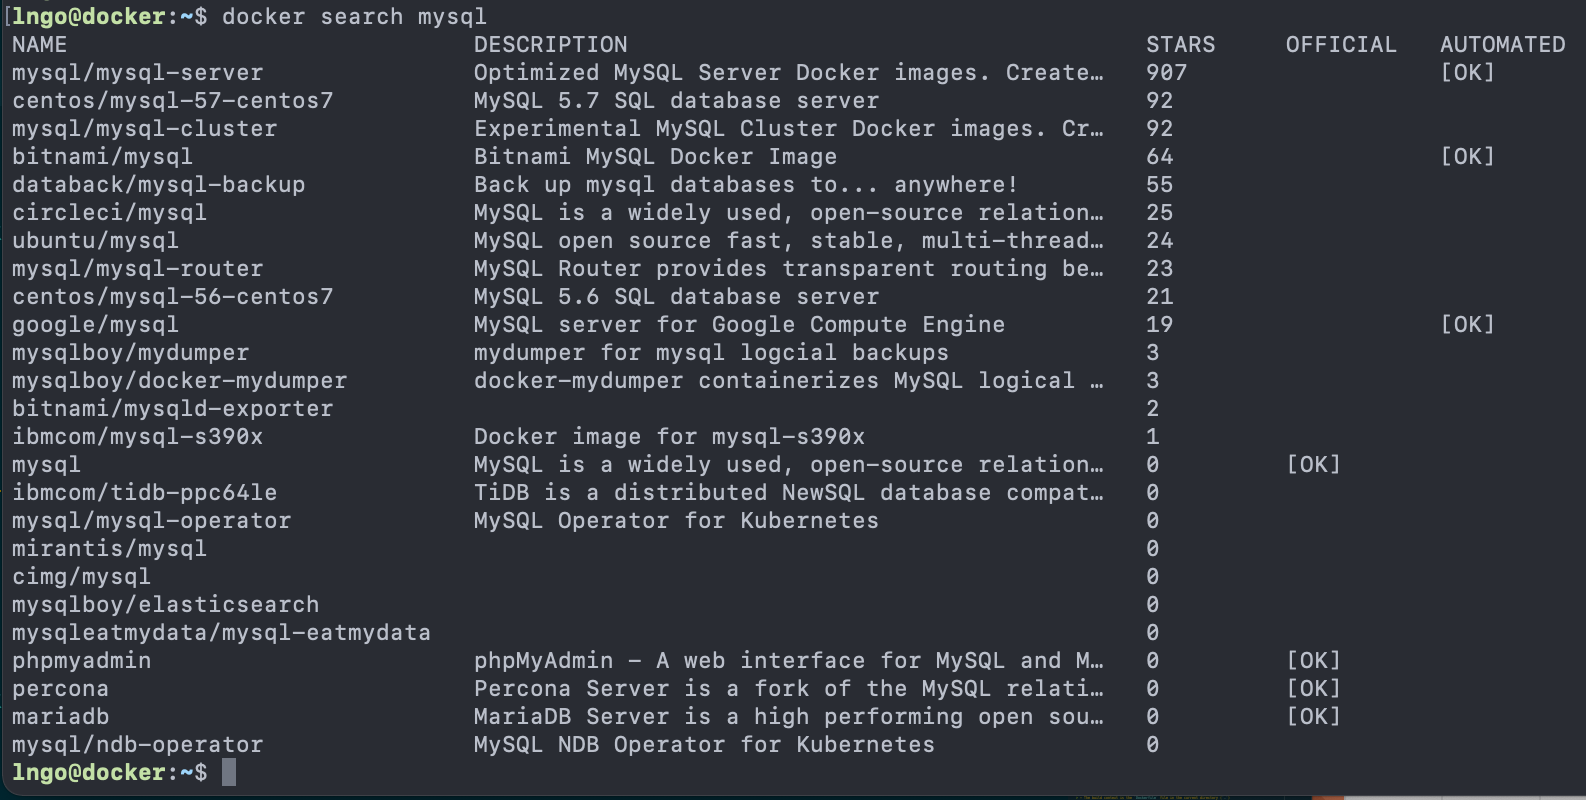
- Create a container using an appropriate base distro
- Inside the container, install and setup the necessary software
- Review the changes in the container
- Turn the container into a new image
- Tag the image
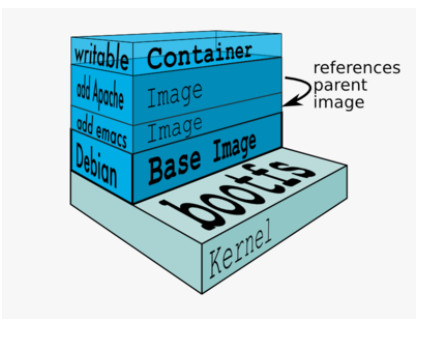
- Remember to note your container ID.
$ docker run -it ubuntu# apt-get update
# apt-get install -y figlet
# exit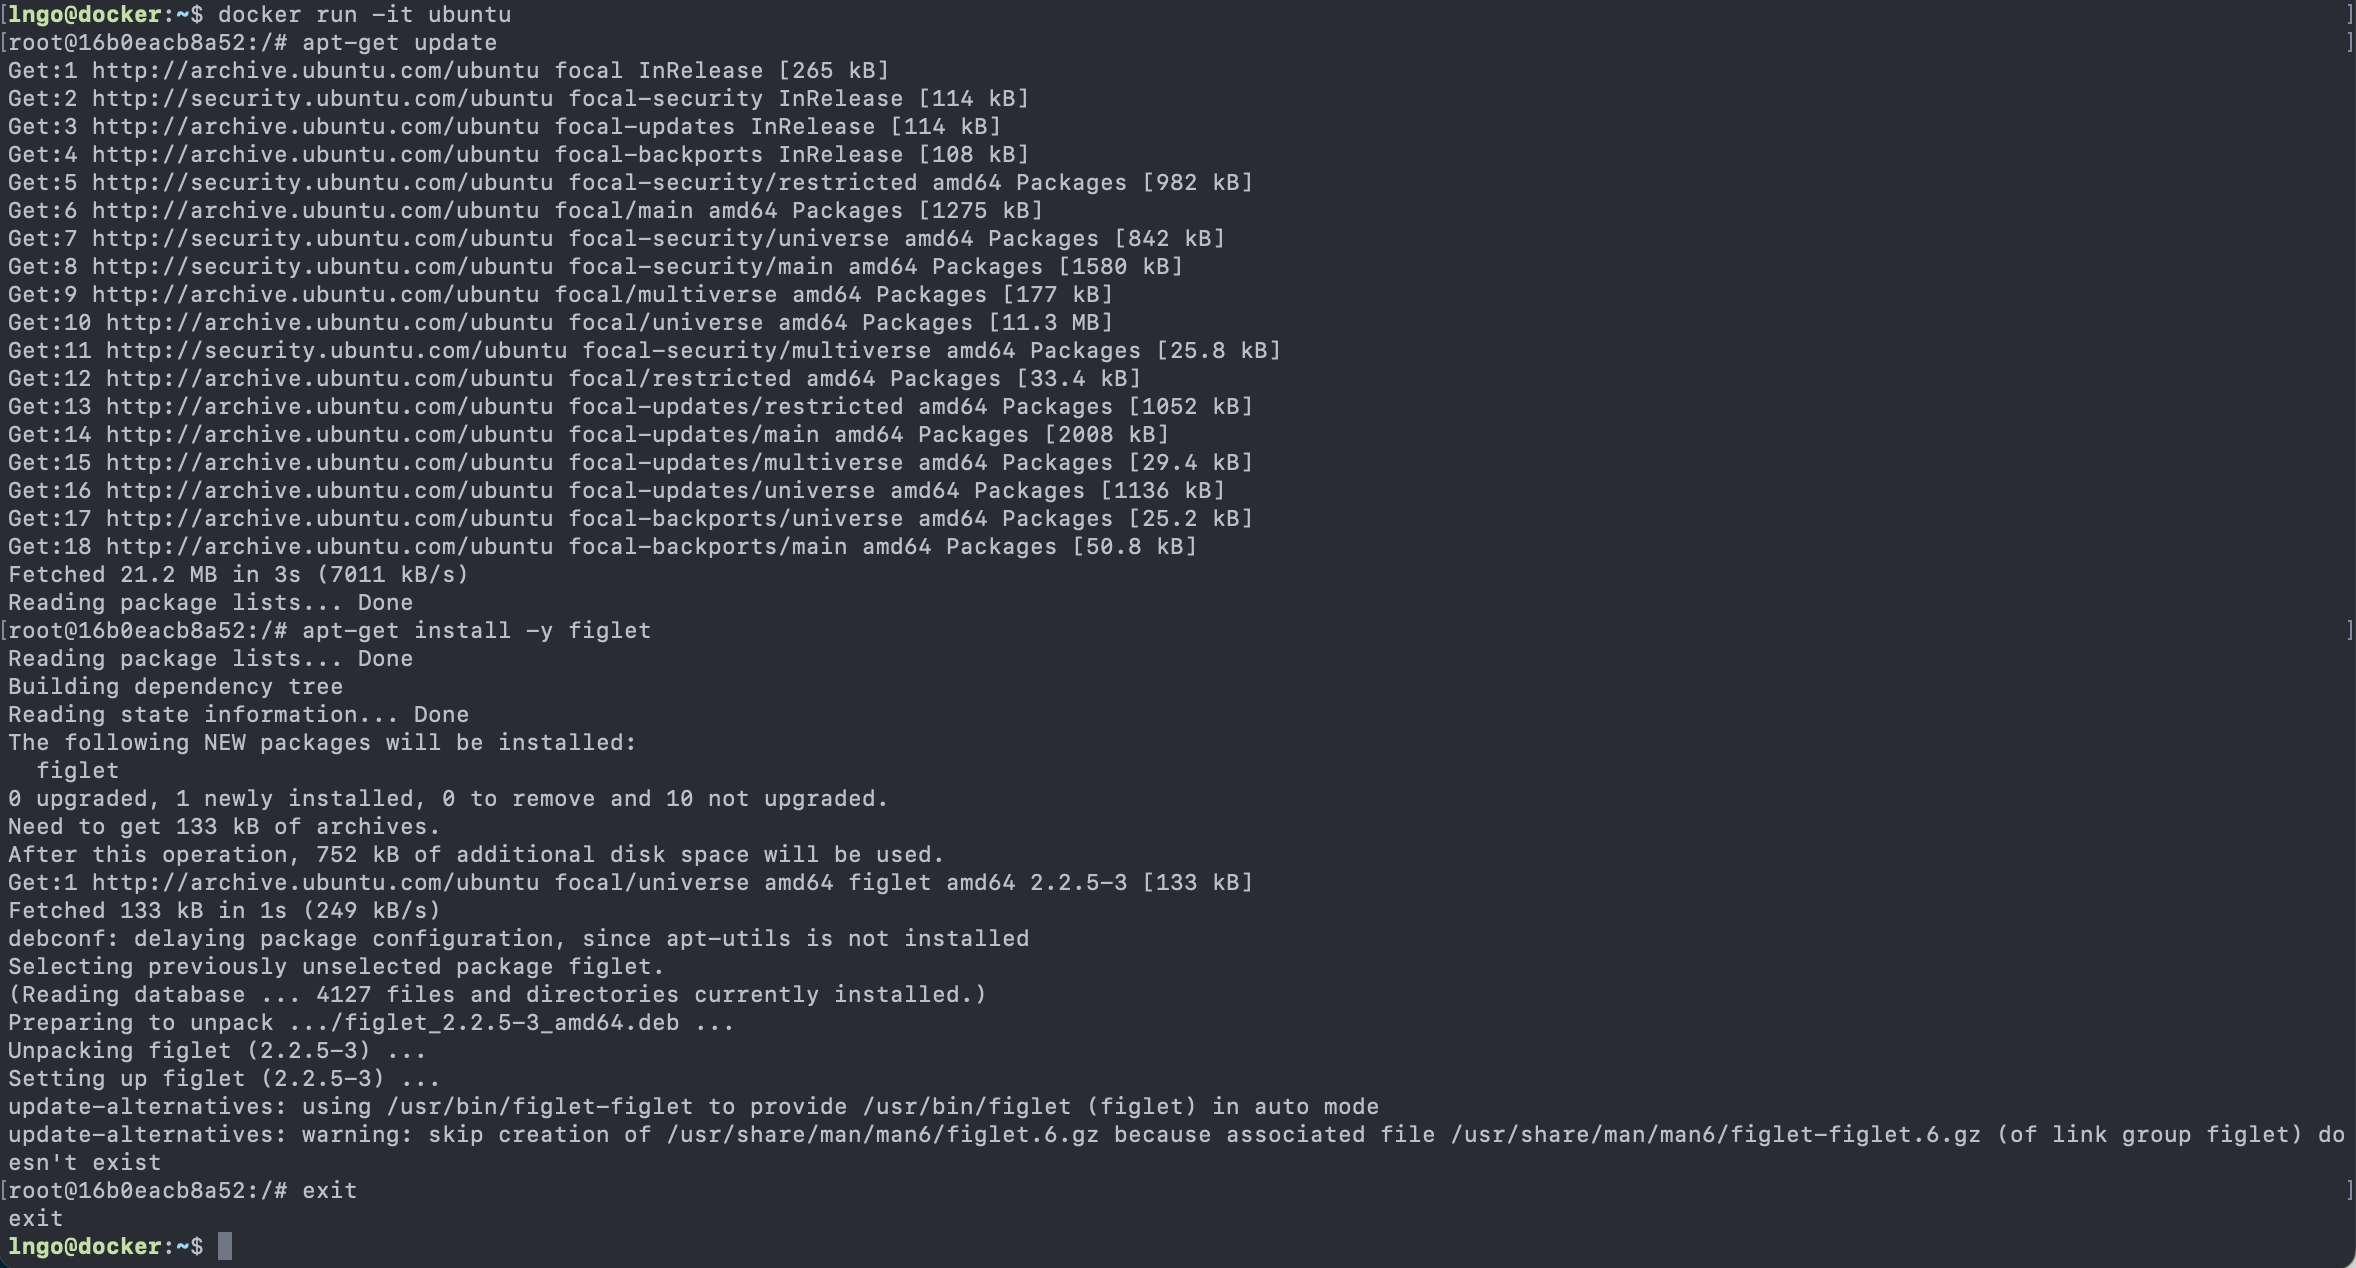
- Remember to note your container ID.
$ docker diff 16b0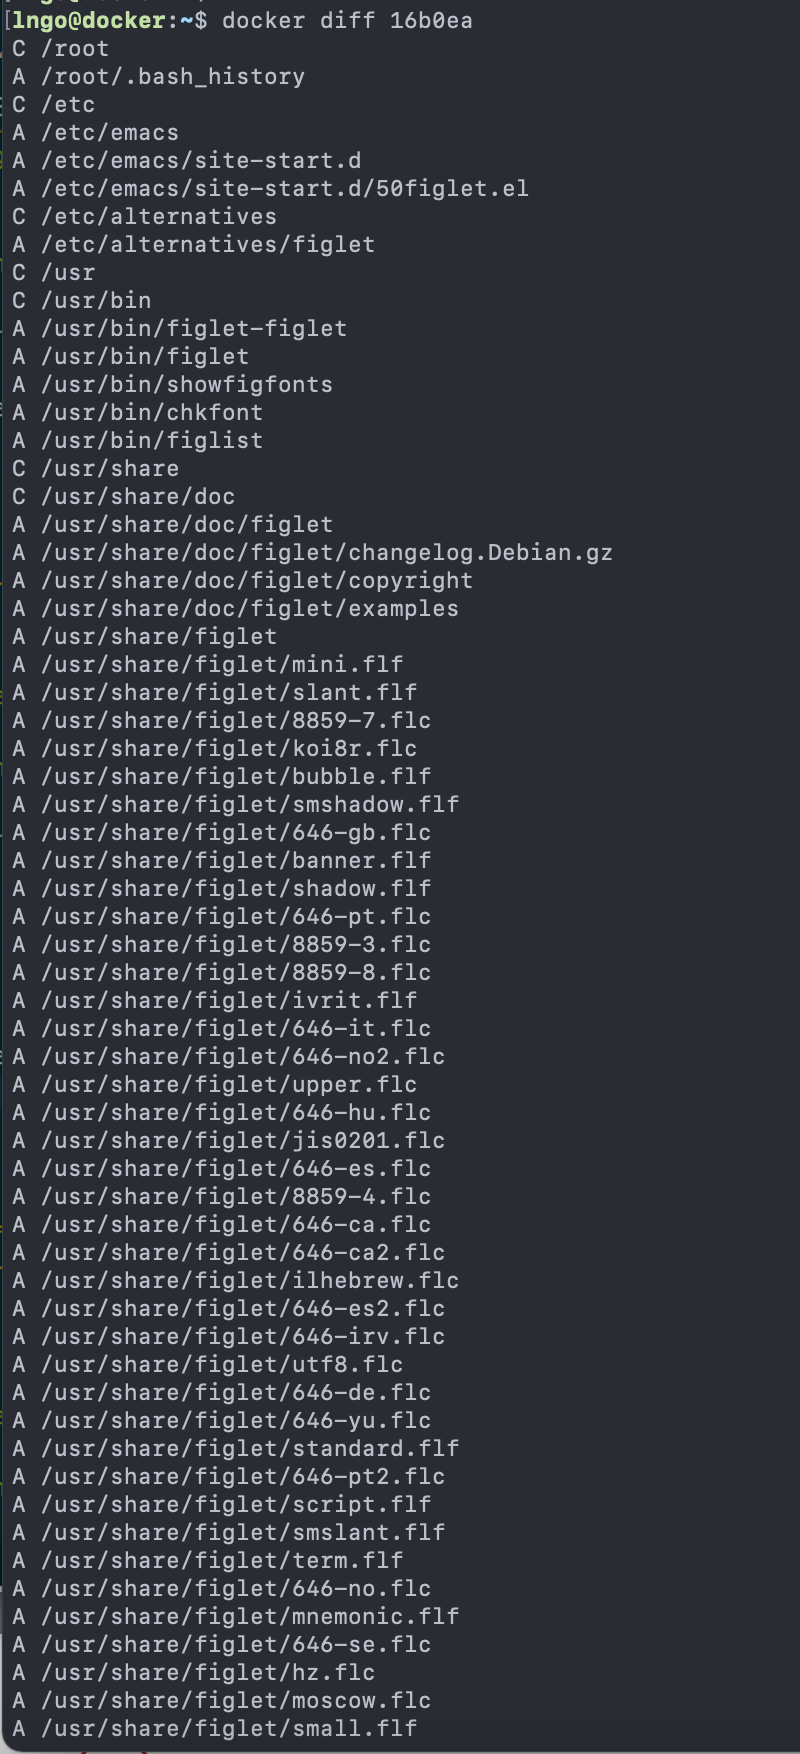
- A: A file or directory was added
- D: A file or directory was deleted
- C: A file or directory was changed
- Remember to note your container ID.
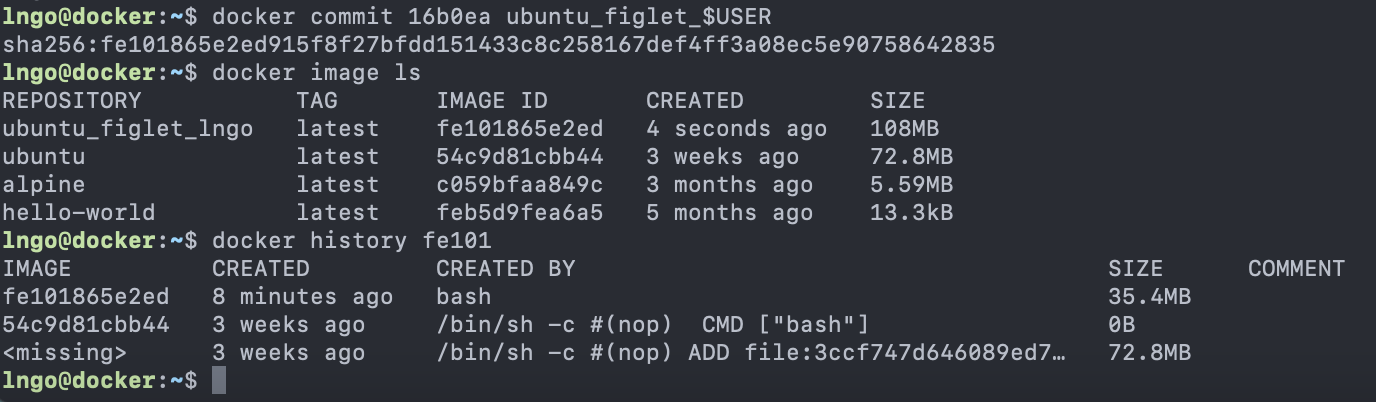
- From the screenshot:
- The
docker commit ...command created a new image namedubuntu_figlet_lngothat has the following unique id:fe101865e2ed. - The
docker image lscommand shows this image. - The
docker history fe101shows the layers making up this image, which include the layer that is the base ubuntu image54c9d.
- The
- Test run the new
ubuntu_figletimage by launching an interactive container using this image, then immediately runfiglet hello world.
- A build recipe for a container image.
- Contains a series of instructions telling Docker/Podman how an image is to be constructed.
- The
docker buildcommand builds an image from a Dockerfile.
- The following commands are done in the terminal (Ubuntu WSL on Windows/Mac Terminal).
$ cd

$ mkdir myimage

$ cd myimage

$ nano Dockerfile- Type the following contents into the nano editor
FROM: the base image for the buildRUN: represents one layer of execution.RUNcommands must be non-interactive.Save and quit after you are done.
To build the image
- The following commands are done in the terminal (Ubuntu WSL on Windows/Mac Terminal).
- Check that you are still inside
myimage
$ pwd

$ docker build -t figlet_$USER .-
-tindicates a tag namedfigletwill be applied to the image. -
.indicates that theDockerfilefile is in the current directory.
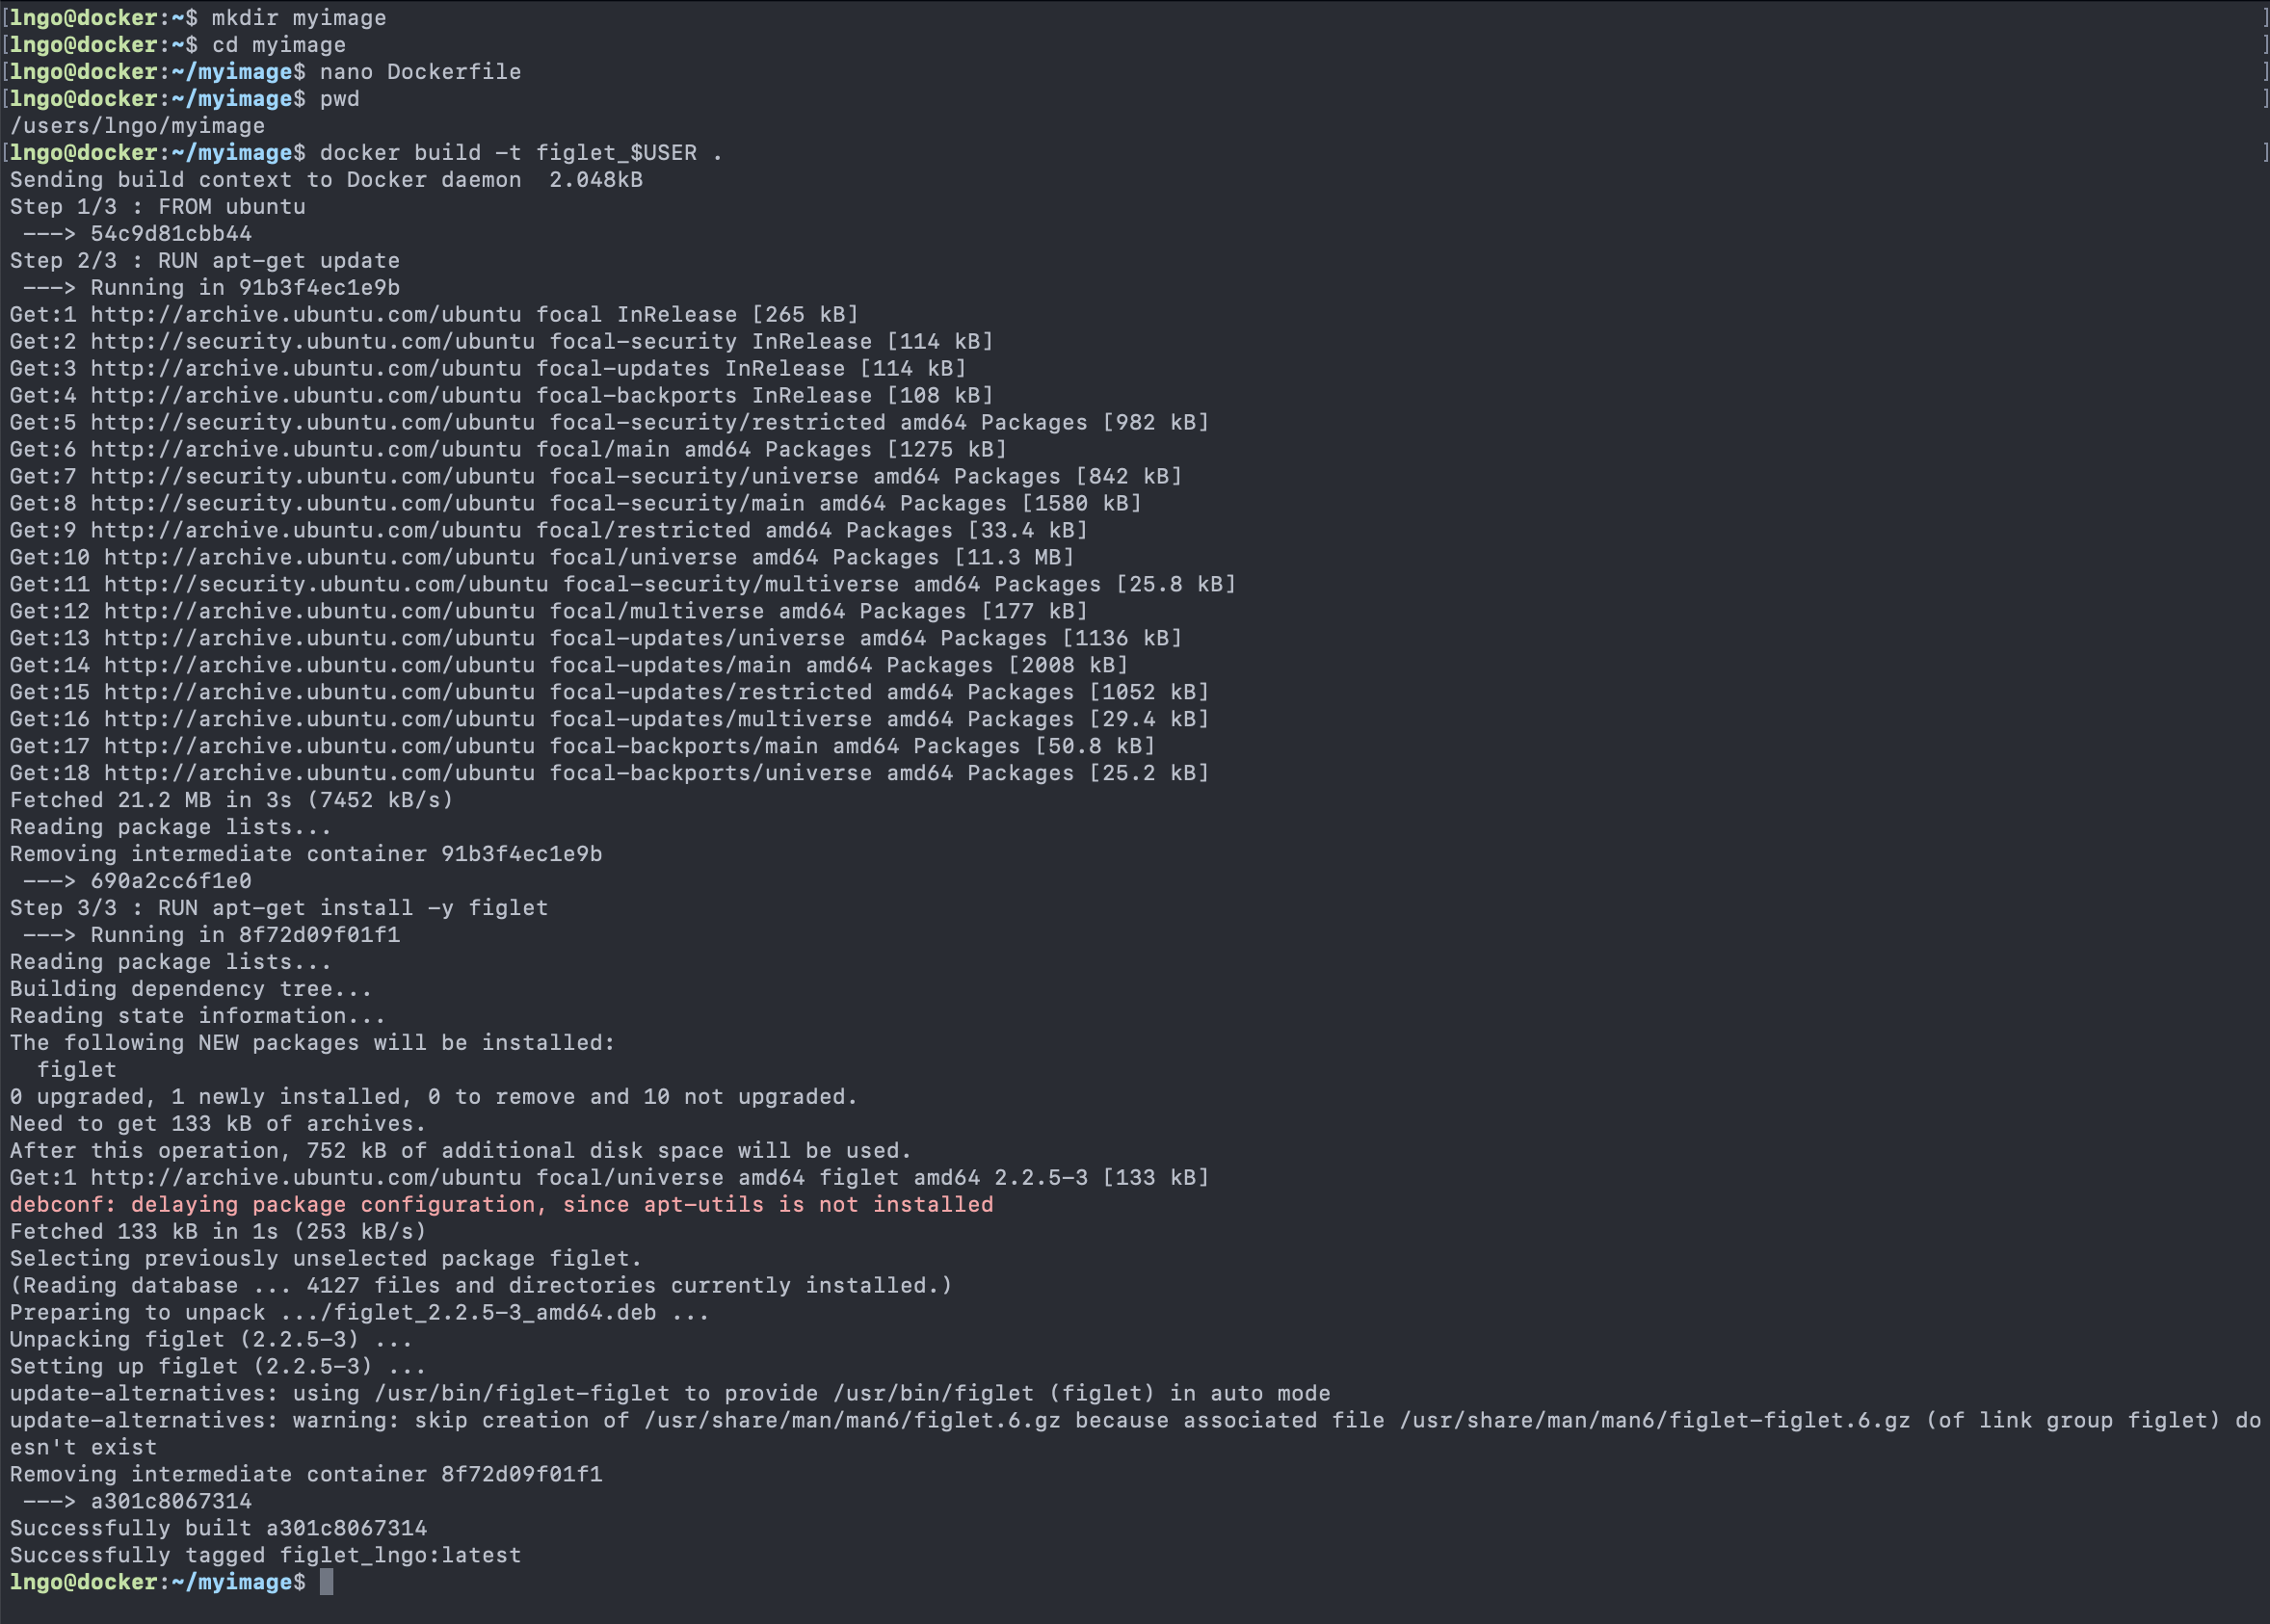
- The build context is the
Dockerfilefile in the current directory (.) and is sent to the container engine. This context allows constructions of images with additional resources from local files inside the build context. - The base image is
Ubuntu. - For each
RUNstatement, a container is created from the base image for the execution of the - commands. Afterward, the resulting container is committed into an
image that becomes the base for the next
RUN.
- Use
docker image lsanddocker history ...to check which layer is reused for this image. - Test run the new
ubuntu_figletimage by launching an interactive container using this image, then immediately runfiglet hello world.
- Edit your Dockerfile so that it has the following content
-
CMD: The command to be run if the container is invoked without any command. - Rebuild the image with the tag
figlet_cmd_$USER. - Run the following command
$ docker run figlet_cmd_$USER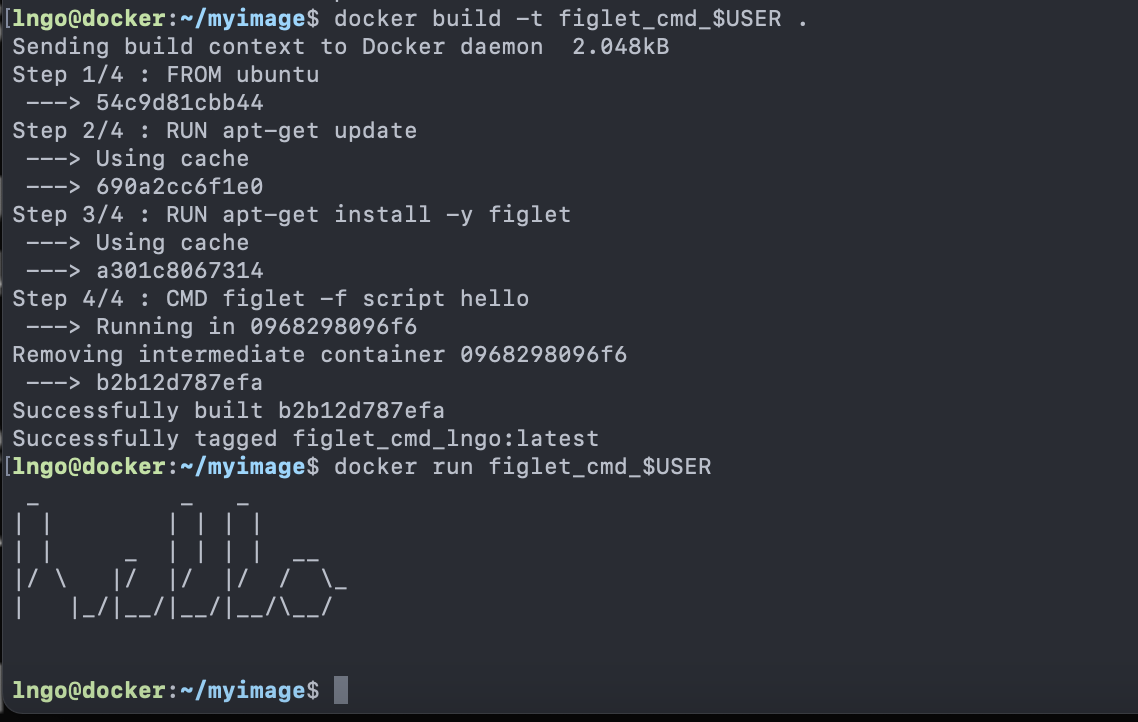
- Question: Did we use any additional storage for this new image?
- With CMD, the
-itflag does not behave as expected without a parameter. - To override CMD, we can provide a command
$ docker run -it figlet_cmd_$USER

$ docker run -it figlet_cmd_$USER bash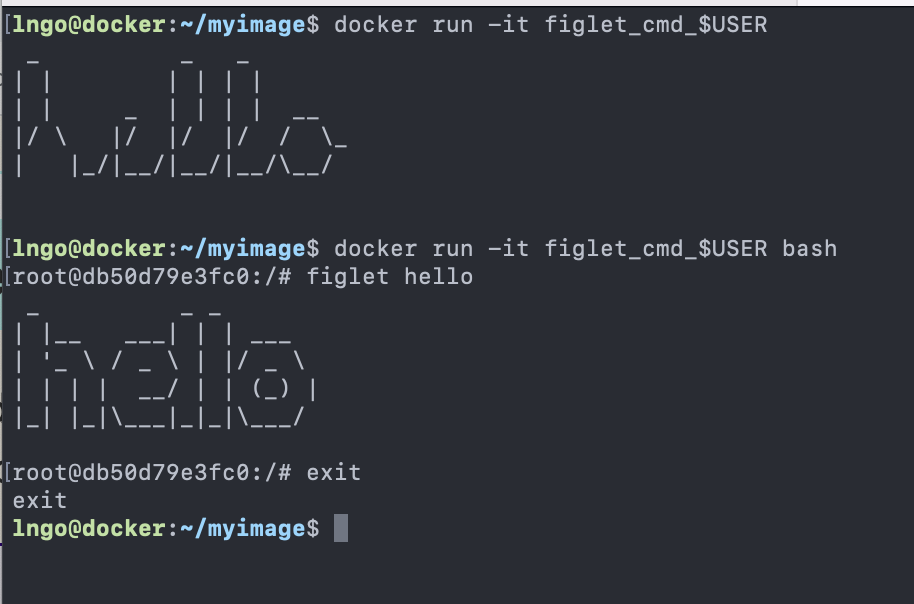
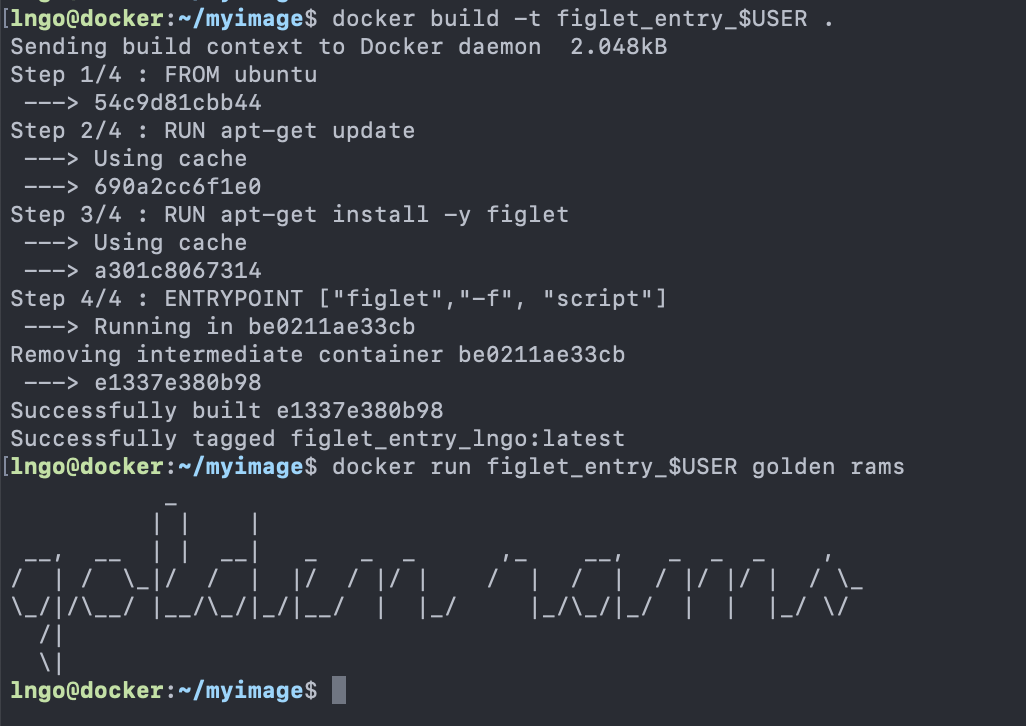
-
ENTRYPOINTandCMDcan be used together. - The command line arguments are appended to those parameters.
- Edit
Dockerfileas follows:
- Rebuild the image with the tag
figlet_both_$USER. - Run the followings:
$ docker run figlet_both_$USER golden rams

$ docker run figlet_both_$USER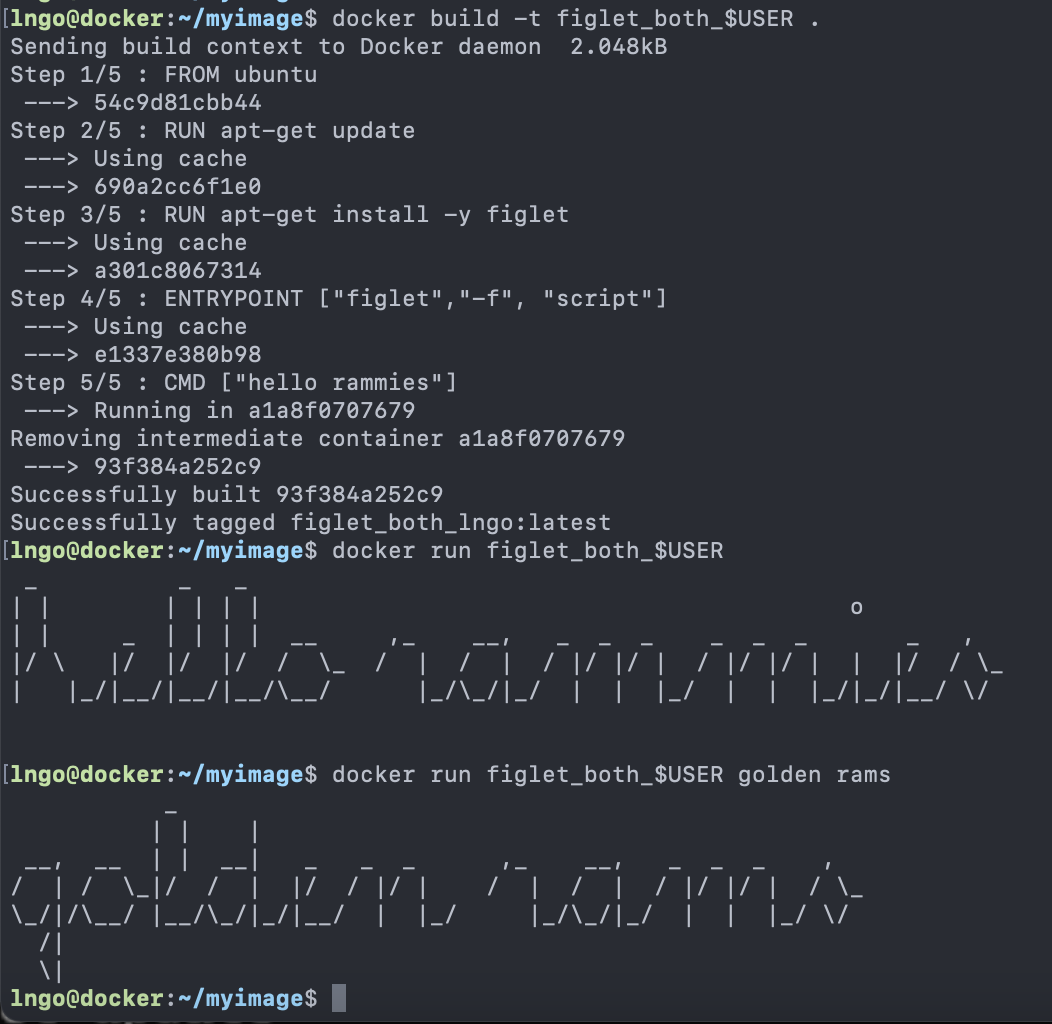
-
/bin/bashdoes not work as expected.
$ docker run -it figlet_both_$USER bash

$ docker run -it --entrypoint bash figlet_both_$USER

# exit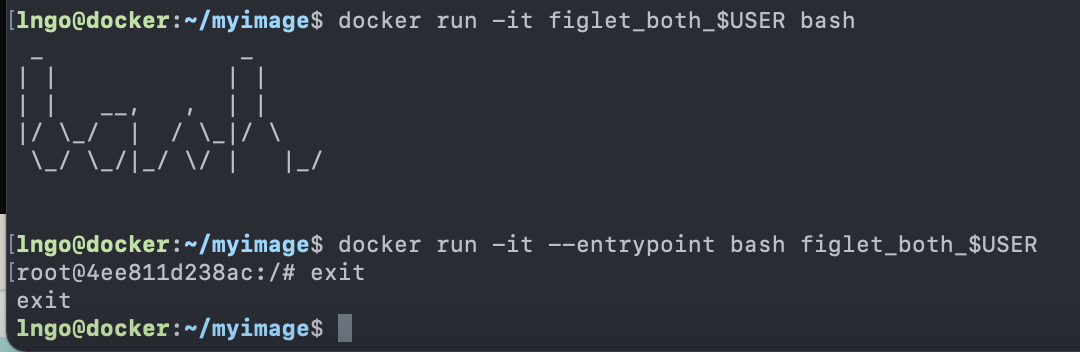
- Create the following file called
hello.c:
- Create the following Dockerfile called
Dockerfile.hello:
- You can build an image with a specific Dockerfile
$ docker build -t hello_$USER -f Dockerfile.hello .

$ docker run hello_$USER- Create an account on Docker Hub.
- Find out how to login from the command line and push the recently
created
helloimage to your Docker Hub account.
- How can services provided by a container become available to the world?
$ docker run -d -P nginx

$ docker ps-
-P: make this service reachable from other computers (--publish-all) -
-d: run in background - Where is the port?
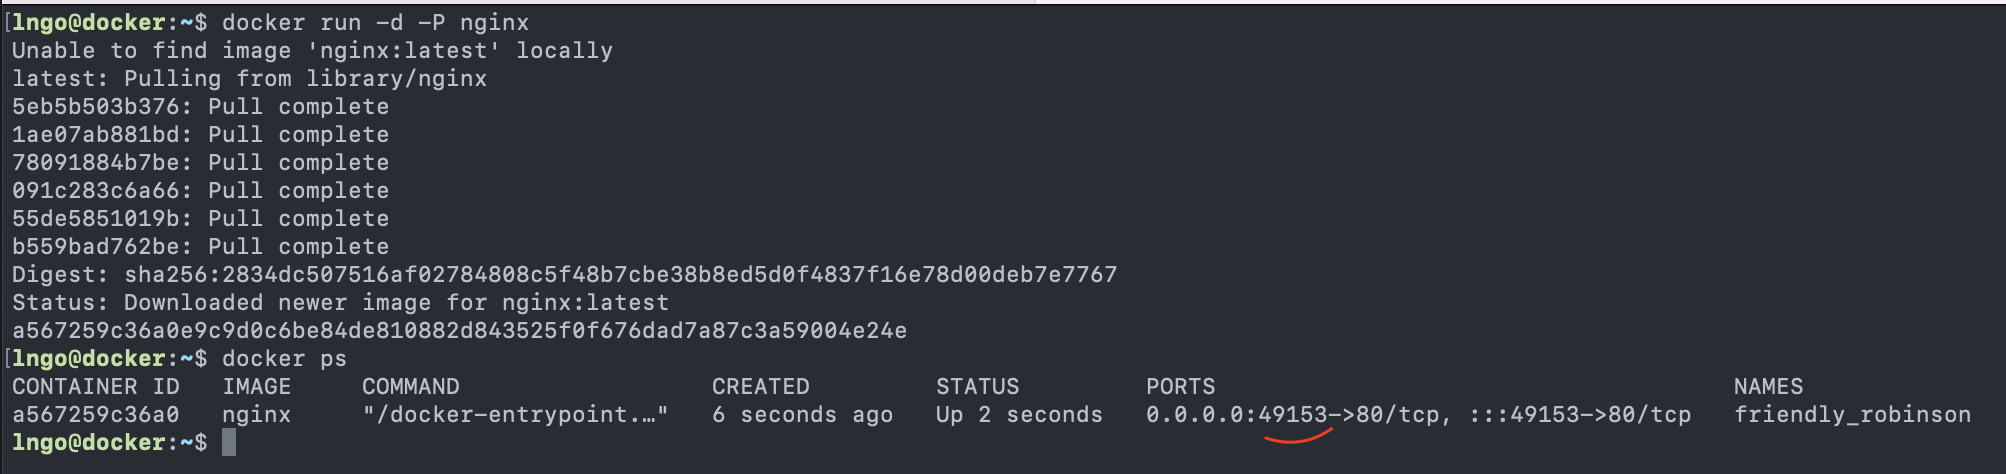
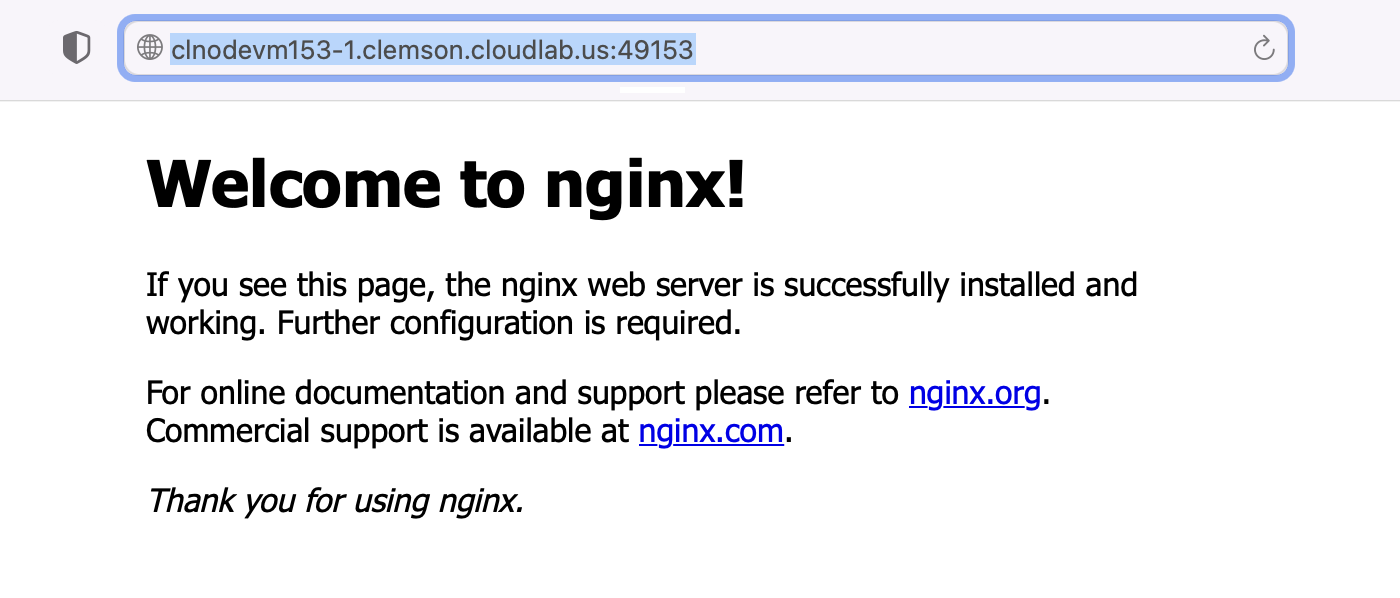
- This is described in the
Dockerfileand can be inspected. - The keyword for this action is
EXPOSE.

- Why do we have to map ports?
- Containers cannot have public IPv4 addresses.
- We are running low on IPv4 addresses anyway.
- Internally to host, containers have their own private addresses
- Services have to be exposed port by port.
- These have to be mapped to avoid conflicts.
$ docker run -d -p 8000:80 nginx

$ docker run -d -p 8080:80 -p 8888:80 nginx- Convention:
port-on-host:port-on-container - Check out the web servers at all of these ports
- Manually add the containers to the infrastructure via container-generated public port.
- Predetermine a port on the infrastructure, then set the corresponding port mapping when run the containers.
- Use a network plugin to connect the containers with network tunnels/VLANS …
- Deploy containers across a physical cluster using Kubernetes.
- Provide the notion of a
networkto connect containers - Provide top level command to manipulate and observe these networks:
docker network
$ docker network

$ docker network ls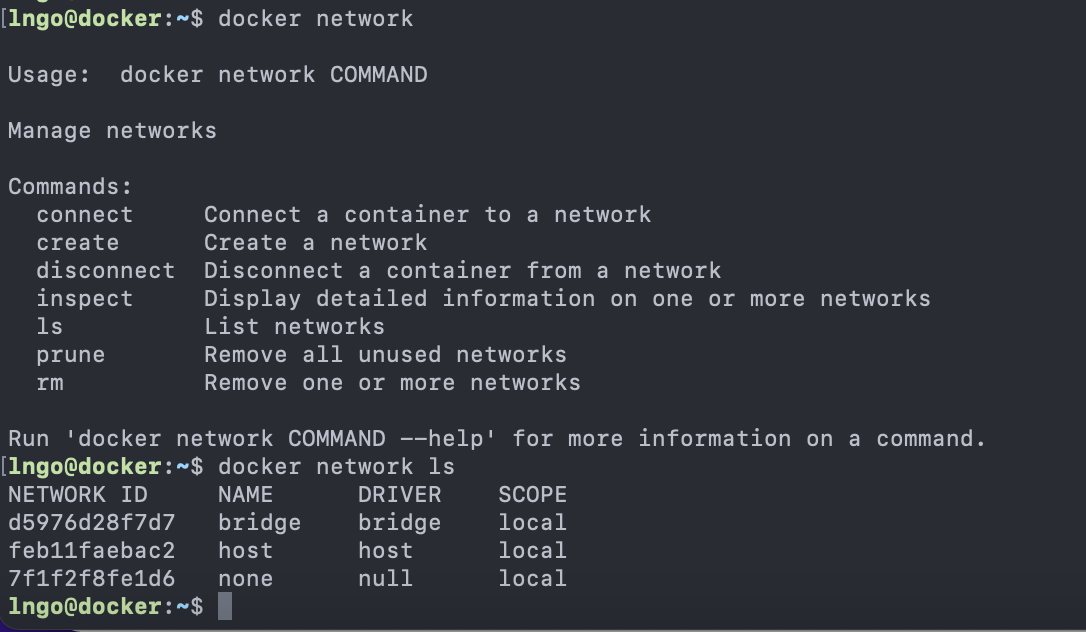
- What’s in a container network?
- Conceptually, it is a virtual switch
- It can be local to a single Engine (on a single host) or global (spanning multiple hosts).
- It has an associated IP subnet.
- The container engine will allocate IP addresses to the containers connected to a network.
- Containers can be connected to multiple networks.
- Containers can be given per-network names and aliases.
- The name and aliases can be resolved via an embedded DNS server.
$ docker network create ramnet

$ docker network ls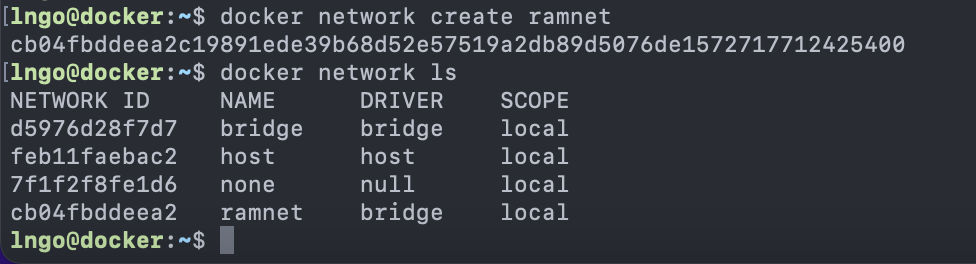
$ docker run -d --name es --net ramnet elasticsearch:2

$ docker run -it --net ramnet alpine sh

# ping es

# exit