Setup
Last updated on 2024-07-26 | Edit this page
For this class, we will be using Python notebooks to connect to a Spark server. This Spark server can be hosted locally or deployed on Kaggle, an equivalent of LeetCode for data scientists.
The instructions below will first show the steps to setup Spark environment on local device. Next, the steps to deploy Spark on Kaggle are also demonstrated.
Spark Setup: Locally hosted
- Make sure that your Windows is up to date prior to completing the remaining steps.
- If you are running on Windows Home, make sure that you switch out of S mode.
- The minimal configuration this setup has been tested on is:
- Intel Celeron CPU N3550
- 4GB memory
- Windows 10 Home version 20H2
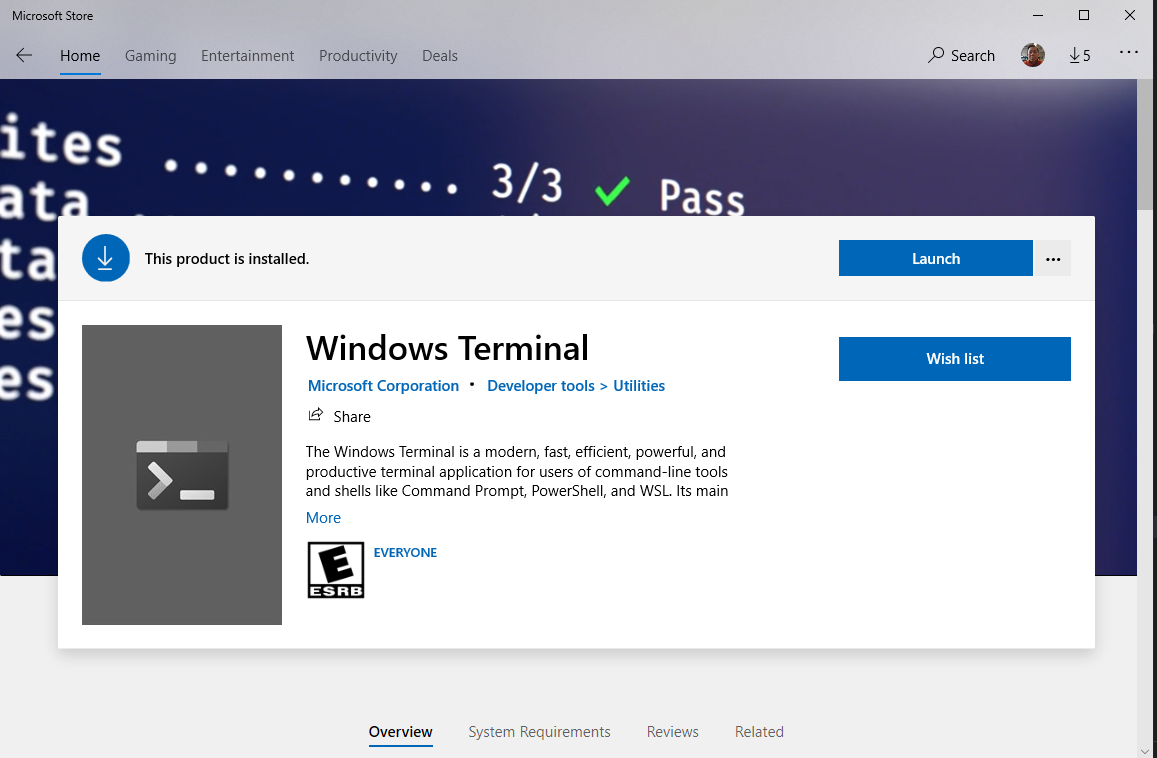
Windows Terminal
- Make sure that your computer is updated.
- I will assume that everyone’s computer is running Windows 10, as it is the standard OS on all Windows-based laptop being sold nowadays.
- Go to
Microsoft Storeapp, search and installWindows Terminal.
Install Java
- It is most likely that you already have Java installed. To confirm this, first, open a terminal.
- Run
javac -versionandjava -version.
- You see the version of Java being displayed on screen. Your version might be different from mine.
- Spark supports up to Java 11 now.
- Similarly, version information will be displayed.
If you do not have both java and
javac, you will need to install Java SDK (Software
Development Kit). We will be using the Java distribution maintained by
OpenJDK.
- Go to OpenJDK website.
- Choose OpenJDK 8 (LTS) or OpenJDK 11 (LTS) for Version and HotSpot for JVM.
- Click on the download link to begin download the installation package.
- Run the installer. You can keep all default settings on the installer.
- Once the installation process finishes, carry out the tests above
again in another terminal to confirm that you have both
javaandjavac.
Install Anaconda
- Visit Anaconda’s download page and download the corresponding Anaconda installers.
- You should select the 64-Bit variety for your installers.
- Run the installation for Anaconda.
- Remember the installation directory for Anaconda.
- For Windows, this is typically under
C:\Users\YOUR_WINDOWS_USERNAME\anaconda3. orC:\ProgramData\anaconda3. - Open a terminal and run:
- Restart the terminal
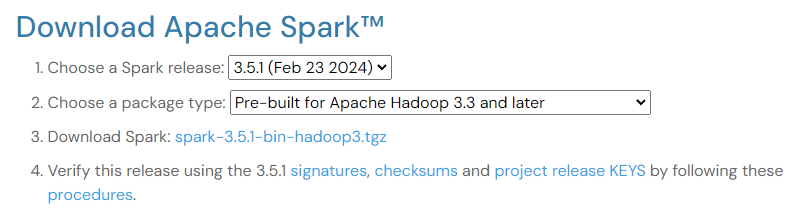
Download Spark
- Download Spark 3.5.1
- Untar and store the final directory somewhere that is easily accessible.
- You might need to download and install 7-Zip to decompress
.tgzfile on Windows.
- When decompressing, you might have to do it twice, because the first
decompression will return a
.tarfile, and the second decompression is needed to completely retrieve the Spark directory. - Move the resulting directory under the
C:drive.
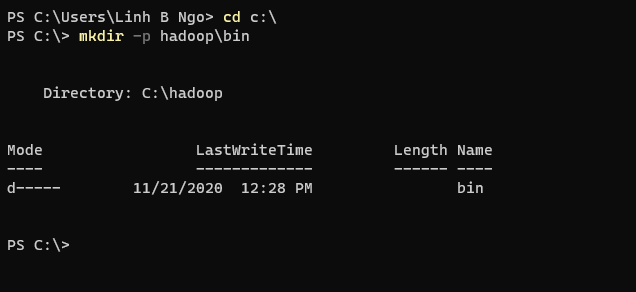
Install libraries to support Hadoop functionalities
- Open
Windows Terminal, and create ahadoopdirectory and abinsubdirectory under theC:drive.
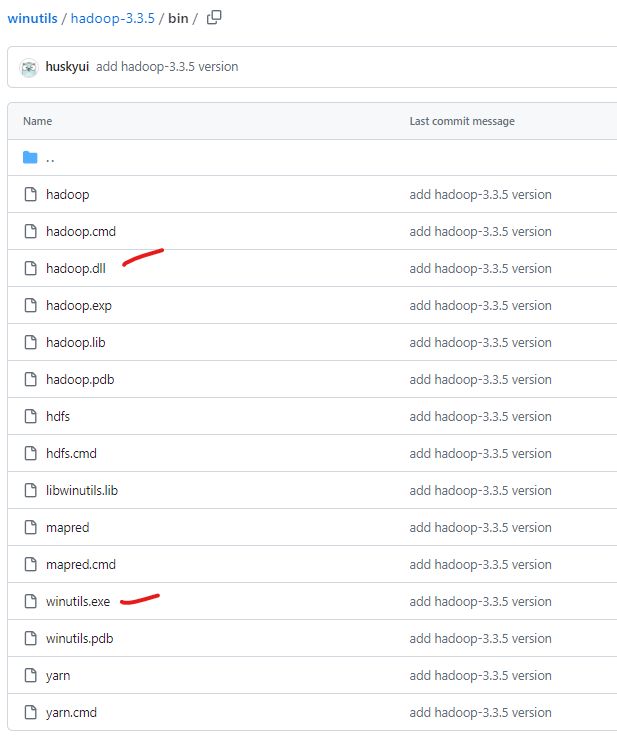
- Visit the link
to winutils.exe, right click on the
Downloadand chooseSave Link As. - Save the file to
C:\hadoop\bin. - Visit the link
to hadoop.dll, right click on the
Downloadand chooseSave Link As. - Save the file to
C:\hadoop\bin.
Setup environment variables
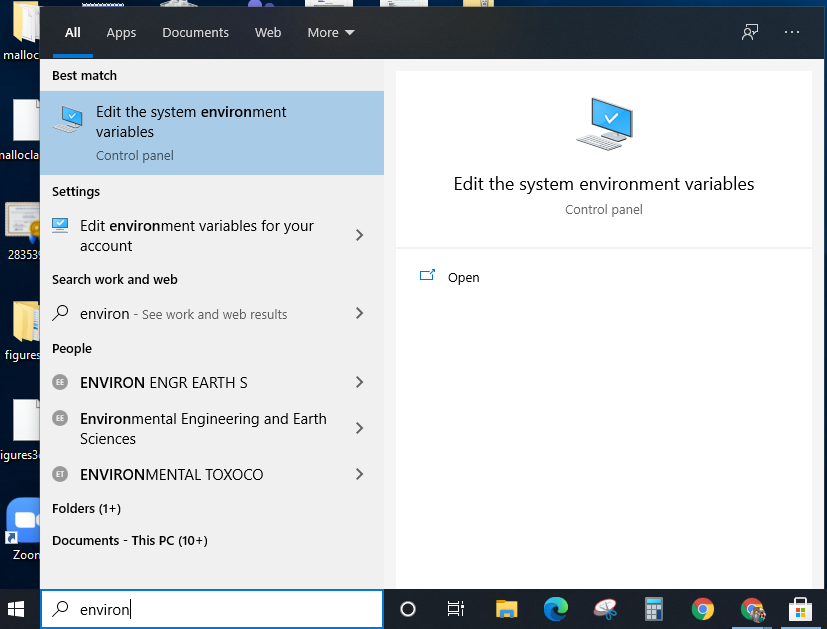
- Click on the Windows icon and start typing
environment variablesin the search box. - Click on
Edit the system environment variables.
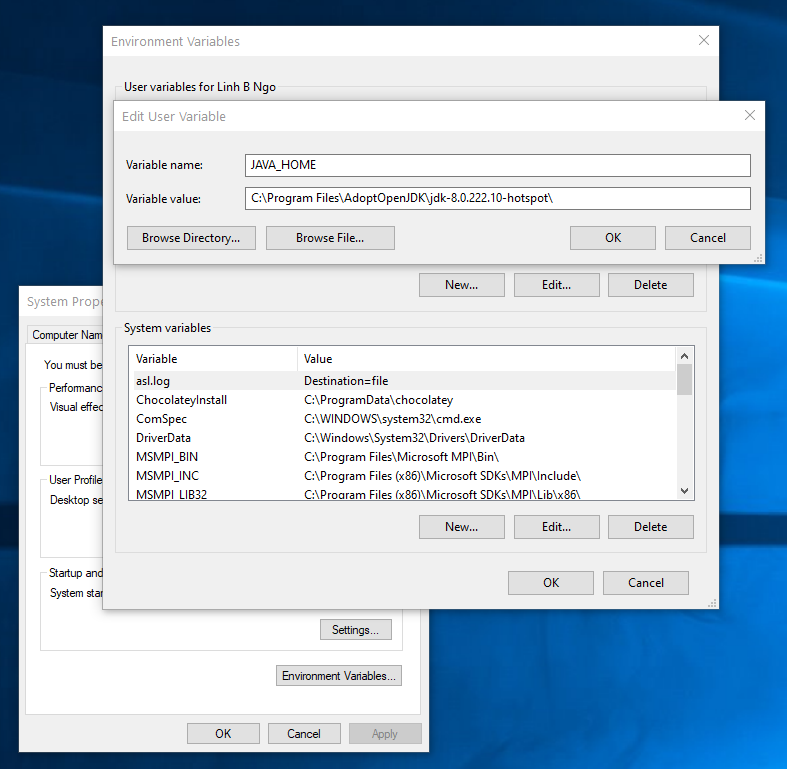
- Click on
Environment Variables. - Under
User variables for ..., clickNewand enter following pairs of input for each of the items below. ClickOKwhen done.- Java
-
Variable name:JAVA_HOME. -
Variable value: TypicallyC:\Program Files\AdoptOpenJDK\jdk-11.0.11.9-hotspot.
-
- Spark
-
Variable name:SPARK_HOME. -
Variable value:C:\spark-3.5.1-bin-hadoop3.
-
- Hadoop
-
Variable name:HADOOP_HOME. -
Variable value:C:\hadoop.
-
- Anaconda3
-
Variable name:ANACONDA_HOME. -
Variable value:C:\Users\YOUR_WINDOWS_USERNAME\anaconda3.
-
- Java
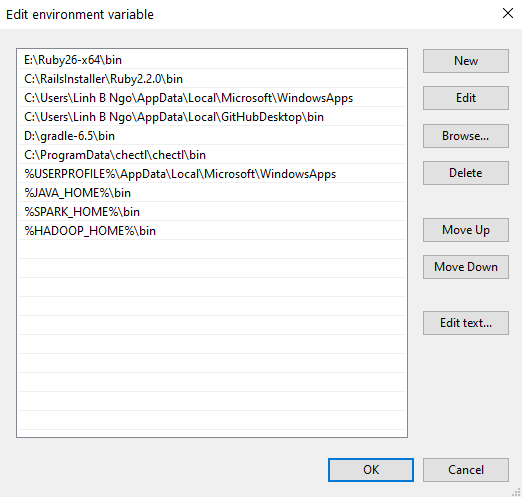
- In
User variables for ..., selectPathand clickEdit. Next, add the executable and enter following pairs of input by pressingNewto enter each the items below into the list. ClickOKwhen done.- Java:
%JAVA_HOME%\bin - Spark:
%SPARK_HOME%\bin - Hadoop:
%HADOOP_HOME%\bin - Anaconda3:
%ANACONDA_HOME%\Scripts
- Java:
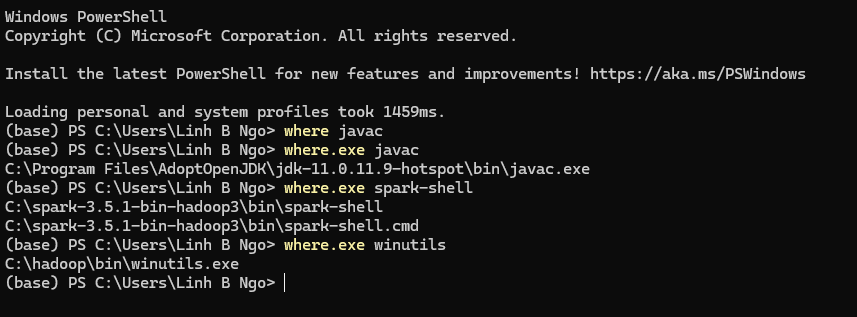
- Close your terminal and relaunch it. Test that all paths are setup correctly by running the followings:
Test Jupyter and pyspark
- Download the following Shakespeare collection.
- Open a terminal
- Launch Jupyter notebook
- Enter the following Python code into a cell of the new notebook.
- Replace
PATH_TO_DOWNLOADED_SHAKESPEARE_TEXT_FILEwith the actual path (including the file name) to where you downloaded the file earlier.
- Adjust the values for
number_coresandmemory_gbbased on your computer’s configuration.- For example, on a computer running Intel Celeron N3550 with 2
logical cores and 4GB of memory,
number_coresis set to2andmemory_gbis set to2.
- For example, on a computer running Intel Celeron N3550 with 2
logical cores and 4GB of memory,
- Run the cell.
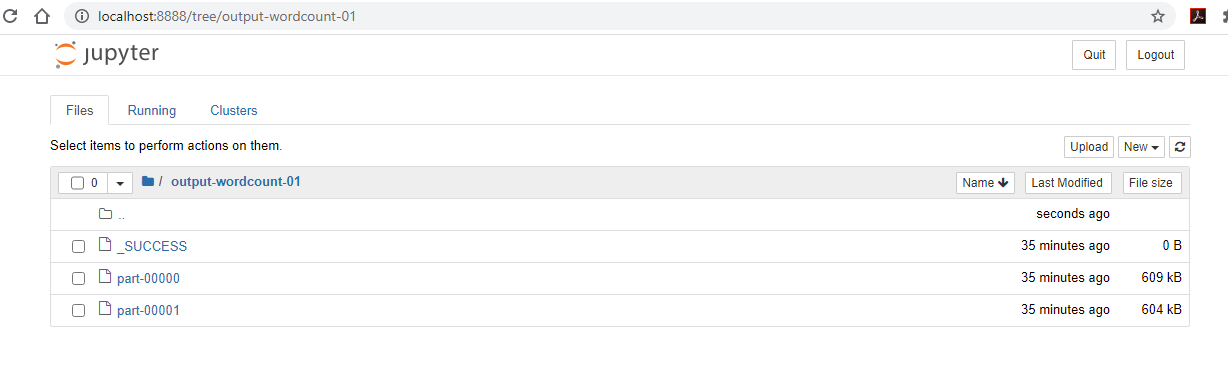
- Once (if) the run completes successfully, you can revisit your
Jupyter Server and observe that
output-word-count-1directory is now created.-
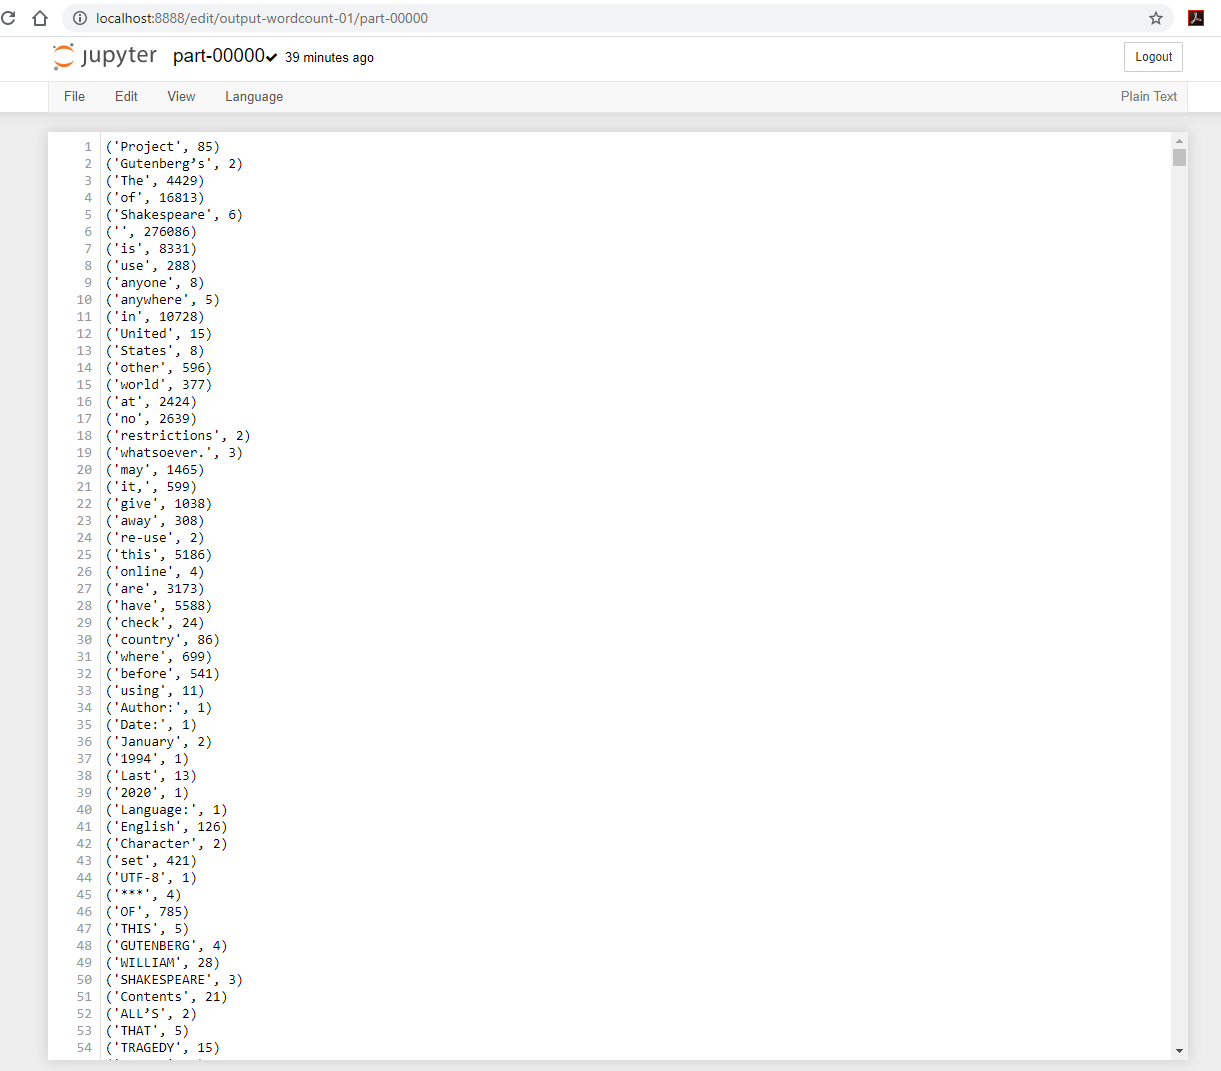
_SUCCESSis an empty file that serves the purpose of notifying of a successful execution. -
part-00000andpart-00001contains the resulting outputs.
-
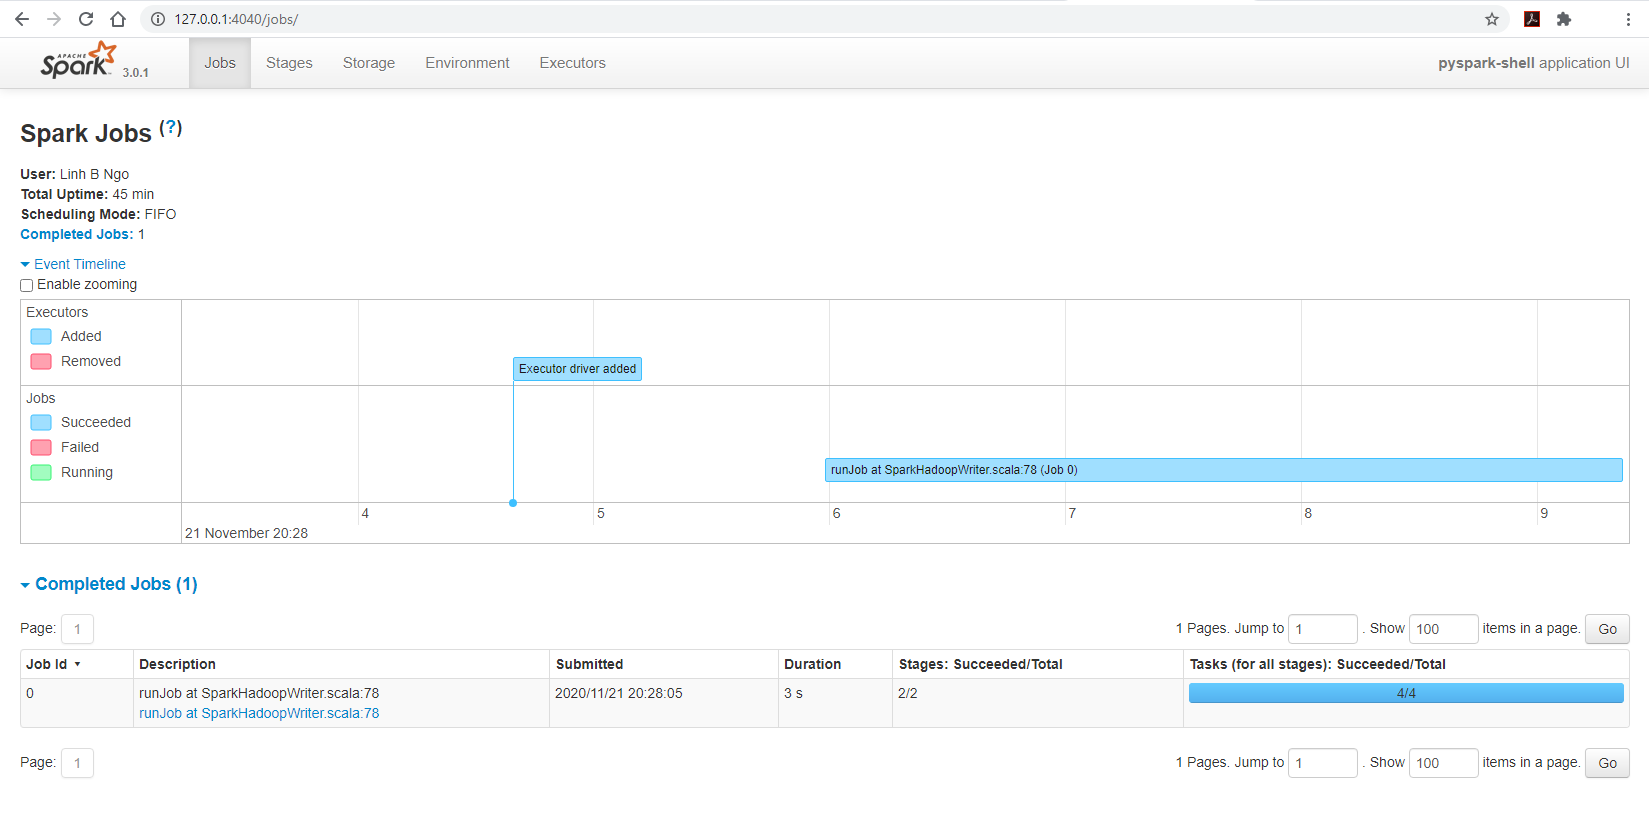
- You can also visit
127.0.0.1:4040/jobs, you can observe the running Spark cluster spawned by the Jupyter notebook:
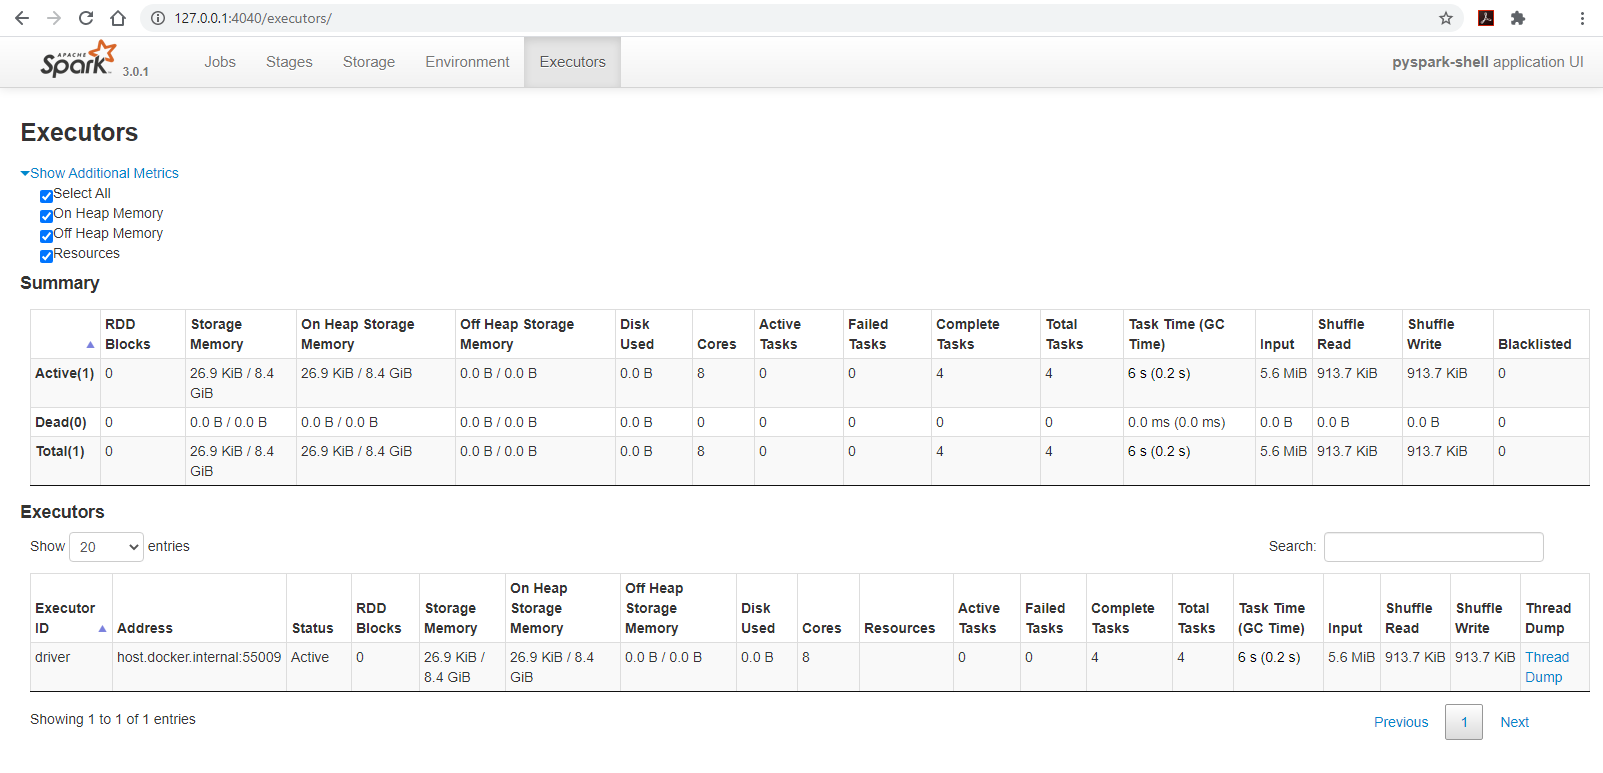
- Changing the Spark page’s tab to
Executorsto observe the configuration of the cluster:- The cluster has 8 cores
- The amount of available memory is only 8.4GB out of 16GB, this is due to Spark’s memory storage reservation/protection.
Install Anaconda
- Visit Anaconda’s download page and download the corresponding Anaconda installers.
- You should select the 64-Bit variety for your installers.
- Run the installation for Anaconda.
Install Java
You can test for the availability of your Java by trying to run:
You should have a Java version higher than 8.0 returned. If you don’t, you can setup Java 11 as follows:
- If you have an M1/M2 Mac machine
BASH
cd
wget https://github.com/adoptium/temurin11-binaries/releases/download/jdk-11.0.24%2B8/OpenJDK11U-jdk_aarch64_mac_hotspot_11.0.24_8.tar.gz
tar xzf OpenJDK11U-jdk_aarch64_mac_hotspot_11.0.24_8.tar.gz
echo "export JAVA_HOME=$HOME/jdk-11.0.24+8" >> ~/.zshrc
echo "export PATH=$JAVA_HOME/bin:$PATH" >> ~/.zshrc
source ~/.zshrc- If you have an Intel-based Mac machine.
BASH
cd
wget https://github.com/adoptium/temurin11-binaries/releases/download/jdk-11.0.24%2B8/OpenJDK11U-jdk_x64_mac_hotspot_11.0.24_8.tar.gz
tar xzf OpenJDK11U-jdk_x64_mac_hotspot_11.0.24_8.tar.gz
echo "export JAVA_HOME=$HOME/jdk-11.0.24+8" >> ~/.zshrc
echo "export PATH=$JAVA_HOME/bin:$PATH" >> ~/.zshrc
source ~/.zshrcTest Jupyter and pyspark
- Download the following Shakespeare collection.
- Launch Jupyter notebook
- Enter the following Python code into a cell of the new notebook.
- Replace
PATH_TO_DOWNLOADED_SHAKESPEARE_TEXT_FILEwith the actual path (including the file name) to where you downloaded the file earlier.
- Adjust the values for
number_coresandmemory_gbbased on your computer’s configuration.- For example, on a computer running Intel Celeron N3550 with 2
logical cores and 4GB of memory,
number_coresis set to2andmemory_gbis set to2.
- For example, on a computer running Intel Celeron N3550 with 2
logical cores and 4GB of memory,
- Run the cell.
- Once (if) the run completes successfully, you can revisit your
Jupyter Server and observe that
output-word-count-1directory is now created.-
_SUCCESSis an empty file that serves the purpose of notifying of a successful execution. -
part-00000andpart-00001contains the resulting outputs.
-
For Linux users, the setup process is similar to that of MacOS users.
Depending on the nature of your shell, you might replace
.zshrc with .bashrc.
Spark Setup: Online platform on Kaggle
CloudLab is an NSF-funded experimental testbed for future computing research and education. CloudLab allows researchers control to the bare metal of a diverse and distributed set of resources at large scale. As a result, it allows repeatable and scientific design of experiments. Some key characteristics of CloudLab include:
-
Sliceability: the ability to support virtualization while maintaining some degree of isolation for simultaneous experiments -
Deep programmability: the ability to influence the behavior of computing, storage, routing, and forwarding components deep inside the network, not just at or near the network edge.
- Visit CloudLab’s website
- Click Request an Account
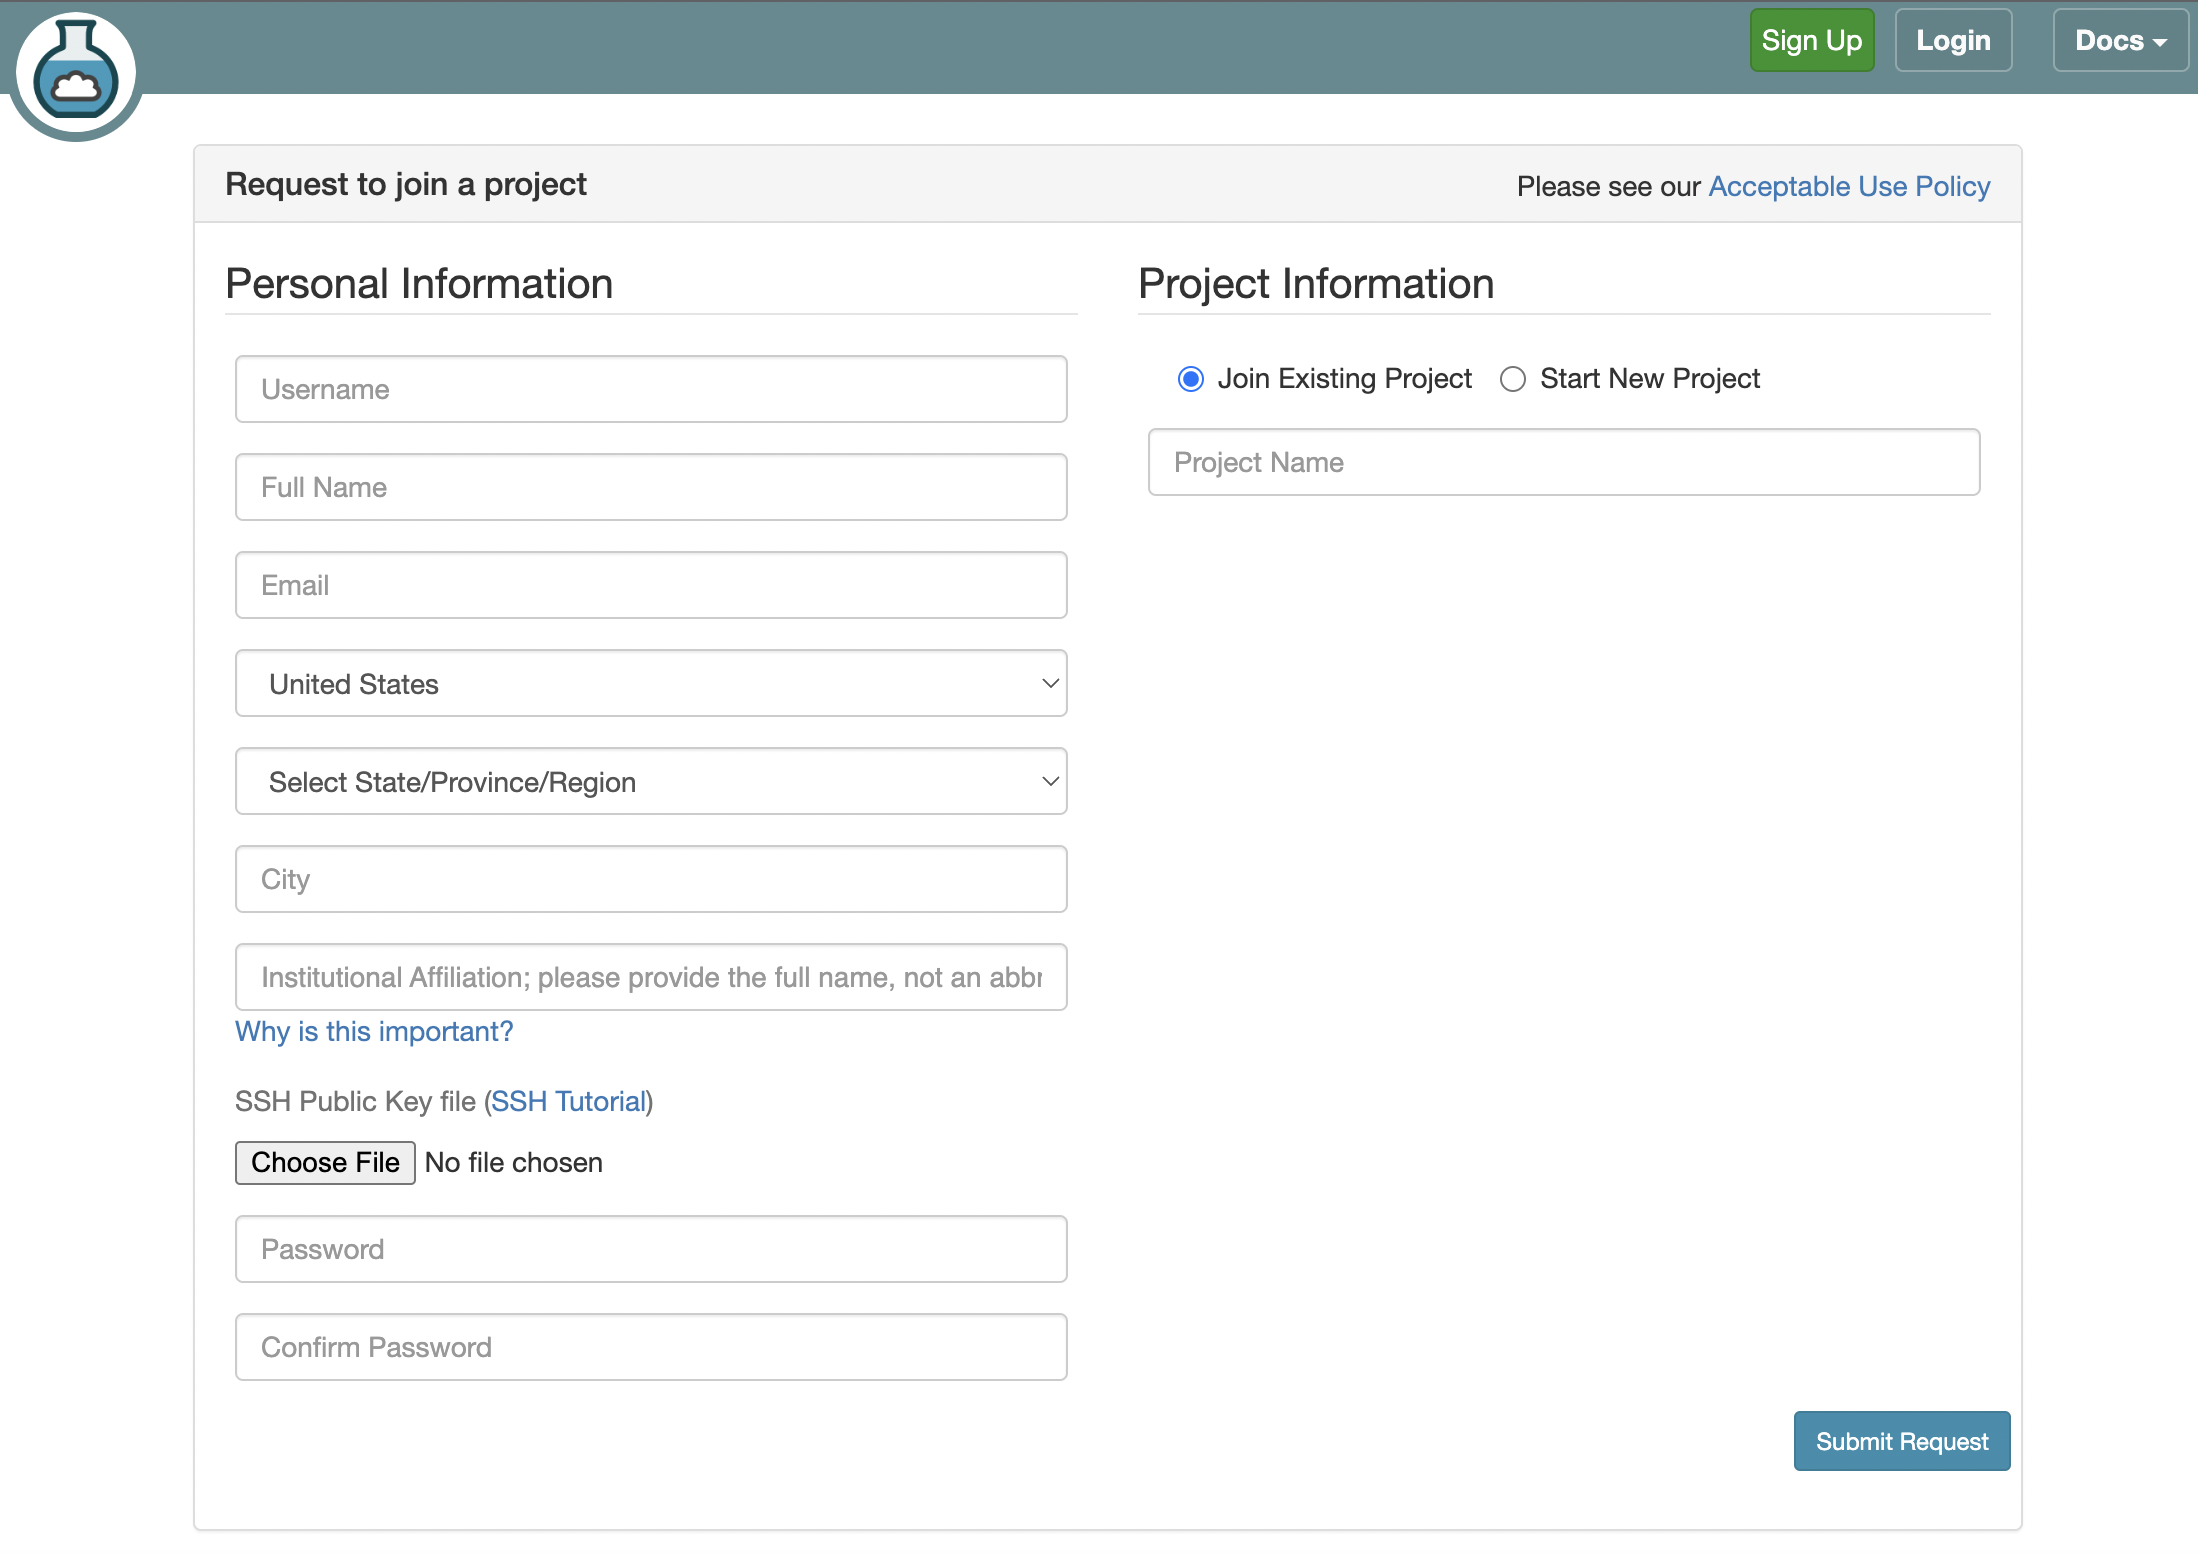
- Fill in the information as shown below and click Submit Request
- Fill in the information as shown below and click
Submit Request-
Username: Use your WCUPA username. Make sure everything is lowercase. -
Full Name: Your first and last name -
Email: Use a non-WCUPA email. WCUPA email tends to block the confirmation email. -
Select Country: United States -
Select State: Pennsylvania -
City: Malvern -
Institutional Affiliation: West Chester University of Pennsylvania - Ignore the
SSH Public Key filebox for now. - Enter a password of your choice in
PasswordandConfirm Passwordboxes. - Check
Join Existing ProjectforProject Information. -
Project Name: SecureEDU
-
- Wait for a confirmation email to arrive in your wcupa.edu mailbox. You might have to resubmit a new request if you don’t see this email in about half an hour.
- After your account is confirmed, the instructor will be able to see your application and can grant you access to CloudLab.
- If you already had a CloudLab account, you can select
Start/Join Projectunder your username, then selectJoin Existing Projectand provide the nameSecureEDU.
- Launch your terminal (setup in the previous section) and run the following command:
Callout
- Hit
Enterfor all questions. - Do not enter a password or change the default location of the files.
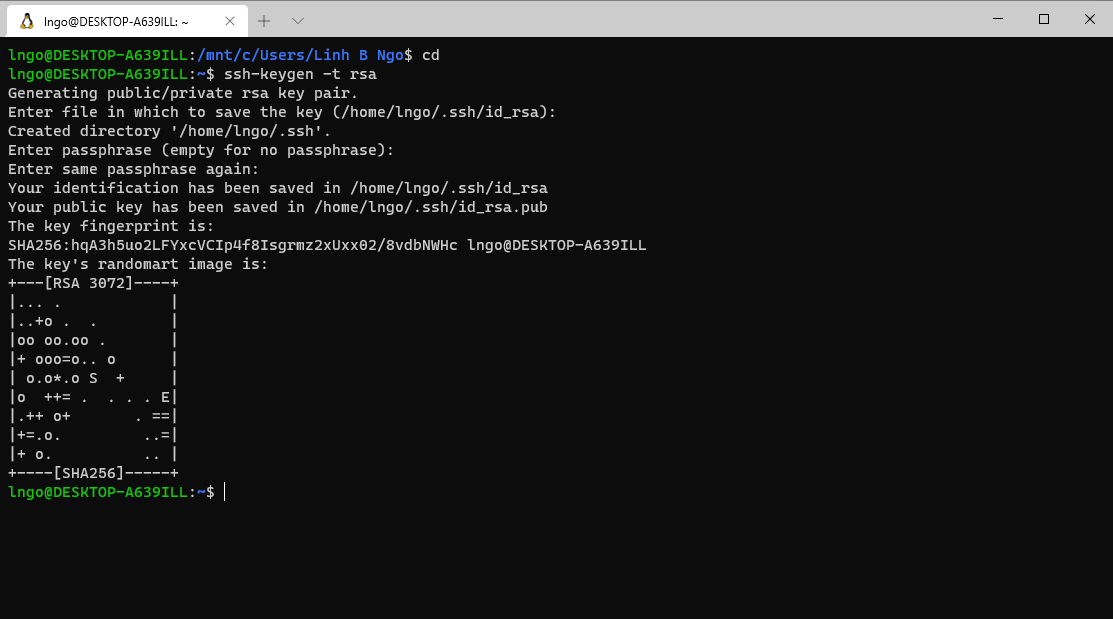
- Run the following command to display the public key

- Drag your mouse over to paint/copy the key (just the text, no extra spaces after the last character)
- Log into CloudLab, click on your username (top right) and select
Manage SSH Keys:
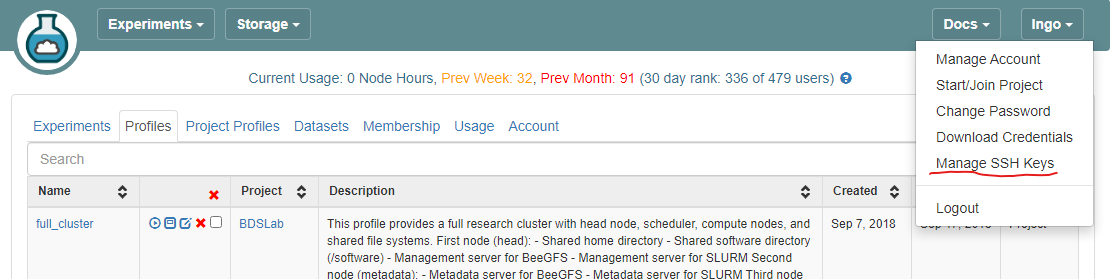
- Paste the key into the
Keybox and clickAdd Key.
Setup GitHub repository
- If you have not had a GitHub account at this point, go to GitHub website and create a new account.
- Go to your GitHub account, under
Repositories, selectNew.- You can select any name for your repo.
- It must be
publicrepository. - The
Add a README filebox must be checked. - Click
Create repositorywhen done.
- In your new Git repository, click
Add fileand selectCreate new file - Type
profile.pyfor the file name and enter the following content into the text editor.
PYTHON
import geni.portal as portal
import geni.rspec.pg as rspec

# Create a Request object to start building the RSpec.
request = portal.context.makeRequestRSpec()
# Create a XenVM
node = request.XenVM("node")
node.disk_image = "urn:publicid:IDN+emulab.net+image+emulab-ops:UBUNTU22-64-STD"
node.routable_control_ip = "true"

node.addService(rspec.Execute(shell="/bin/sh", command="sudo apt update"))
node.addService(rspec.Execute(shell="/bin/sh", command="sudo apt install -y apache2"))
node.addService(rspec.Execute(shell="/bin/sh", command='sudo systemctl status apache2'))

# Print the RSpec to the enclosing page.
portal.context.printRequestRSpec()- Click
Commit new filewhen done.
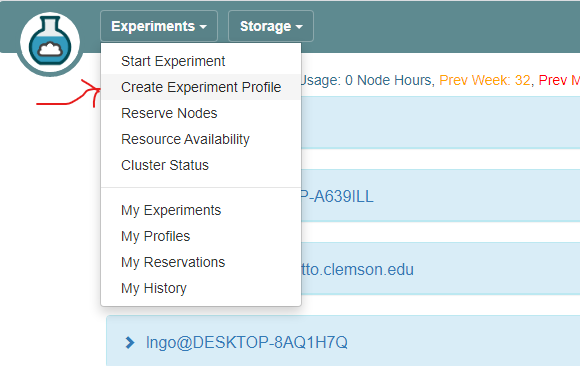
- Login to your CloudLab account, click
Experimentson top left, selectCreate Experiment Profile.
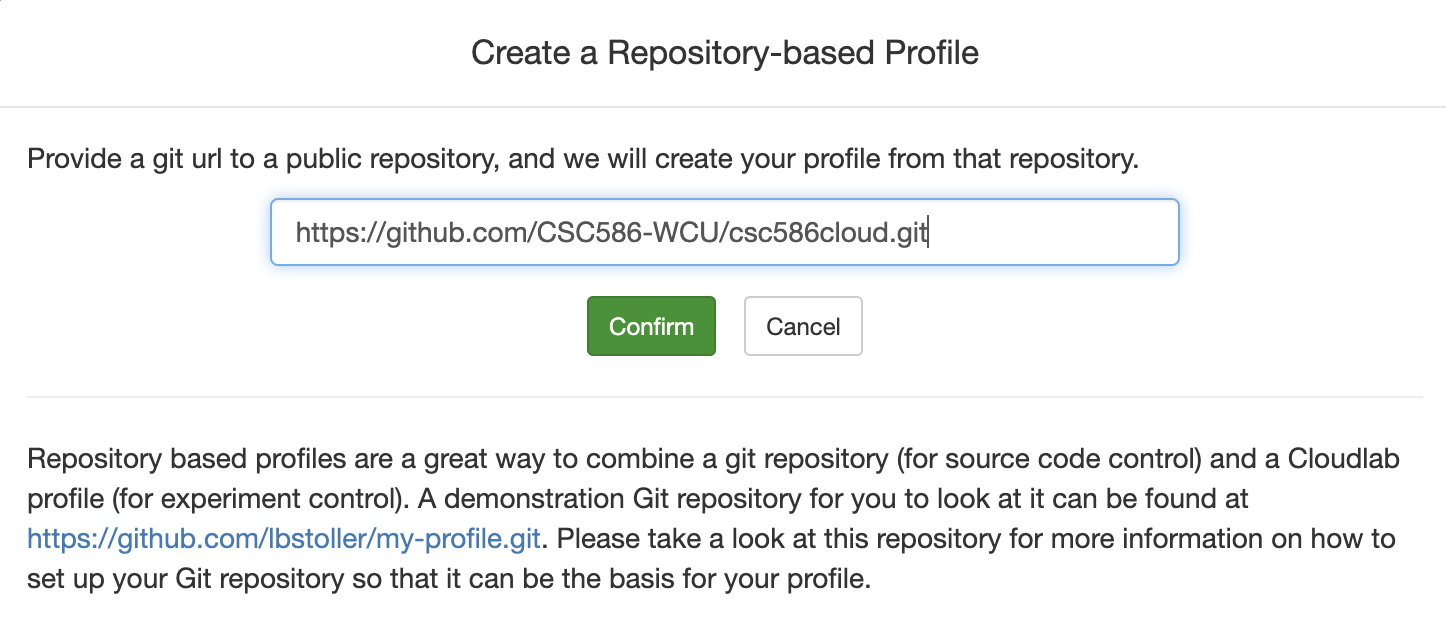
- Click on
Git Repo - Paste the URL of your previously created Git repo
here and click
Confirm
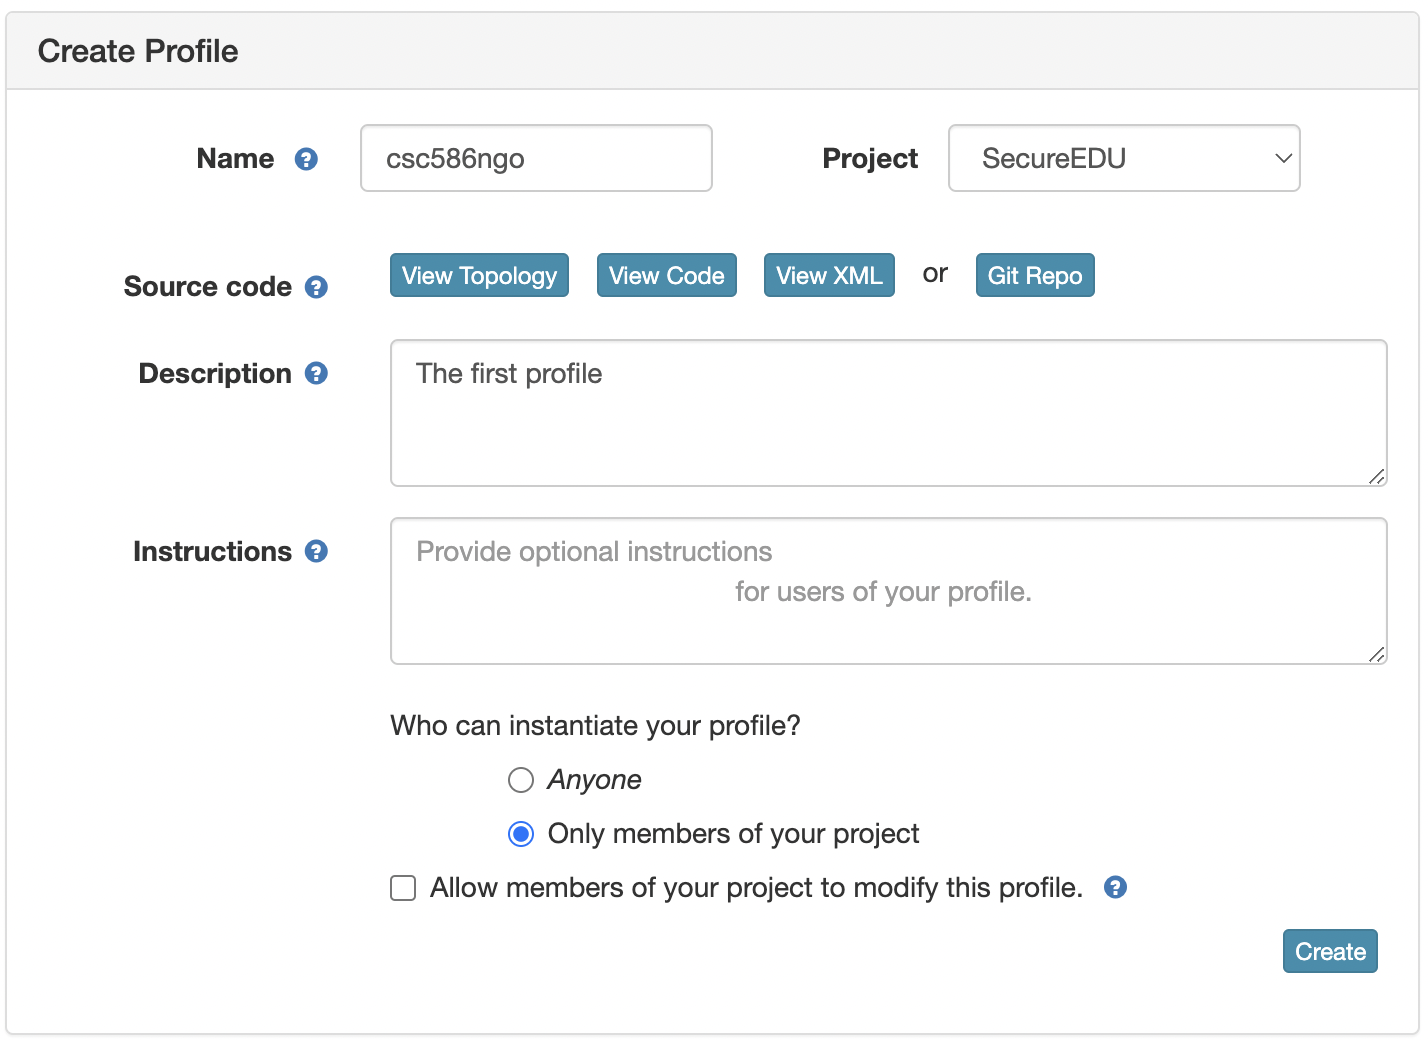
- Enter the name for your profile, put in some words for the Description.
- You will not have a drop-down list of Project.
- Click
Createwhen done.
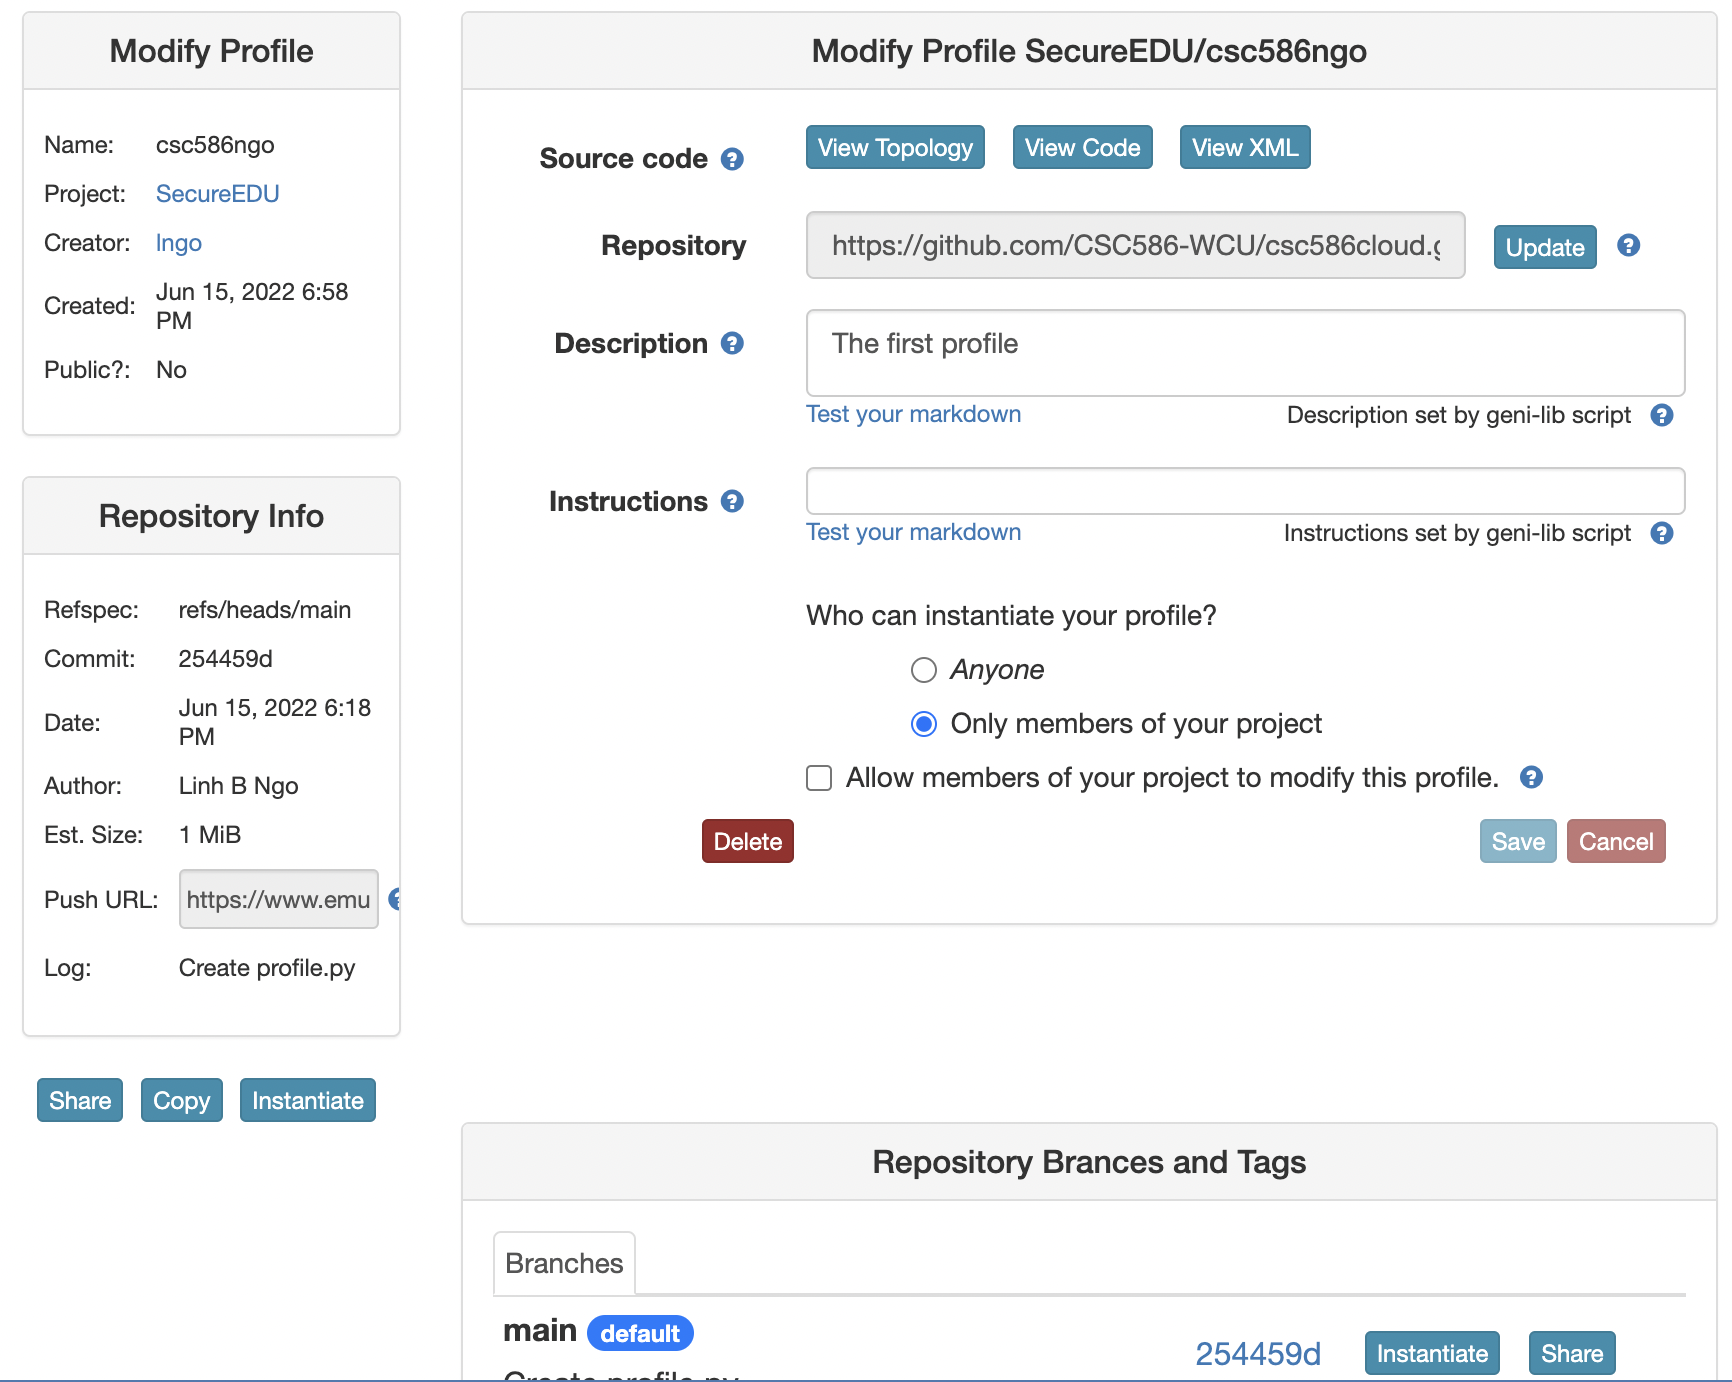
- Click
Instantiateto launch an experiment from your profile.
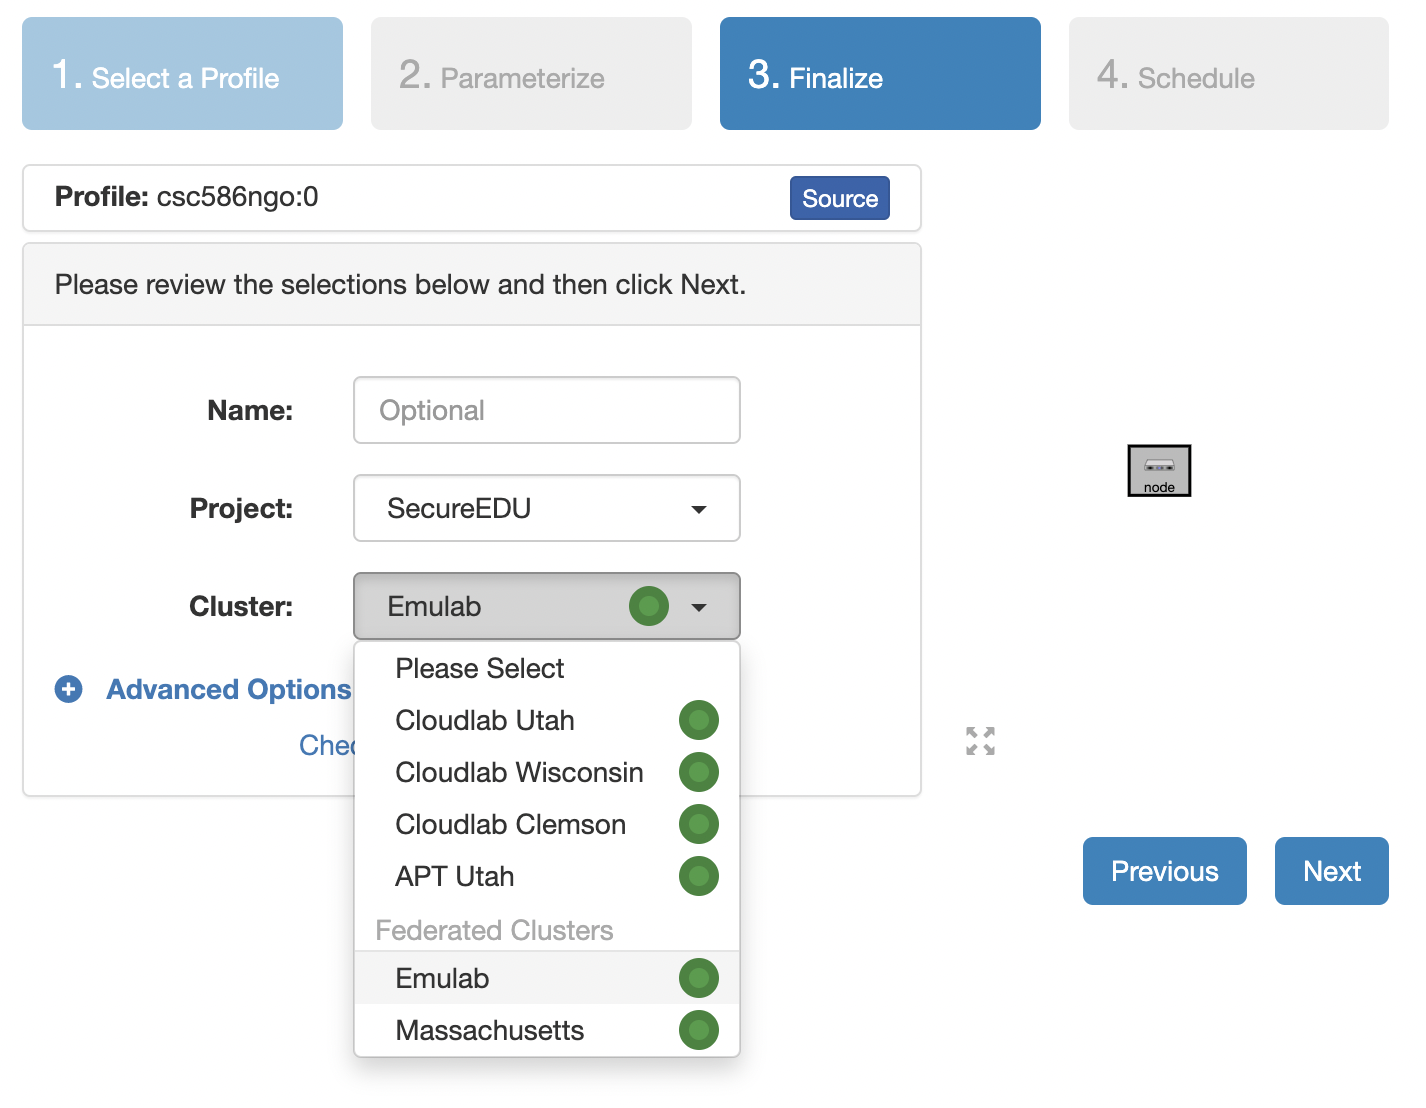
- Select a Cluster from Wisconsin, Clemson, or Emulab, then click
Next. - Do not do anything on the next
Start on date/timescreen. ClickFinish.
- Your experiment is now being
provision.
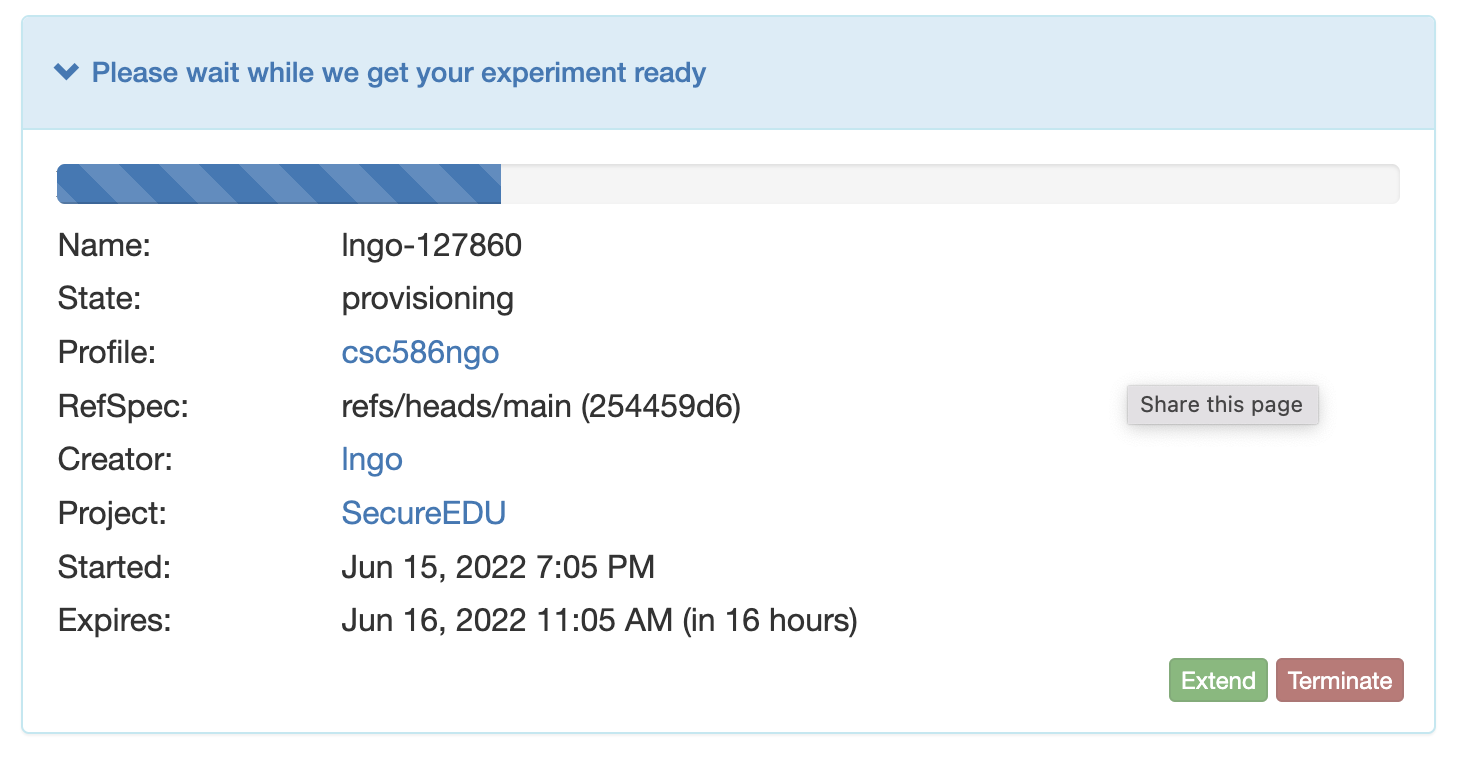
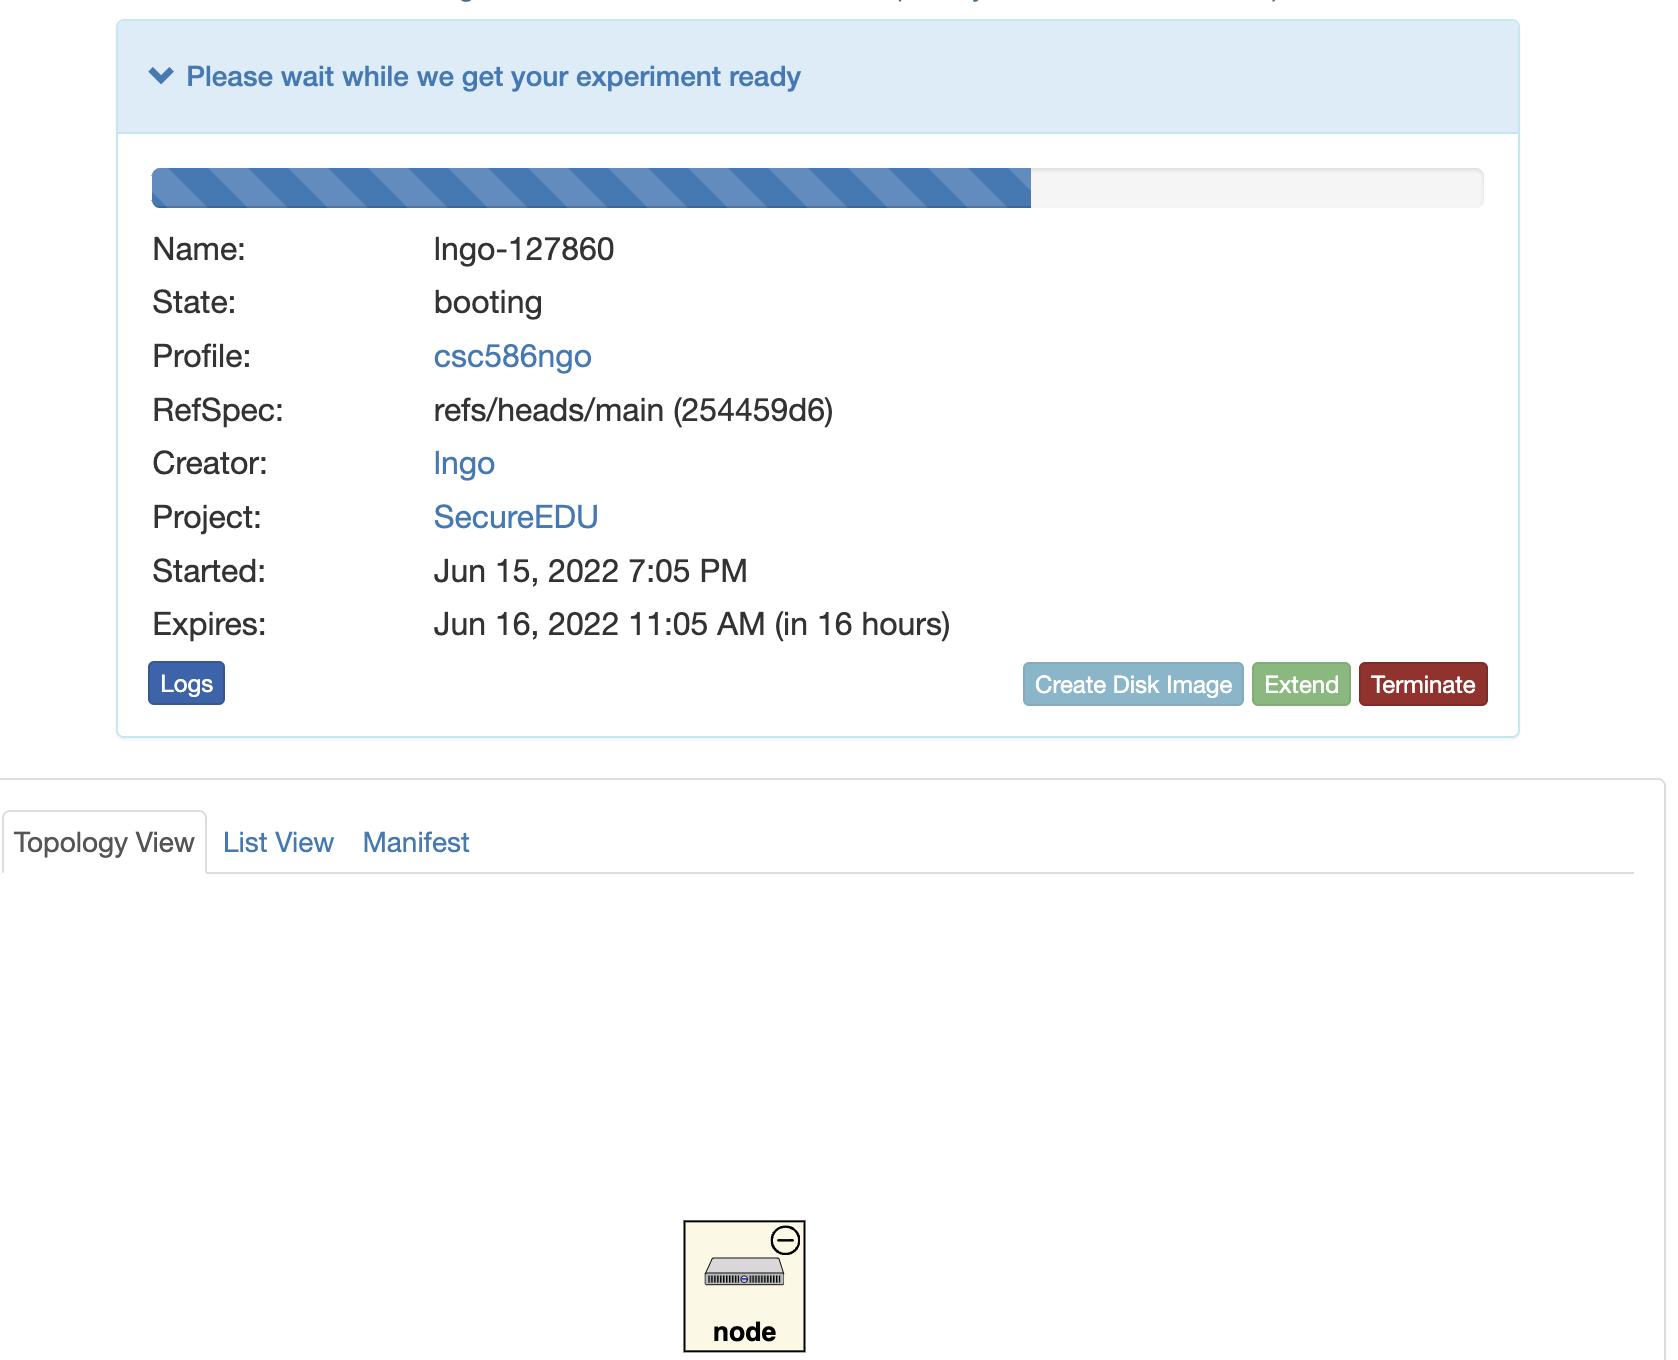
- Once resources are provisioned, CloudLab will boot up your experiment.
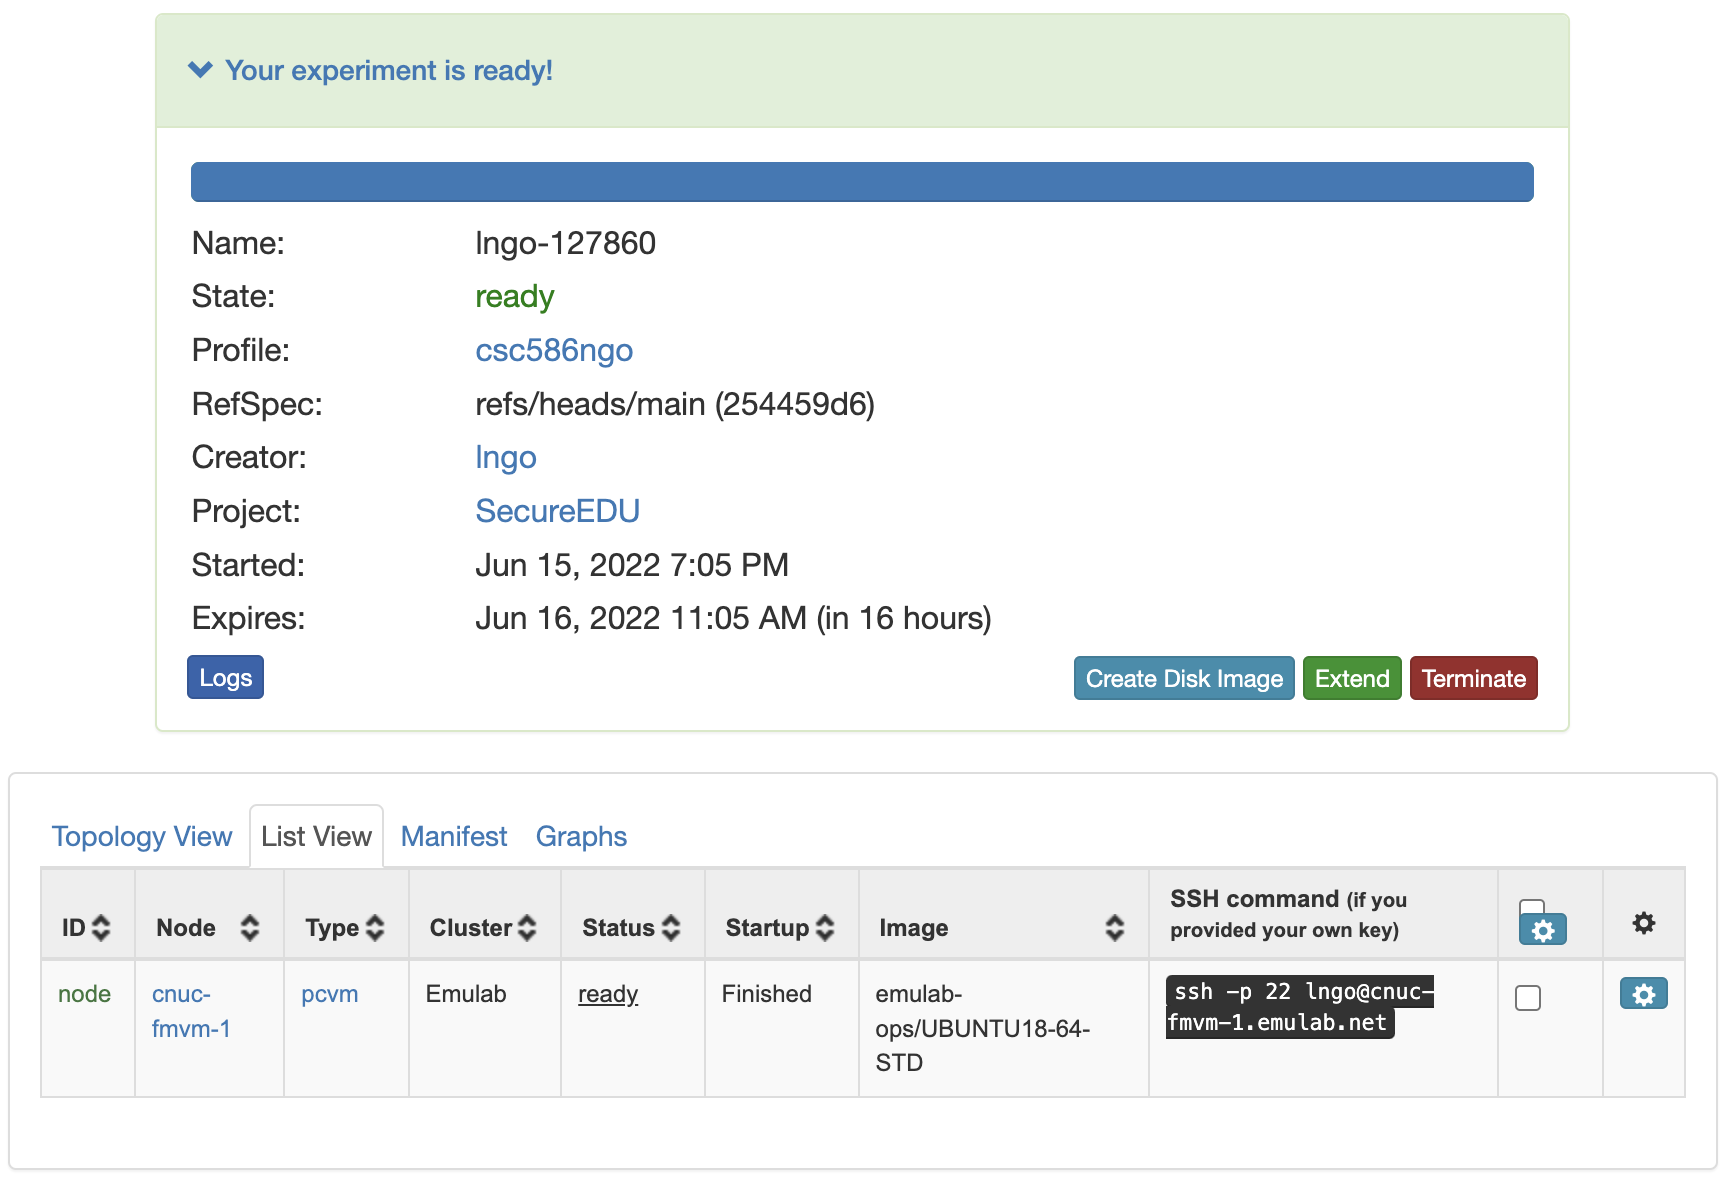
- When it is ready, you can use the provided SSH command to log in to your experiment (assuming your key was set up correctly).
- The command is in the List View tab.
Callout
- If you fail to connect to the
readyexperiment, it is most likely that your public SSH key has not been copied correctly into your CloudLab account. - Check the copied key carefully, and repeat the copy process if necessary (you don’t need to generate a new key)
- Click
Terminate, then find your profile and instantiate it again.