Summary and Schedule
This is the curriculum for CSC 467, Big Data Engineering. The website is built with The Carpentries Workbench.
- Instructor: Linh B. Ngo
- Office: UNA 138
- Office Hours: By appointment
- Email: lngo AT wcupa DOT edu
- Phone: 610-436-2595
Course Information
- The course runs from August 26, 2024 until December 09, 2024. It is an in-person course.
Course Description
This course will investigate engineering approaches in solving challenges in data-intensive and big data computing problems. Course topics include distributed tools and parallel algorithms that help with acquiring, cleaning, and mining very large amount of data.
| Setup Instructions | Download files required for the lesson | |
| Duration: 00h 00m | 1. Syllabus | |
| Duration: 00h 45m | 2. Introduction | |
| Duration: 01h 30m | 3. MapReduce Programming Paradigm | How does Linux come to be? |
| Duration: 02h 30m | 4. Spark Computing Environment | How does Linux come to be? |
| Duration: 03h 30m | 5. Data Parallel Computing with Spark | How does Linux come to be? |
| Duration: 04h 30m | 6. Page Rank | How does Linux come to be? |
| Duration: 05h 30m | 7. Locality Sensitive Hashing | How does Linux come to be? |
| Duration: 06h 30m | 8. Frequent Itemsets | How does Linux come to be? |
| Duration: 07h 30m | 9. Clustering | How does Linux come to be? |
| Duration: 08h 30m | 10. Recommendation Systems | How does Linux come to be? |
| Duration: 09h 30m | 11. Distributed Machine Learning with Spark | How does Linux come to be? |
| Duration: 10h 30m | Finish |
The actual schedule may vary slightly depending on the topics and exercises chosen by the instructor.
For this class, we will be using Python notebooks to connect to a Spark server. This Spark server can be hosted locally or deployed on Kaggle, an equivalent of LeetCode for data scientists.
The instructions below will first show the steps to setup Spark environment on local device. Next, the steps to deploy Spark on Kaggle are also demonstrated.
Spark Setup: Locally hosted
- Make sure that your Windows is up to date prior to completing the remaining steps.
- If you are running on Windows Home, make sure that you switch out of S mode.
- The minimal configuration this setup has been tested on is:
- Intel Celeron CPU N3550
- 4GB memory
- Windows 10 Home version 20H2
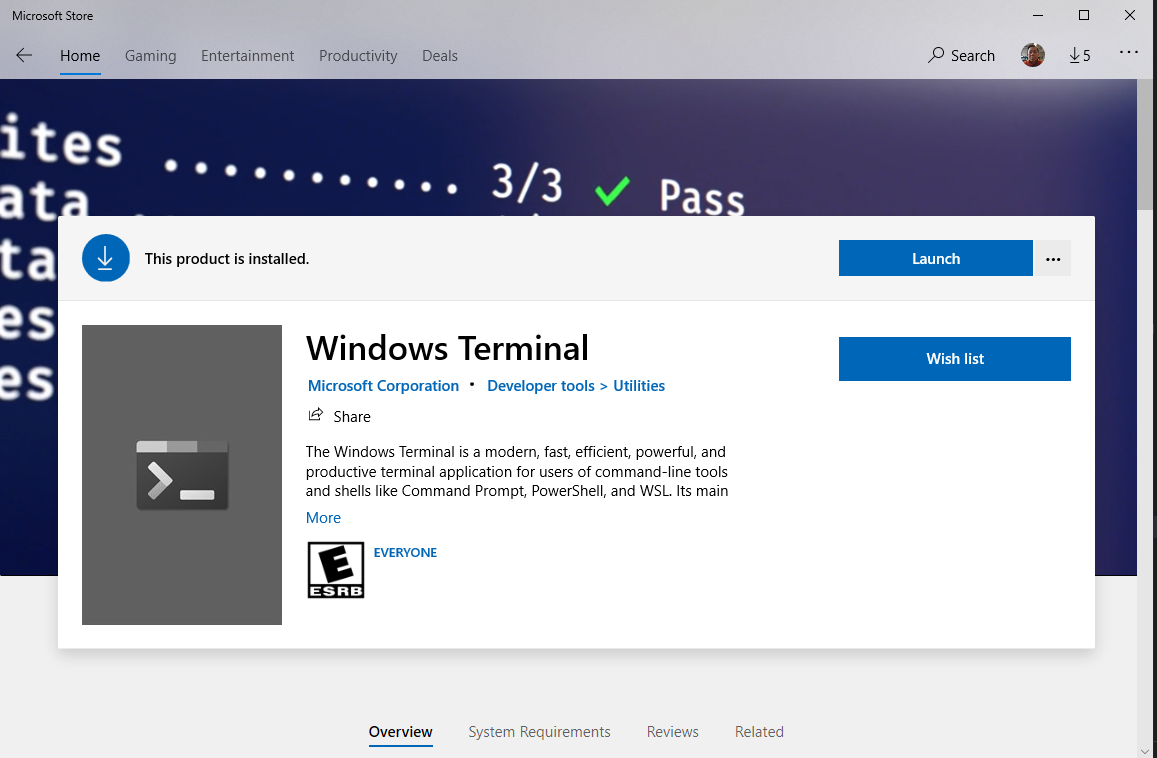
Windows Terminal
- Make sure that your computer is updated.
- I will assume that everyone’s computer is running Windows 10, as it is the standard OS on all Windows-based laptop being sold nowadays.
- Go to
Microsoft Storeapp, search and installWindows Terminal.
Install Java
- It is most likely that you already have Java installed. To confirm this, first, open a terminal.
- Run
javac -versionandjava -version.
- You see the version of Java being displayed on screen. Your version might be different from mine.
- Spark supports up to Java 11 now.
- Similarly, version information will be displayed.
If you do not have both java and
javac, you will need to install Java SDK (Software
Development Kit). We will be using the Java distribution maintained by
OpenJDK.
- Go to OpenJDK website.
- Choose OpenJDK 8 (LTS) or OpenJDK 11 (LTS) for Version and HotSpot for JVM.
- Click on the download link to begin download the installation package.
- Run the installer. You can keep all default settings on the installer.
- Once the installation process finishes, carry out the tests above
again in another terminal to confirm that you have both
javaandjavac.
Install Anaconda
- Visit Anaconda’s download page and download the corresponding Anaconda installers.
- You should select the 64-Bit variety for your installers.
- Run the installation for Anaconda.
- Remember the installation directory for Anaconda.
- For Windows, this is typically under
C:\Users\YOUR_WINDOWS_USERNAME\anaconda3. orC:\ProgramData\anaconda3. - Open a terminal and run:
- Restart the terminal
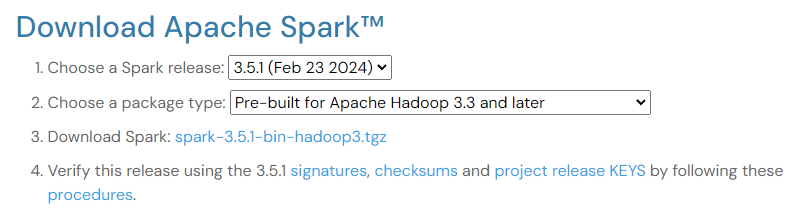
Download Spark
- Download Spark 3.5.1
- Untar and store the final directory somewhere that is easily accessible.
- You might need to download and install 7-Zip to decompress
.tgzfile on Windows.
- When decompressing, you might have to do it twice, because the first
decompression will return a
.tarfile, and the second decompression is needed to completely retrieve the Spark directory. - Move the resulting directory under the
C:drive.
Install libraries to support Hadoop functionalities
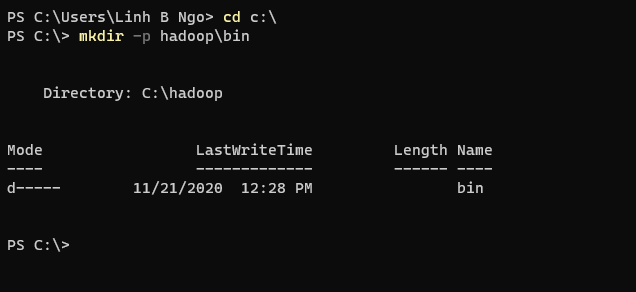
- Open
Windows Terminal, and create ahadoopdirectory and abinsubdirectory under theC:drive.
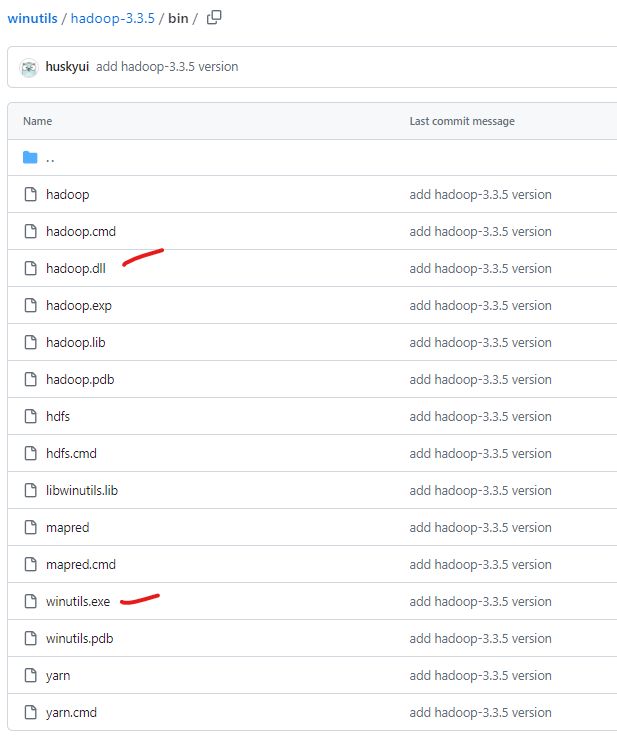
- Visit the link
to winutils.exe, right click on the
Downloadand chooseSave Link As. - Save the file to
C:\hadoop\bin. - Visit the link
to hadoop.dll, right click on the
Downloadand chooseSave Link As. - Save the file to
C:\hadoop\bin.
Setup environment variables
- Click on the Windows icon and start typing
environment variablesin the search box. - Click on
Edit the system environment variables.
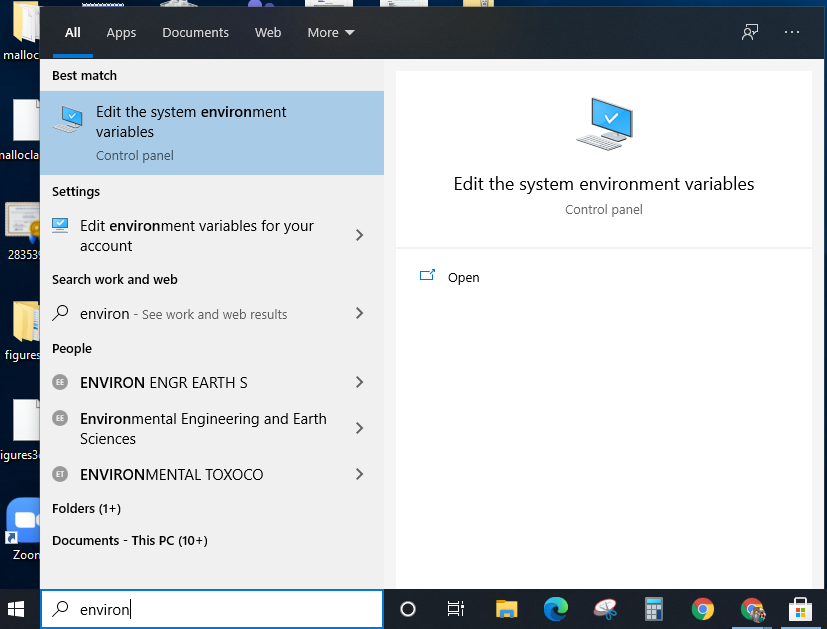
- Click on
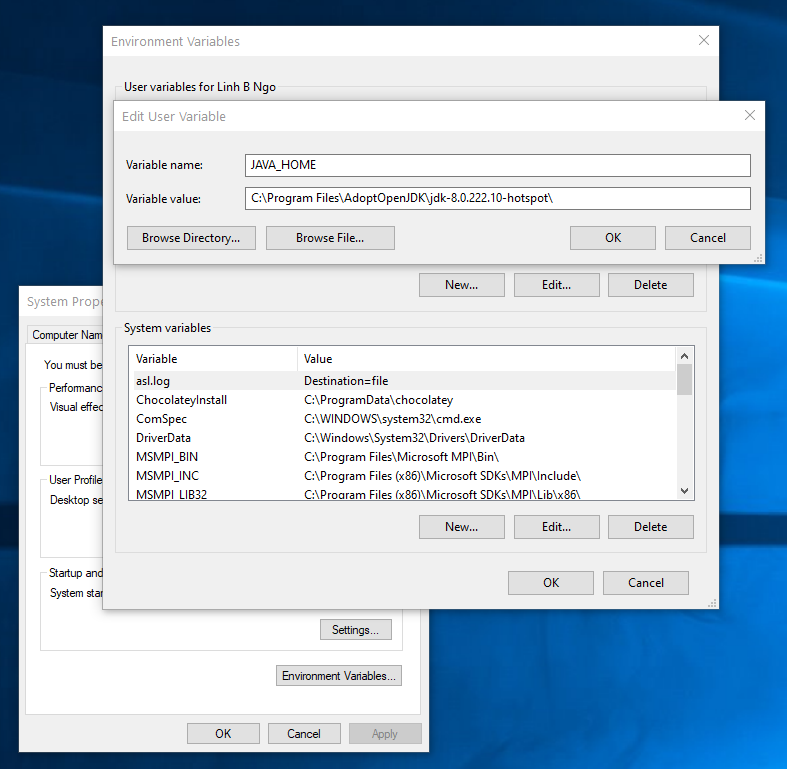
Environment Variables. - Under
User variables for ..., clickNewand enter following pairs of input for each of the items below. ClickOKwhen done.- Java
-
Variable name:JAVA_HOME. -
Variable value: TypicallyC:\Program Files\AdoptOpenJDK\jdk-11.0.11.9-hotspot.
-
- Spark
-
Variable name:SPARK_HOME. -
Variable value:C:\spark-3.5.1-bin-hadoop3.
-
- Hadoop
-
Variable name:HADOOP_HOME. -
Variable value:C:\hadoop.
-
- Anaconda3
-
Variable name:ANACONDA_HOME. -
Variable value:C:\Users\YOUR_WINDOWS_USERNAME\anaconda3.
-
- Java
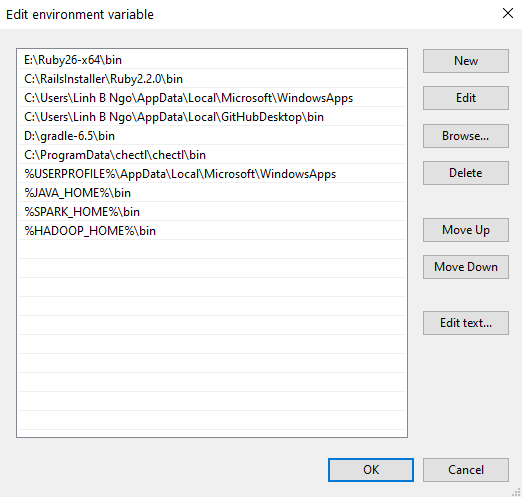
- In
User variables for ..., selectPathand clickEdit. Next, add the executable and enter following pairs of input by pressingNewto enter each the items below into the list. ClickOKwhen done.- Java:
%JAVA_HOME%\bin - Spark:
%SPARK_HOME%\bin - Hadoop:
%HADOOP_HOME%\bin - Anaconda3:
%ANACONDA_HOME%\Scripts
- Java:
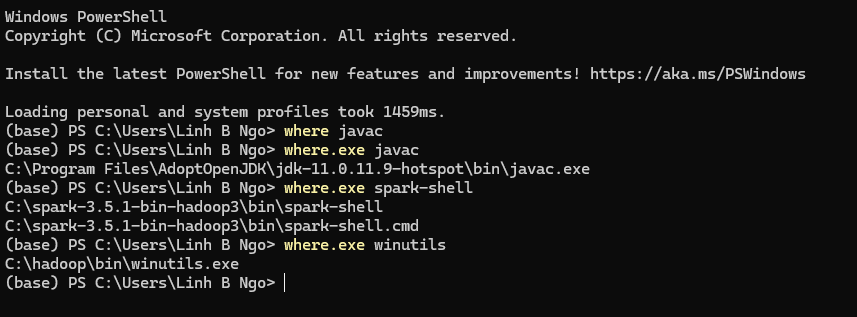
- Close your terminal and relaunch it. Test that all paths are setup correctly by running the followings:
Test Jupyter and pyspark
- Download the following Shakespeare collection.
- Open a terminal
- Launch Jupyter notebook
- Enter the following Python code into a cell of the new notebook.
- Replace
PATH_TO_DOWNLOADED_SHAKESPEARE_TEXT_FILEwith the actual path (including the file name) to where you downloaded the file earlier.
- Adjust the values for
number_coresandmemory_gbbased on your computer’s configuration.- For example, on a computer running Intel Celeron N3550 with 2
logical cores and 4GB of memory,
number_coresis set to2andmemory_gbis set to2.
- For example, on a computer running Intel Celeron N3550 with 2
logical cores and 4GB of memory,
- Run the cell.
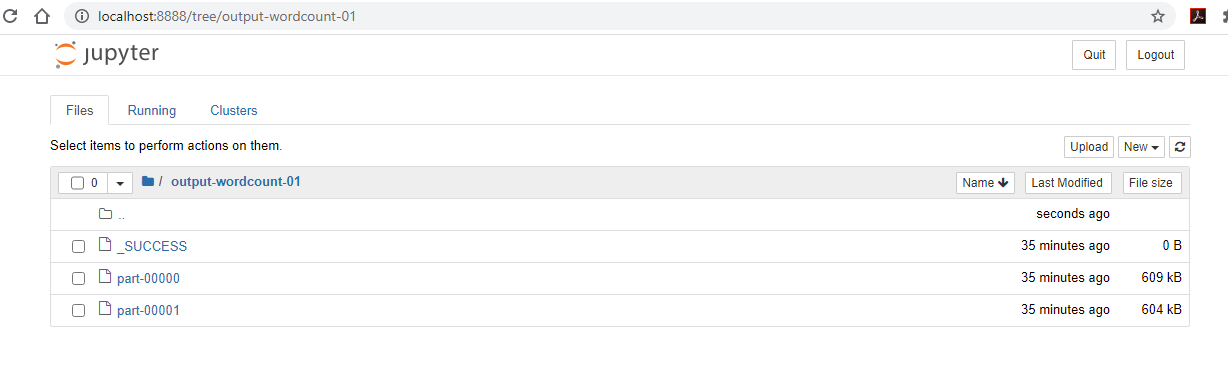
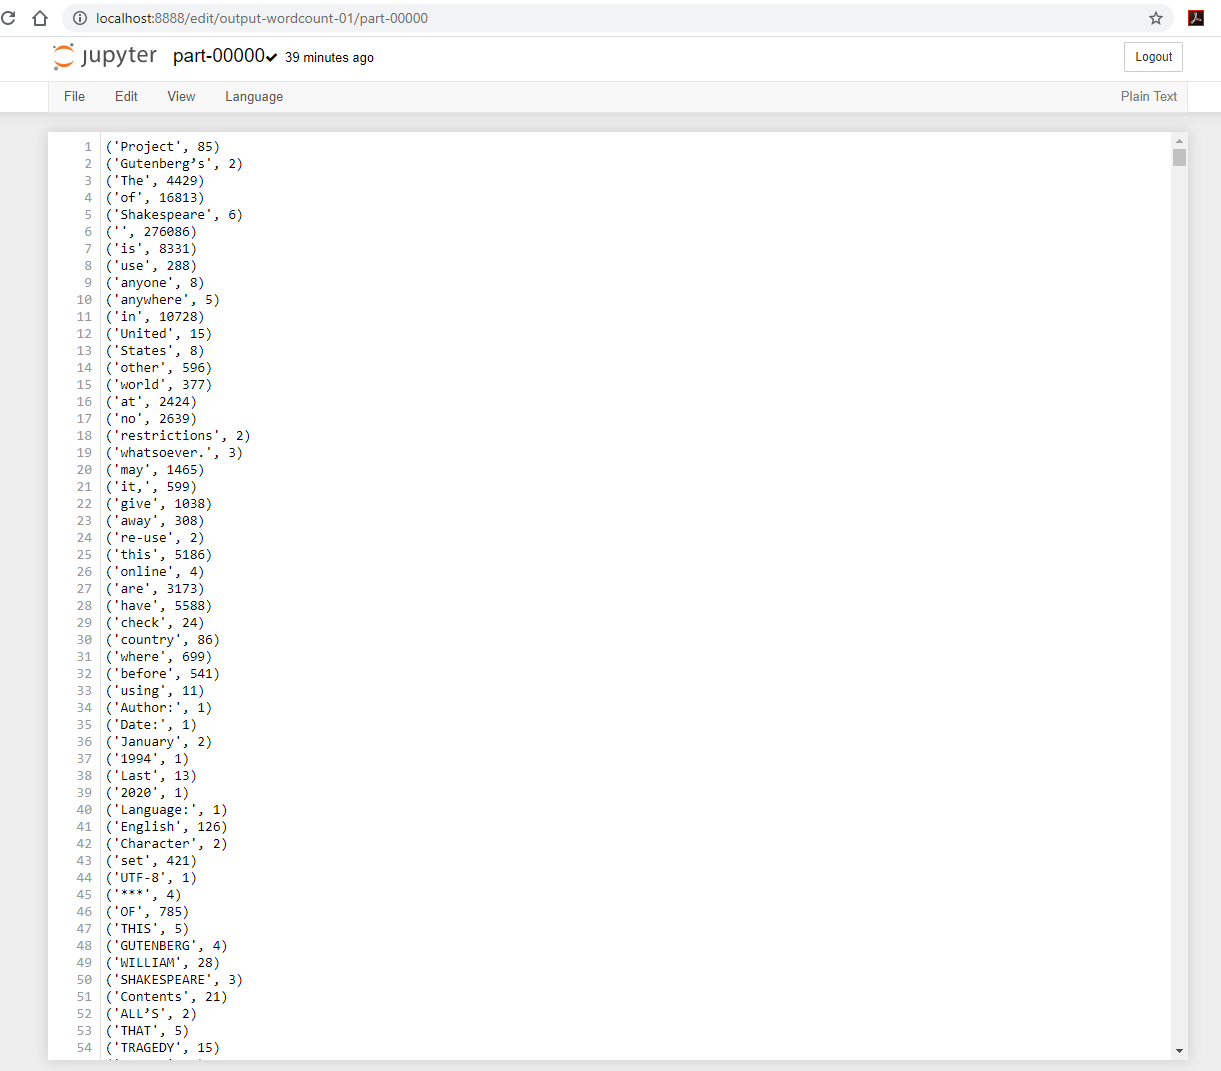
- Once (if) the run completes successfully, you can revisit your
Jupyter Server and observe that
output-word-count-1directory is now created.-
_SUCCESSis an empty file that serves the purpose of notifying of a successful execution. -
part-00000andpart-00001contains the resulting outputs.
-
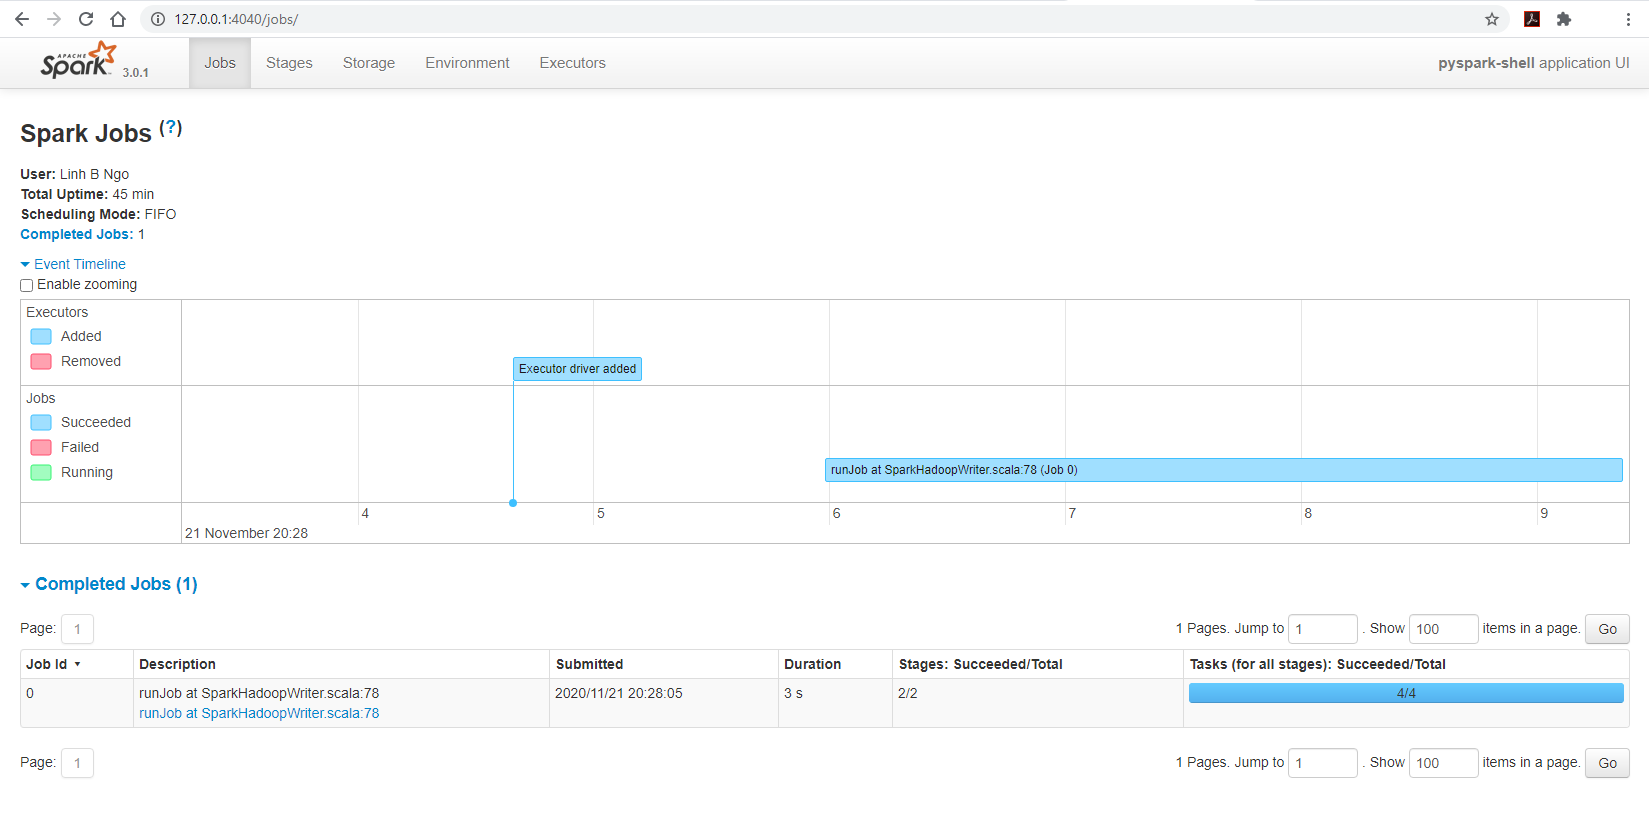
- You can also visit
127.0.0.1:4040/jobs, you can observe the running Spark cluster spawned by the Jupyter notebook:
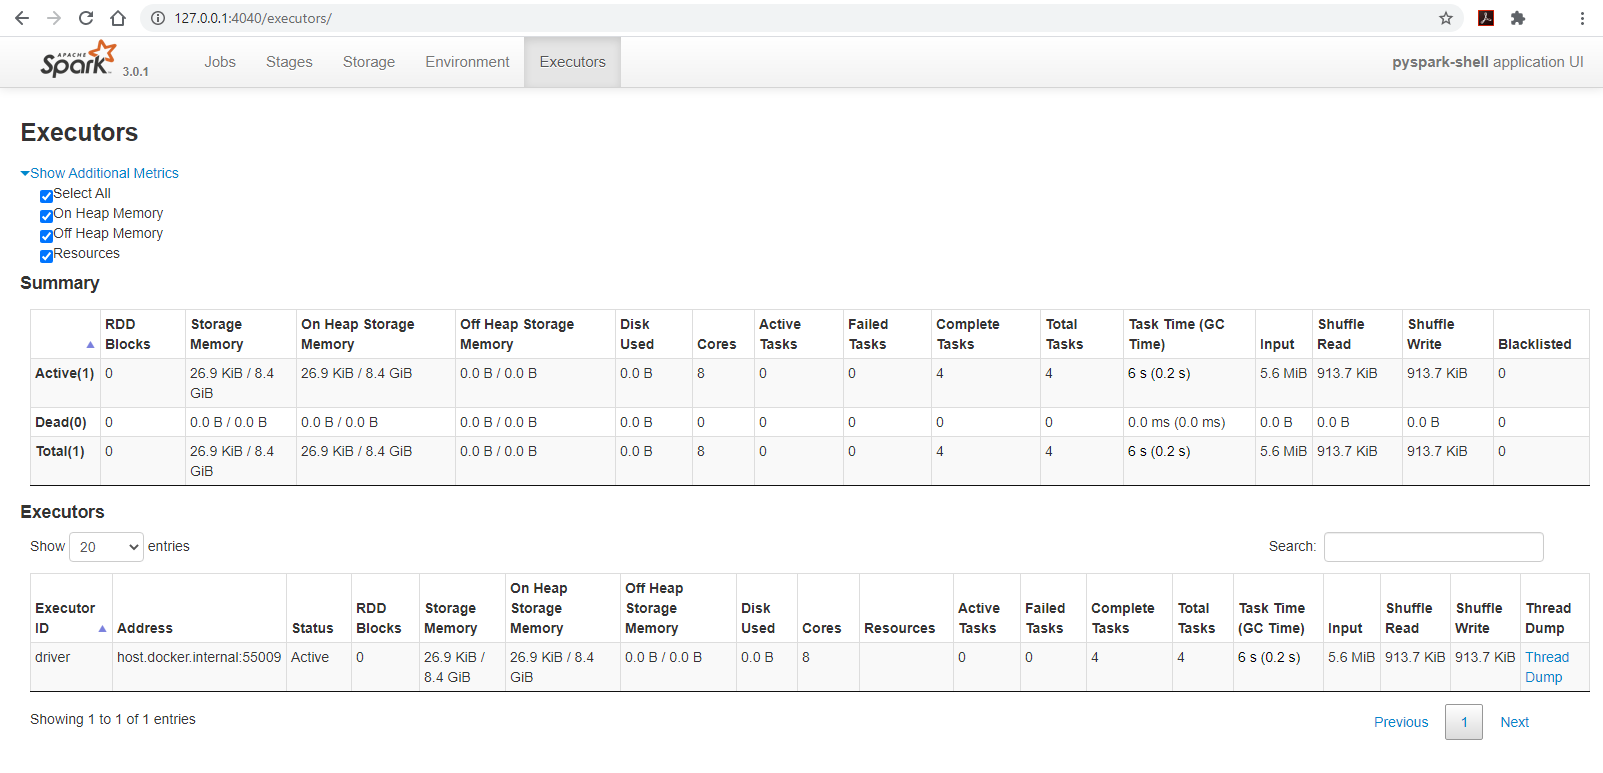
- Changing the Spark page’s tab to
Executorsto observe the configuration of the cluster:- The cluster has 8 cores
- The amount of available memory is only 8.4GB out of 16GB, this is due to Spark’s memory storage reservation/protection.
Install Anaconda
- Visit Anaconda’s download page and download the corresponding Anaconda installers.
- You should select the 64-Bit variety for your installers.
- Run the installation for Anaconda.
Install Java
You can test for the availability of your Java by trying to run:
You should have a Java version higher than 8.0 returned. If you don’t, you can setup Java 11 as follows:
- If you have an M1/M2 Mac machine
BASH
cd
wget https://github.com/adoptium/temurin11-binaries/releases/download/jdk-11.0.24%2B8/OpenJDK11U-jdk_aarch64_mac_hotspot_11.0.24_8.tar.gz
tar xzf OpenJDK11U-jdk_aarch64_mac_hotspot_11.0.24_8.tar.gz
echo "export JAVA_HOME=$HOME/jdk-11.0.24+8" >> ~/.zshrc
echo "export PATH=$JAVA_HOME/bin:$PATH" >> ~/.zshrc
source ~/.zshrc- If you have an Intel-based Mac machine.
BASH
cd
wget https://github.com/adoptium/temurin11-binaries/releases/download/jdk-11.0.24%2B8/OpenJDK11U-jdk_x64_mac_hotspot_11.0.24_8.tar.gz
tar xzf OpenJDK11U-jdk_x64_mac_hotspot_11.0.24_8.tar.gz
echo "export JAVA_HOME=$HOME/jdk-11.0.24+8" >> ~/.zshrc
echo "export PATH=$JAVA_HOME/bin:$PATH" >> ~/.zshrc
source ~/.zshrcTest Jupyter and pyspark
- Download the following Shakespeare collection.
- Launch Jupyter notebook
- Enter the following Python code into a cell of the new notebook.
- Replace
PATH_TO_DOWNLOADED_SHAKESPEARE_TEXT_FILEwith the actual path (including the file name) to where you downloaded the file earlier.
- Adjust the values for
number_coresandmemory_gbbased on your computer’s configuration.- For example, on a computer running Intel Celeron N3550 with 2
logical cores and 4GB of memory,
number_coresis set to2andmemory_gbis set to2.
- For example, on a computer running Intel Celeron N3550 with 2
logical cores and 4GB of memory,
- Run the cell.
- Once (if) the run completes successfully, you can revisit your
Jupyter Server and observe that
output-word-count-1directory is now created.-
_SUCCESSis an empty file that serves the purpose of notifying of a successful execution. -
part-00000andpart-00001contains the resulting outputs.
-
For Linux users, the setup process is similar to that of MacOS users.
Depending on the nature of your shell, you might replace
.zshrc with .bashrc.
Spark Setup: Online platform on Kaggle
Kaggle is an online platform for learning and practicing data science and engineering. You can think of it as LeetCode for data science.
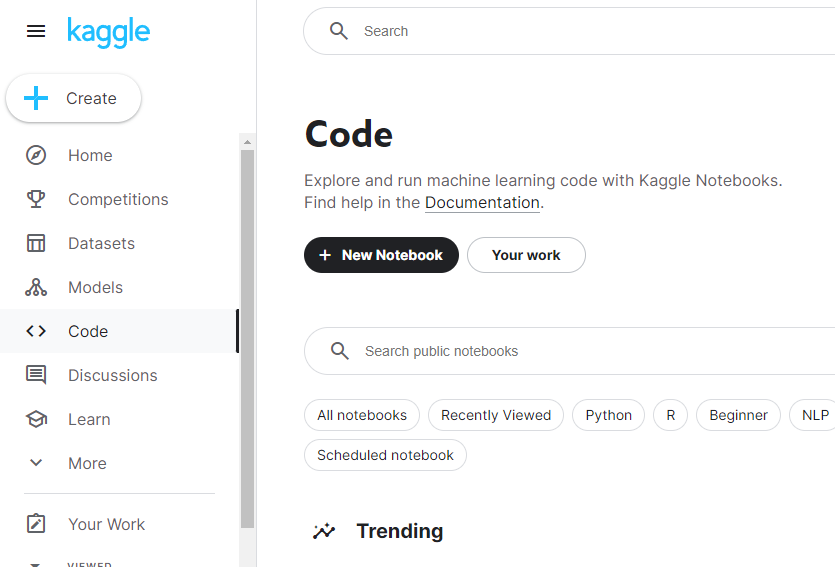
- First, you need to create an account on Kaggle and log in.
- Select
Code, then+ New Notebook.
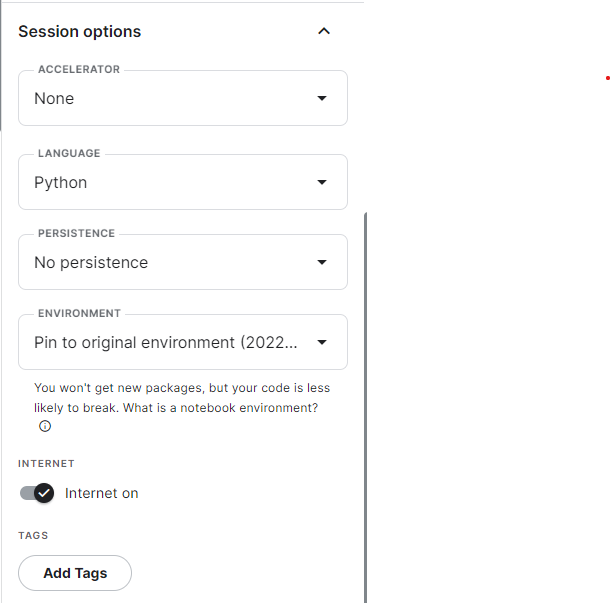
- After the notebook is launched, on the right-side of the browser, go
to
Session optionsand make sure thatInternetison
- Run the following codes in the first cell. This is to setup Java inside the notebook environment
BASH
!wget https://github.com/adoptium/temurin11-binaries/releases/download/jdk-11.0.24%2B8/OpenJDK11U-jdk_x64_linux_hotspot_11.0.24_8.tar.gz
!tar xzf OpenJDK11U-jdk_x64_linux_hotspot_11.0.24_8.tar.gz
!rm OpenJDK11U-jdk_x64_linux_hotspot_11.0.24_8.tar.gz- Run the following codes in the second cell. This is to setup Spark
BASH
!wget https://archive.apache.org/dist/spark/spark-3.5.1/spark-3.5.1-bin-hadoop3.tgz
!tar xzf spark-3.5.1-bin-hadoop3.tgz
!rm spark-3.5.1-bin-hadoop3.tgz- Run the following codes in the third cell. This is to setup
findspark.
- Run the following body of Python codes in the fourth cell of the notebook. This will initiate the Spark stand-alone cluster inside the Kaggle VM.
PYTHON
import os
import sys

os.environ["JAVA_HOME"] = "/kaggle/working/jdk-11.0.24+8/"
os.environ["SPARK_HOME"] = "/kaggle/working/spark-3.5.1-bin-hadoop3/"
spark_path = os.environ['SPARK_HOME']
sys.path.append(spark_path + "/bin")
sys.path.append(spark_path + "/python")
sys.path.append(spark_path + "/python/pyspark/")
sys.path.append(spark_path + "/python/lib")
sys.path.append(spark_path + "/python/lib/pyspark.zip")
sys.path.append(spark_path + "/python/lib/py4j-0.10.9.7-src.zip")

import findspark
findspark.init()

import pyspark
number_cores = 8
memory_gb = 4

conf = (pyspark.SparkConf().setMaster('local[{}]'.format(number_cores)).set('spark.driver.memory', '{}g'.format(memory_gb)))

sc = pyspark.SparkContext(conf=conf)- We will test Spark in the next cell with the following codes
PYTHON
textFile = sc.textFile("100-0.txt")
wordcount = textFile.flatMap(lambda line: line.split(" ")) \
            .map(lambda word: (word, 1)) \
            .reduceByKey(lambda a, b: a + b)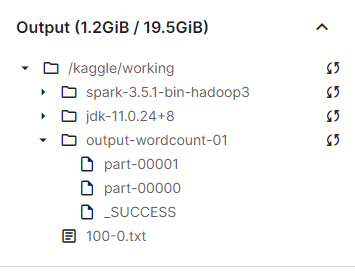
wordcount.saveAsTextFile("output-wordcount-01")- Note that
/kaggle/workingis the current working directory inside Kaggle VM. If you expand theOutputtab on the right side, you will see the content of this directory. Openoutput-wordcount-01, you will see the_SUCCESSfile.
Callout
- Kaggle’s environments are temporary. You will need to rerun all the first three setup cells anytime you start your work on Kaggle.